树莓派 – 温度计和家庭网络控制

在本文件中,我们将看到在 Raspberry Pi 上安装温度传感器的步骤, 创建一个用于存储温度的数据库,以及一个定期获取温度的脚本. 我们将创建一个网站,它可以让我们获取当前温度,以及显示温度历史的图表. 更进一步, 我们将在网站上添加按钮,这些按钮将执行诸如开启/关闭恒温器的任务!
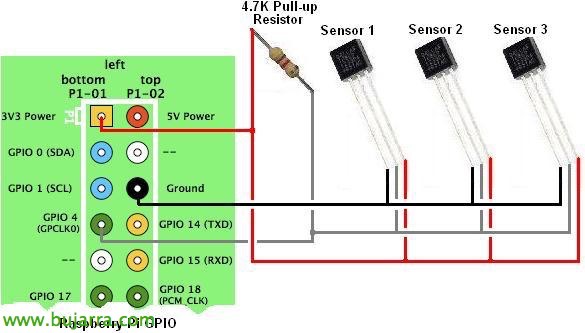
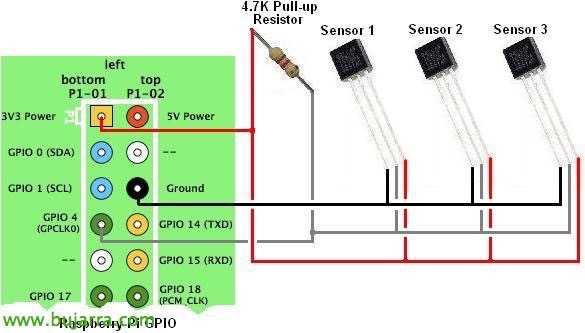
首先我们需要一个数字温度传感器,比如 DS18B20,在 eBay 上只需 1 欧元,甚至有防水款用于水族箱, 另外我们还需要一个 4.7k 电阻. 我们甚至可以弄一个湿度传感器,这样就可以绘制两种图表 =).
我们要做的是启用模块来使用温度计, 安装 MySQL 来在数据库中存储温度图表的历史记录, 将创建一个 Python 脚本来每隔一段时间向数据库填充数据 2 最后,我们将安装 Apache 并创建一个网站,在那里我们可以实时查看温度,还可以看到带有历史记录的图表. Y si enlazamos con el documento anterior donde veíamos como usar un relé con la Raspberry, podremos crear en la misma web unos botones que nos permitan encender o apagar una luz. Empecemos habilitando los módulos:
[源代码]sudo modprobe w1-gpio
sudo modprobe w1-therm[/源代码]
Para cuando botee la Raspberry que lo guarde:
[源代码]sudo vim /etc/modules
w1-gpio
w1-therm[/源代码]
Y probamos con el siguiente comando donde veremos la temperatura de cada sensor:
[源代码]cat /sys/bus/w1/devices/ID_SENSOR/w1_slave[/源代码]
Instalar MySQL, requisitos y crear BD,
Tras dejar los termómetros ya funcionando, lo siguiente será instalar MySQL y todos los requisitos para crear una BD y almacenar las temperaturas de en mi caso 2 sensores de temperatura (ambiente y acuario). La instalación de MySQL Server pedirá establecer la contraseña de ‘root’:
[源代码]sudo apt-get install python-pip
apt-get install python-mysqldb
sudo pip install requests
sudo pip install pymysql
sudo apt-get install mysql-server mysql-client php5-mysql[/源代码]
Entramos en MySQL y creamos una BD llamada ‘Temperaturas’, una tabla llamada ‘temps’ 跟 3 campos ‘temp1’, ‘temp2’ y ‘created_at’:
[源代码]mysql -u root -p
MySQL 的> CREATE DATABASE Temperaturas;
MySQL 的> USE Temperaturas;
CREATE TABLE temps (
temp1 FLOAT, temp2 FLOAT, created_at TIMESTAMP DEFAULT CURRENT_TIMESTAMP
);[/源代码]
Demonio para sacar temperatura,
Continuamos creando un script en Python que lea las temperaturas y las almacene en la BD anterior, para ello podremos utlizar el siguiente script donde modificaremos con nuestros IDs correspondientes de los sensores en ‘sensorids’, le podemos llamar ‘temperatura_demonio.py’:
[源代码]import requests
import hashlib
导入时间
sensorids = ["28-00000523e071", "28-0000052391f2"]
avgtemperatures = []
for sensor in range(莱恩(sensorids)):
temperatures = []
for polltime in range(0,3):
text = ”;
while text.split("n")[0].找到("YES") == -1:
tfile = open("/sys/bus/w1/devices/"+ sensorids[传感器] +"/w1_slave")
text = tfile.read()
tfile.close()
时间.sleep(1)
secondline = text.split("n")[1]
temperaturedata = secondline.split(" ")[9]
temperature = float(temperaturedata[2:])
temperatures.append(温度 / 1000)
avgtemperatures.append(sum(temperatures) / 浮(莱恩(temperatures)))
acuario = avgtemperatures[0]
ambiente = avgtemperatures[1]
导入 MySQLdb
db = MySQLdb.connect("localhost","root","CONTRASENA_DE_ROOT","Temperaturas")
游标 = db.cursor()
cursor.execute 命令("""INSERT INTO temps (temp1,temp2) 值 (%s,%s) """,(水瓶座,ambiente))
db.commit 文件()[/源代码]
Ejecutamos el script un par de veces para crear un par de registros en la BD con
[源代码]python temperatura_demonio.py[/源代码]
Y comprobamos sencillamente que la BD que tiene datos con:
[源代码]mysql -u root -p
use Temperaturas;
选择 * from temps;[/源代码]
如果一切都正确, 我们设置Python脚本每两分钟执行一次, 在cron中添加以下行使用 ‘crontab -e’’
[源代码]*/2 * * * * /usr/bin/python /home/pi/temperatura_demonio.py[/源代码]
安装网页服务器,
一旦我们有了一个守护进程正在将温度记录到数据库中, 接下来就是用Apache建立一个网站,并制作一个带有JavaScript图表的漂亮门户. 开始:
[源代码]sudo apt-get install apache2 php5 libapache2-mod-php5
WGET HTTP://iada.nl/en/system/files/tempmon_2_0.zip[/源代码]
将ZIP解压到 ‘/var/www/temp/’’ 并编辑 ‘index.php’’ 所有连接数据正确, 并进行一些基本修改, 在这个例子中有一些带来的德语单词.
[源代码]$mysqli = new mysqli("HOST", "USER", "PASSWORD", "DATABASE");
过去24小时的宝石 –> 媒体
室内传感器 –> 水族馆
室外传感器 –> 环境[/源代码]
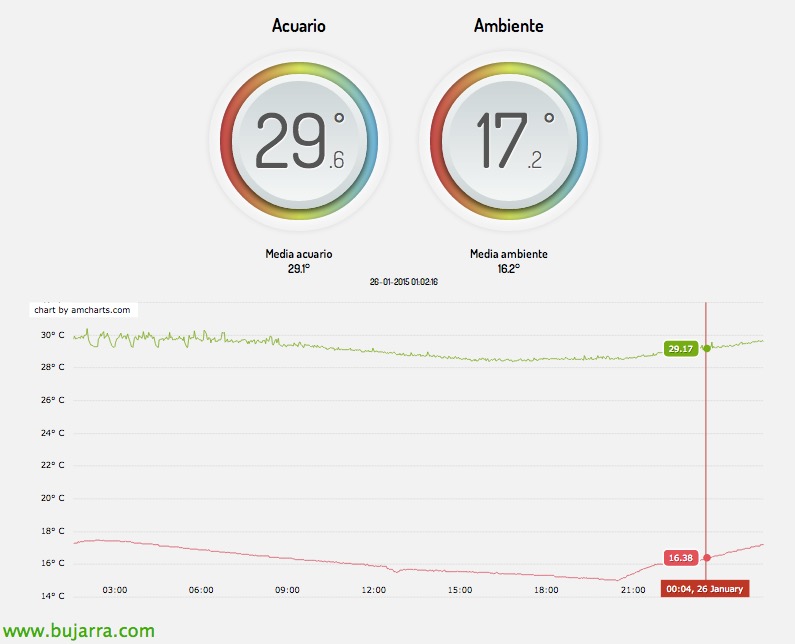
这是重新启动Apache服务后网页的样子! 皮条客, 不?, 我们将访问网站 http://IP_RASPBERRY/temp
向网站添加额外按钮,
如果我们想向网站添加按钮以执行任何操作, 在此示例中,我们将放置一个按钮以打开连接到继电器另一端的恒温器 (termostato_enciende.sh) & 另一个用于关闭它 (termostato_apaga.sh); 此外,再添加两个按钮用于开启 & 关闭走廊的灯 (pasillo_enciende.sh & pasillo_apaga.sh). 在‘index.php’文件的末尾, 在body结束前添加:
[源代码]
<H1>暖气</H1>
<form id="relay" action="remote_relay.php" method="GET">
<input type="button" id="TermostatosubmitOn" style="border:1px solid #000; 字体大小:40Px;" value="On" onClick="TermostatorelayOn()"/>
<input type="button" id="TermostatosubmitOff" style="border:1px solid #000; 字体大小:40Px;" value="Off" onClick="TermostatorelayOff()"/>
<H1>Pasillo</H1>
<input type="button" id="PasillosubmitOn" style="border:1px solid #000; 字体大小:40Px;" value="On" onClick="PasillorelayOn()"/>
<input type="button" id="PasillosubmitOff" style="border:1px solid #000; 字体大小:40Px;" value="Off" onClick="PasillorelayOff()"/>
</形式>
<?php $state = $_GET["total"]; 如果 ($state == "Termostatoon"){ exec("/home/pi/termostato_enciende.sh"); } 如果 ($state == "Termostatooff"){ exec("/home/pi/termostato_apaga.sh"); } 如果 ($state == "Pasilloon"){ exec("/home/pi/pasillo_enciende.sh"); } 如果 ($state == "Pasillooff"){ exec("/home/pi/pasillo_apaga.sh"); } ?>[/源代码]
我们编辑加载‘script.js’的Java脚本’ 添加以下修改:
[源代码]window.onload = function(){
buttonOn = document.getElementById(‘TermostatosubmitOn’);
buttonOn.onClick = TermostatorelayOn;
buttonOff = document.getElementById(‘TermostatosubmitOff’);
buttonOff.onClick = TermostatorelayOff;
buttonOff = document.getElementById(‘PasillosubmitOff’);
buttonOff.onClick = PasillorelayOff;
buttonOff = document.getElementById(‘PasillosubmitOff’);
buttonOff.onClick = PasillorelayOff;
}
function TermostatorelayOn(){
hidden = document.getElementById("total");
hidden.value = "Termostatoon";
form = document.getElementById("relay");
form.method = "GET";
form.action = "index.php";
form.submit();
}
function TermostatorelayOff(){
hidden = document.getElementById("total");
hidden.value = "Termostatooff";
form = document.getElementById("relay");
form.method = "GET";
form.action = "index.php";
form.submit();
}
function PasillorelayOn(){
hidden = document.getElementById("total");
hidden.value = "Pasilloon";
form = document.getElementById("relay");
form.method = "GET";
form.action = "index.php";
form.submit();
}
function PasillorelayOff(){
hidden = document.getElementById("total");
hidden.value = "Pasillooff";
form = document.getElementById("relay");
form.method = "GET";
form.action = "index.php";
form.submit();
}[/源代码]
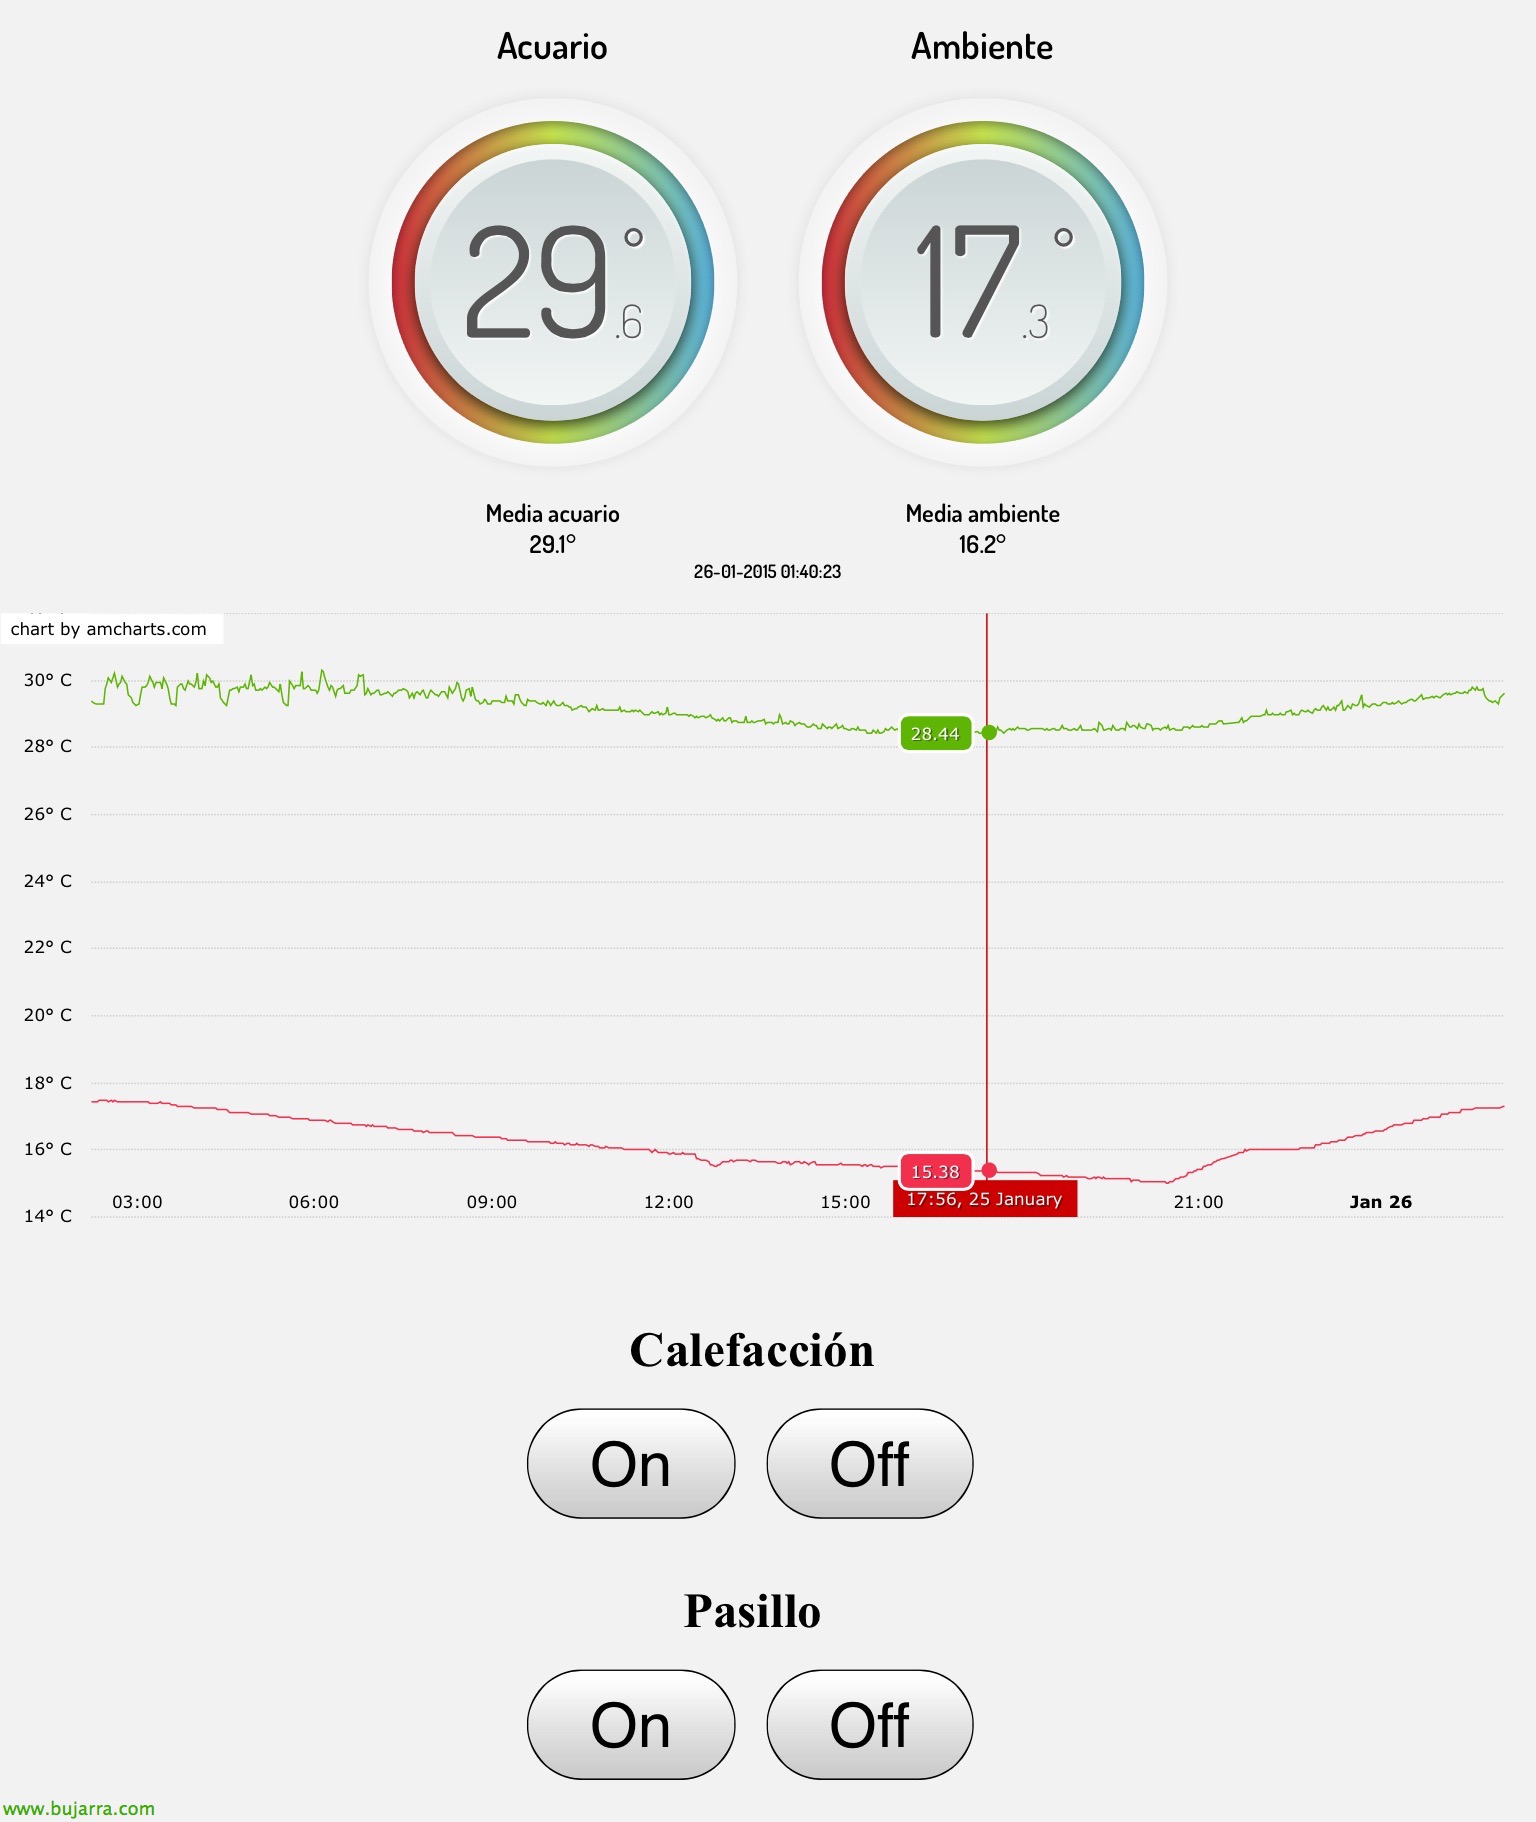
这将是在 iPad 上的网站结果,其中一方面我们将看到这两个传感器的当前温度, 记住可以添加更多, 或者使用湿度传感器, 等… 在底部我们可以放置像这样简单的按钮来关闭或打开继电器并打开或关闭电路! 或者任何我们能想到的, 去… 用于从外部连接 (互联网) 访问我们家庭的这个网站, 我们可以使用像 DynDNS 或 NO-IP 这样的免费服务来随时了解我们的公网 IP,同时配置 VPN 以实现安全访问. 这样我们就可以在到家之前从任何地方打开恒温器, 或满足我们任何其他的需求, 例如带摄像头的报警器…