

Migración del perfil Citrix UPM a FSLogix

Si todavía eres de los que sigues trabajando con los perfiles móviles de Citrix UPM (User Profile Management) y quieres probar la maravilla de FSLogix, pero claro, tienes usuarios con perfil UPM y quieres migrar eso a FSLogix para no partir de cero, hau da zure post-a!
Beraz, esan dudana, si queréis ver de qué va esto de FSLogix ya escribimos en su día un documento donde explicábamos su funcionamiento, este post únicamente veremos cómo migrar los datos de un perfil UPM existente a contenedores VHD o VHDX de FSLogix.
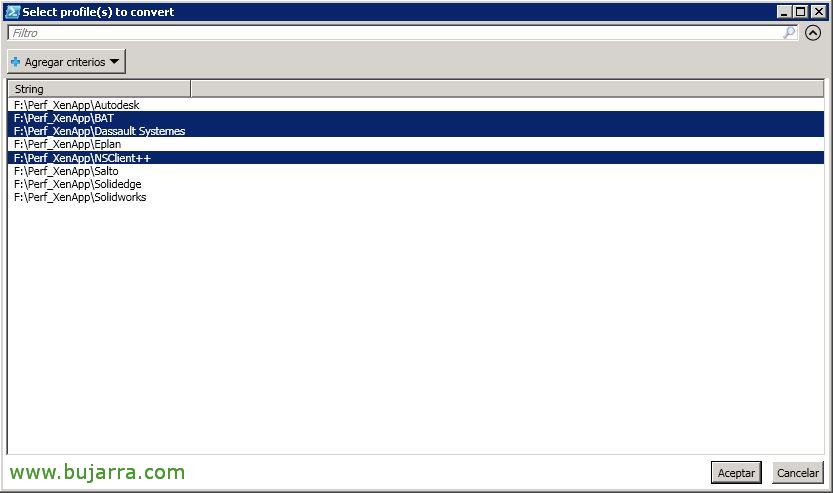
Utilizaremos el script maravilloso de David Ott, lo que hará será convertirnos los perfiles que encuentre en ‘F:\Perf_XenApp’ y los dejará en formato FSLogix en ‘F:\Perf_FSLogix’ (obviamente en el script modifica con tus paths correctos, así como modifica el tamaño máximo del disco virtual que creará, yo lo tengo en 10GB con crecimiento dinámico). Al ejecutar el script nos detectará los perfiles que ha descubierto, y seleccionaremos los que queramos migrar. Podremos probar con uno, y tras validarlo ir por grupos, o todos a la vez como los valientes. Lo bueno es que no se toca el perfil original, hau da, siempre tendrás una vuelta atrás por si el VHD o VHDX nuevo del usuario te da problemas.
Os dejo aquí el script que estamos utilizando: Migra_Perfiles_UPM_a_FSLogix.ps1
<#
Written by David Ott
This script will convert Citrix UPM profiles to FSLogix .vhd profiles (you should be able to edit it to do vhdx as well)
Pay attention to all of the commented areas.  It uses diskpart to create/mount/dismount the .vhd file, and
robocopy to copy the UPM profile to the .vhd.
Once executed (assuming you have edited $newprofilepath and $oldprofiles to match your environment) it will give you a list of
profiles to convert.  You can then select which profile(s) FSLogix profiletara bihurtu nahi baduzu.
Script hau ere editatu dezakezu Hyper-V komandoak erabiliz vhd/vhdx fitxategiak sortzeko/muntatzeko/desmuntatzeko diskpart erabiltzean izan beharrean, Hyper-V modulua instalatuta baduzu.
Produkzioan erabili aurretik probatu!!
#>
# fslogix profilaren bidea
$newprofilepath = "F:\Perf_FSLogix" ##### FSLogix erro profilaren bidea
<#
UPM profilaren bidea - Gure produkzio UPM erro karpetak username.domain dira, eta benetako Windows 7 profile lives under
v2x64\UPM_Profile:
\\server\share\%USERNAME%.%USERDOMAIN%\!CTX_PROFILEVER!!CTX_OSBITNESS!
Honakoa ingurunearen arabera editatu beharko da - Garrantzitsuena da UPM_Profile direktorio guztien bidea osoa izatea
#>
$oldprofiles = gci F:\Perf_XenApp | select -Expand fullname | sort | out-gridview -OutputMode Multiple -title "Profilak hautatu(s) bihurtzeko"| %{
Join-Path $_ "UPM_Profile"
}

# | ?{$_.name -like "*.$env:userdomain"}

# foreach old profile
foreach ($old in $oldprofiles) {
<#
Since I know that the folder has the username in it i get that and save it to the sam variable, and use that to get the user's sid
then save that to $sid.
You will most likely have to edit the $sam line to pull the username out of the old profile path.  Play with the string and
split-path until you nail down just the username.  For instance let's say your current profile path is
\\server\profileshare\username\v2x64\UPM_Profile  you could do something like this
$sam = (($old -split "profileshare")[1] -split "v2x64")[0] -replace "\\",""
That splits the string at profileshare, and selects the 2nd part (0 would be the first) which is \username\v2x64\UPM_Profile
it then splits that again using v2x64 and selects the first part (remember 0 is the first) which is \username\
Finally it replaces the "\" characters (you need to match \\ as \ is a special character the first slash just says to use it as a
string) with nothing... leaving you with the username.
#>
$sam = (($old -split "Perf_XenApp")[1] -split "UPM_Profile")[0] -replace "\\",""
$sid = (New-Object System.Security.Principal.NTAccount($sam)).translate([System.Security.Principal.SecurityIdentifier]).Balioa
<#
A .reg file located in %localappdata%\FSLogix - Last thing the script-ek egiten duen azken gauza da profilelist gakoa
# .reg fitxategia sortzea
#>
$regtext = "Windows Registry Editor Version 5.00

[HKEY_LOCAL_MACHINE\SOFTWARE\Microsoft\Windows NT\CurrentVersion\ProfileList\$sid]
'"ProfileImagePath'"='"C:\\Users\\$sam`"
'"FSL_OriginalProfileImagePath'"='"C:\\Users\\$sam`"
'"Flags'"=dword:00000000
'"State'"=dword:00000000
'"ProfileLoadTimeLow'"=dword:00000000
'"ProfileLoadTimeHigh'"=dword:00000000
'"RefCount'"=dword:00000000
'"RunLogonScriptSync'"=dword:00000000
"
<# set the nfolder path to \\newprofilepath\username_sid - this is not default
If you're going with the default, then replace then reverse the $sam/$sid variables as below
$nfolder = join-path $newprofilepath ($sid+"_"+$sam)
#>
$nfolder = join-path $newprofilepath ($sid+"_"+$sam) ##### See note above
# if $nfolder doesn't exist - create it
if (!(test-path $nfolder)) {New-Item -Path $nfolder -ItemType directory | Out-Null}
& icacls $nfolder /setowner "$env:userdomain\$sam" /T /C
& icacls $nfolder /grant $env:userdomain\$sam`:'(OI')'(CI')F /T
# sets vhd to \\nfolderpath\profile_username.vhd
$vhd = Join-Path $nfolder ("Profile_"+$sam+".vhd")
# diskpart commands
$script1 = "create vdisk file='"$vhd'" maximum 10240 type=expandable"
$script2 = "sel vdisk file='"$vhd'"'r'nattach vdisk"
$script3 = "sel vdisk file='"$vhd'"'r'ncreate part prim'r'nselect part 1'r'nformat fs=ntfs quick"
$script4 = "sel vdisk file='"$vhd'"'r'nsel part 1'r'nassign letter=T"
$script5 = "sel vdisk fitxategia'"$vhd'"`r`desanexa vdisk"
$script6 = "sel vdisk file='"$vhd'"`r`anexa vdisk irakurriz soilik`"`r`trinkotu vdisk"
<#
vhd ez badago sortu, anexa, wait 5 seconds (Windows-ek eguneratu behar du), sortu/formateatu partizioa,
T letra asignatzen dio (behar den bezala aldatu), eta diskoaren etiketa Profile-username ezartzen du
#>
if (!(test-path $vhd)) {
$script1 | diskpart
$script2 | diskpart
Start-Sleep -s 5
$script3 | diskpart
$script4 | diskpart
& etiketa T: Profile-$sam
New-Item -Path T:\Profile -ItemType direktorioa | Out-Null
# profilaren baimenak ezarri
start-process icacls "T:\Profile /setowner SYSTEM"
Start-Process icacls -ArgumentList "T:\Profile /reset /T"
Start-Process icacls -ArgumentList "T:\Profile /inheritance:d"
$cmd1 = "T:\Profile /grant $env:userdomain\$sam`:'(OI')'(CI')F"
Start-Process icacls -ArgumentList "T:\Profile /grant SYSTEM`:'(OI')'(CI')F"
Start-Process icacls -ArgumentList "T:\Profile /grant Administrators`:'(OI')'(CI')F"
Start-Process icacls -ArgumentList $cmd1
} else {
# vhd badagoenean orduan anexa, wait 5 seconds, letra T assignatu
$script2 | diskpart
Start-Sleep -s 5
$script4 | diskpart
}

# UPM profil kopiak Profile direktorioan vhd-n /E /Purge - this is so it will update with the latest info
"Copying $old to $vhd"
& robocopy $old T:\Profile /E /Purge /r:0 | Out-Null

# cambiar nombre perfil UPM ya migrado
#Rename-Item -Path F:\Perf_XenApp\$sam -NewName "Cambio.$sam" -Force

# Mover perfil UPM ya migrado
Move-Item F:\Perf_XenApp\$sam F:\Perf_XenApp_Cambiado_UPM_Profile\$sam  -Force

# creates the %localappdata%\FSLogix path if it doesnt exist
if (!(Test-Path "T:\Profile\AppData\Local\FSLogix")) {
New-Item -Path "T:\Profile\AppData\Local\FSLogix" -ItemType direktorioa | Out-Null
}
# profiledata.reg fitxategia sortzen du existitzen ez bada
if (!(Test-Path "T:\Profile\AppData\Local\FSLogix\ProfileData.reg")) {$regtext | Out-File "T:\Profile\AppData\Local\FSLogix\ProfileData.reg" -Encoding ascii}
$script5 | diskpart
}
Espero que os sea de utilidad por si alguna vez lo necesitáis, agradecer al autor del script su trabajazo. Si nos fijamos bien, erabiltzaile bakoitzaren izena erabiliko du SID lortzeko eta horrela edukiontziaren direktorioa modu egokian izendatzeko, erabiltzaileari jabe egingo dio edukiontzia baimen osoekin, adierazitako tamainarekin VHD sortuko du, montatuko du, NTFS-an partizionatu, unean-unean T unitate gisa:, eta UPM profilaren eduki osoa VHD honetara kopiatu.
Eskerrik asko denoi zuen irakurketa denboragatik & sare sozialetan partekatu.


