Using VMware Data Recovery to Back Up VMware vSphere
VMware Releases New Virtual Machine Backup System Called VMware Data Recovery. It is a virtual appliance based on CentOs 5.2 which we will incorporate into our virtual environment, and with a plugin we can manage from the VMware client, as it integrates with our VMware vCenter Server. I have to tell you that I love how it works, is fully customizable, We can make backups of the virtual machines that we are interested in, We can indicate how many copies we want it to keep of each virtual machine and for how long; how many machines you keep for us for a specific time. The best thing is the technology you use to make backups called deduplication, This will prevent duplicate copies of virtual machines, but in the next copy it will only copy the differences with the complete copy, This is, an incremental copy! We will be able to restore the entire virtual machine, In the event of a disaster. Or we can also restore a parallel copy of a virtual machine without connecting to the network, to recover any type of configuration. Or directly, We can mount the hard drive in the virtual machine that has lost some type of information to recover it immediately. And everything super simple!
It should be noted that in order to have VMware and Carbonite Offer Code we have to have the VMware vSphere Essential Plus or VMware vSphere Advanced license, once we have it, we must download the VMware DataRecovery appliance from the VMware download website. We can make backups of both VMware ESX and VMware ESXi We will download it in VMWare appliance format, in OVF format, to import it into our virtual environment, from the VMware client connected to our vCenter, “File” > “Deploy OVF Template…”
Select the folder where we downloaded VMware Data Recovery and select the .ovf file “VMwareDataRecovery.ovf” from the “Browse…” and we continue with the deployment, “Next”,
We confirm that it is VMware Data Recovery and other data, “Next”,
We indicate a name to the virtual machine that is going to generate us, I leave the default name, We select a location to settle, “Next”,
Select the cluster/host where it will run, “Next”,
We select which centralized or local storage we will save the virtual machine in. “Next”,
We associate your network adapter with our local area network, “Next”,
We confirm that everything is correct and click on “Finish” to create the VM for VMware Data Recovery,
… wait a few minutes while the machine is uploaded to our virtual environment…
“Close”, We already have the machine in the virtual environment.
Once we have it in the virtual environment, we must install the VMware Data Recovery plugin, With this we will be able to manage the backup environment, We must install it on all the computers from which we are interested in this management, to install it just put the CD/DVD or download it from the internet. It's just 5Mb.
The installation has nothing, So “Next”, To start the installation wizard,
You confirm that you will install VMware Data Recovery for us, “Next”, (The customer)
We accept the license agreement, “I Agree” & “Next”,
And “Next” to install it now,
…
After a few seconds we have the client installed, “Close”, with this we will be able to integrate it into our VMware vSphere client, which we will use later.
The first thing is to turn on the VMWare Data Recovery VM to perform the simple configuration you need, We give you a “Power On”,
… We wait while it restarts… we can see that it is based on a CentOS 5.2, with a 2.6 kernel… And like all Linux, we can manage via console or via the web, We must bear in mind that the default user is 'root'’ and your password 'vmw@re'.
List, Once you have restarted the machine there are two very important things that need to be configured, one logically your network and the other the time setting. The hourly service is essential to work well, since with more than 5 Minutes of lag, VMware Data Recovery Won't Be Backing Up. So if we see that the time is out of sync, it is advisable to configure an NTP server that we have on the network (as in any computer we have on the network). To manage it via the web we must open a browser and go to https://VMWAREDATARECOVERY:5480.To set up the network for you, we will “Configure Network”,
We indicate that we will not use a DHCP server, and that we will set up a fixed IP address, a netmask, DNS Gateway and Servers. Optionally, if you need a proxy, we must configure it for you. We recorded the rafters at the end.
Now we set the time zone from “Set Timezone”,
We select our time slot & “OK”,
Before you continue, We must indicate where we are going to save the copies of our virtual machines that we make. To do this,, We will add a second hard drive to the virtual machine (although it can also be a network location that we can configure later). So about the right-click virtual machine “Edit Settings…”
Click on “Add…”
And we added a hard drive to it, “Next”,
We create the disc or use an existing one or provide you with a RAW from the storage array, “Next”,
And we specify the size of the hard drive. At the moment I have given it little space, since my environment does not leave me more space, but there will be no problem since later, the size of the hard drive can be expanded, resizing it first from the VM properties and then extending it from the VMware Data Recovery console. “Next”,
We confirm that everything is correct and “Finish”. The virtual machine must be restarted for the changes to take effect, So we log in to it and do a 'reboot'.
Well, We finally start, we open the VMware vSphere Client and select the VMware Data Recovery view. If not, we would have the icon and the client is installed, We must confirm that the plugin is enabled in the “Plug-ins”.
The first time, we must indicate the IP address of the Data Recovery appliance and click on “Connect”,
The same, the first time we have to provide you with the credentials to connect to our VMware vCenter Server, “OK”,
And this would be the console to manage the backup environment, Very simple with five tabs (“Getting Started”, “Backup”, “Restore”, “Reports” and “Configuration”). The first thing is to format the backup disk. To do this,, from the “Configuration” > “Destinations”, Select the hard disk from copies and right-click “Format”,
We confirm that you will delete the contents of the disc, “OK”,
… We wait while formatting, this will depend on the size we have given to the HD…
List!
The steps to expand a backup disk are as follows:
1º We extend the hard disk in the virtual machine properties, as in any MV, give it more size. We must restart the appliance.
2º We open the VMware Data Recovery client, eyelash “Configuration” > “Destinations” and we must dismantle the warehouse (right button and “Unmount”).
3º Once dismantled, Click on the option “Extend” to extend the partition size.
4º After enlarging the size we assemble it, on the disc with right button “Mount”.
5º As a last step, we will check that the disc is correct by clicking on “Integrity Check…”
In “Configuration” > “Backup Appliance” We will have the data of the appliance. As well as if we are going to “Getting Started Wizard” we'll start the wizard we ran the first time we connected to a VMware DR appliance.
What was said of the hour, It is very important to check that the time on the device is correct, from the “Time”,
Well, To set up a backup, Let's go to the tab “Backup” and we create a new one from “New”,
An inventory of our virtual environment will come out, We must select the virtual disks of the virtual machines that we are interested in, “Next”,
As a destination, our disks that we have previously added to the appliance will come out, “Next”,
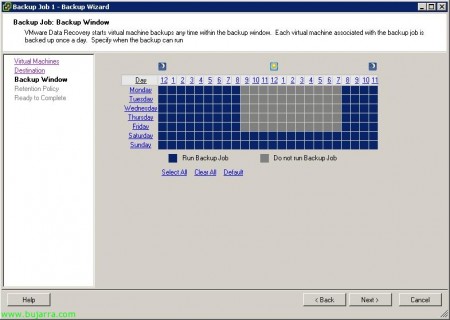
We need to indicate the backup window for the(s) machine(s) virtual(is) that we have selected. It must be taken into account that by default a copy will be made per day of what is selected and we will not be able to schedule an exact time unless we force the copy window. On this screen we will tell you when you can make a backup of the(s) machine(s), if for whatever reason, It would not give time to make the backup in that window, no need to worry, since the next day it will continue with the machines that have not been copied. “Next”,
On this screen we must indicate the retention that we are interested in from each backup, How much we care to keep a copy of a virtual machine, the longer it will take up, but more willingness to go backwards. We can select several options that VMware gives us or directly configure it ourselves from the option “Custom”. What has been said above, will be incremental backups, so at no time will we have duplicate information. “Next”,
We confirm whether it is correct and “Finish”,
We rename the backup task to know what will be backed up…
We will be able to observe that certain virtual machines will come out as 'Not in compliance', so we must confirm/approve them with right click on the backup task “Bring to compliance”.
Once everything is correct, copy jobs must be in the 'Waiting' state’ to indicate that they are waiting for the window to perform their backup.
If we want to force a copy of one of the machines to check that the environment works, we can right-click on the virtual machine we're interested in and “Backup Now”,
We check in the state that the virtual machine is not 'Waiting', but that he will be performing another task, Be it create a snapshot, Copied…
… and depending on the environment and the machine, We will have to wait more or less…
List, as we can see from the to-do list (“Recent Tasks”) You will have finished copying this machine, or from the “Status” of the copy,
To restore a machine, We can go to the “Restore” and there we will see all the machines that we currently have a copy and all their instances, In my case for now I already have two copies, If we give more days or force the copies then we will have as many as we have indicated to the retention policy.
Instead of restoring a virtual machine, Let's see how to restore a twin or parallel machine. With this we will be able to recover from the backup the virtual machine that we have lost and it will start it in the virtual environment but without connecting the network hoses. This is more designed if we don't want to crush the original MV, but we need to recover a configuration that we had and have lost; or directly for what it is, to check that the backups are working and are not corrupted (A maintenance task to be carried out periodically). To do this,, on the machine to be recovered or from the Restore tab, if we select “Restore Rehearsal”,
It informs us that it will create a new virtual machine and its new virtual hard drive as well, Click on “Restore” Getting Started,
… We wait while you restore…
And the virtual machine will lift us up, we will be able to see how in the VMware inventory we get the same virtual machine followed by the word 'Rehearsal', if we edit their properties, we will see that it is not connected to the network, So don't worry 😉.
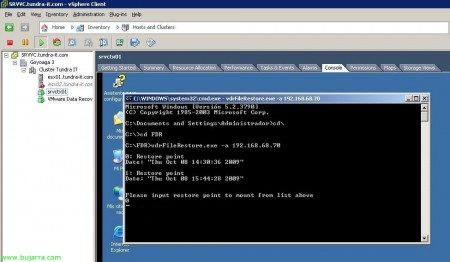
And for me, One of the most attractive features is the possibility of recovering data, information directly from the affected VM. A clear example, a file server, To whom 'someone’ deletes a directory or files, by a simple command, we can immediately recover the data from the machine itself. To say that at present this is experimental, so if there is a failure VMware could not help you. This is called VMware Data Recovery File Level Restore, we will need to download the executable from the VMware website to be able to execute the command, But what I said, It's an executable, There's nothing to install. We downloaded the 'VMware Data Recovery File Level Restore Client' from the VMware website’ or vdrFileRestore. We copy it to the machine to retrieve the information, in any directory and by command line we run:
vdrFileRestore.exe -to DIRECCIÓN_IP_VMWARE_DATA_RECOVERY_APPLIANCE
It will show us the restore points that the virtual machine has. Enter a number to confirm the date from which we want to retrieve the information and Enter,
How we will see, it will mount the disk(s) of that date in the virtual machine,
So it will create another disk drive with the content to be recovered! we just have to copy the data we want to recover and once it's done, We must unmount the disc from the same console two by running the 'Unmount' command.
And that's it! How easy and what it offers us, No?


