Integrating our multiroom sound system with Volumio and Snapcast into Home Assistant

If you have the pleasure and pleasure of having a Volumio to manage the audio of your home (or company), You know how to listen to your MP3s, online radios or Spotify (inter alia) and you also have various speakers with Snapcast distributed, We can manage it like not, from our beloved Home Assistant, Take a look at it, it's amazing!
If you don't know what I'm talking about, and you don't know what Volumio is, Check out this old post which is sure to inspire you and encourage you to mount it on a Raspberry Pi (or in a VM). And if you want to deploy several Raspberry Pi with speakers to have the best background music you can think of, Check out This other document. Well, to the point, Started!
All you have to do is add it to your Home Assistant configuration file, in 'configuration.yaml’ The following information, which is nothing more than the IP address of Volumio and its port, which by default is 3000tcp:
media_player:
  - Platform: Volumio host: DIRECCION_IP_VOLUMIO port: 3000
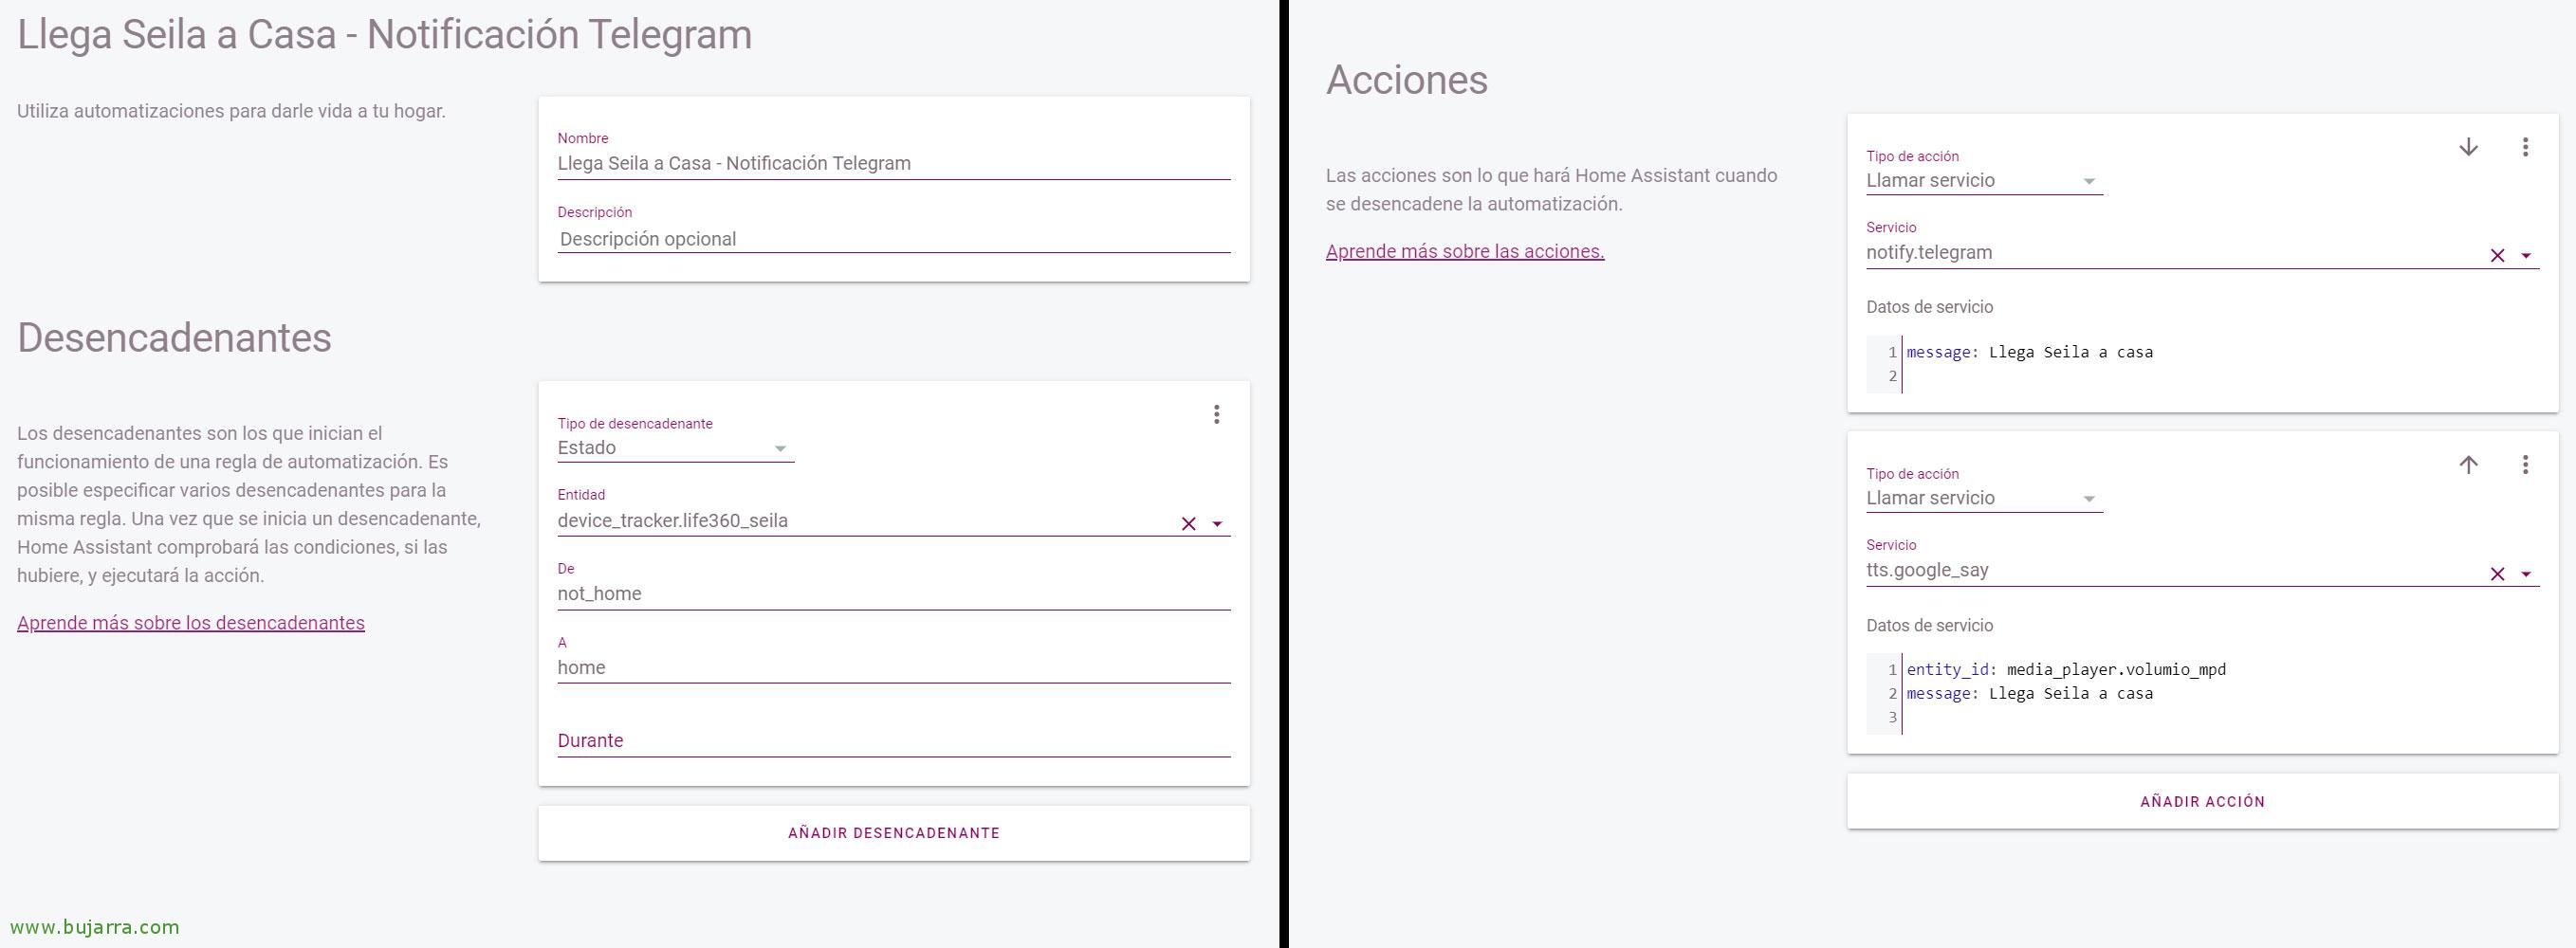
With that we will have enough to control our Volumio, But while we're at it,… why not also control the speakers that we have connected with Snapcast? If we have Snapcast enabled in Volumio (As I put in the previous link) with multiple Raspberry Pis as speakers scattered around the home or office, I leave you the additional code that we should add. And another 'since', taking advantage of Volumio, by having MPD (Music Player Daemon) Installed and enabled, We can also add it to the settings, It won't let us control too much, but it can be used to send audio messages to the speakers… Oh, Something interesting, ¿No? so that the speakers give us warnings, and let us know when the woman arrives, or an appointment on the calendar, or whatever we want from Hassio… In that case, The following configuration would remain:
media_player:
  - Platform: Volumio host: DIRECCION_IP_VOLUMIO port: 3000
  - Platform: Snapcast Host: DIRECCION_IP_VOLUMIO
  - Platform: damn name: volumio_mpd host: DIRECCION_IP_VOLUMIO
Well, as usual, we save the file and restart Hassio, from "Settings" > "Server Control" > "Server Management" > "Restart". With this everything ready!

Now we'll just need to add a type panel “Media Control” and look for our Volumio there, as we can see, Snapcast devices will also have detected us, in this case, as I said, there are several Raspberry Pis around the house that act as a speaker.

It will be as simple as we want to customize a view with our sound system, in this case we handle Volumio, but also with an iframe, I like its interface 🙂 better and after adding each SnapCast device that has been detecting us, we can add them in the visualization that interests us.

The goal will be to be able to control the volume of each one, as well as being able to turn the speakers off or on remotely.

If we add the Volumio MPD entity we can use TTS (Text-to-Speech) Google Speakers can send text messages, ideal for generating certain alerts. If you are interested in this part you must add in the Home Assistant configuration file (remember to restart Hassio later):
tts:
  - Platform: google_translate language: 'es' cache: true cache_dir: /TMP/TTS time_memory: 300
    base_url: HTTP://DIRECCION_IP_VOLUMIO:8123
    service_name: google_say
And as always, automations, our friends 😉 can do whatever we want, that he puts the music on us at some time, a Spotify playlist on Sunday mornings, to let us know over the loudspeakers when someone comes home, etc, etc…
I leave you the links of the integrations that we have used in this post in case you want to have more information:
- Volume: https://www.home-assistant.io/integrations/volumio/
- SnapCast: https://www.home-assistant.io/integrations/snapcast/
- Text to Speech (TTS): https://www.home-assistant.io/integrations/tts/
I hope you found it curious and interesting!