Video surveillance system with Frigate and Home Assistant

If you have a Home Assistant and want to set up a video surveillance system, you can (for home or business), Well, there's no choice but to set up Frigate, What is Open Source?. We will be able to receive in Telegram messages (with photos and videos), When cameras detect people, Dogs, Cats, birds, horses…
Well, The idea is simple, We have or want to have security cameras, video surveillance, good quality but cheap IP cameras and manage the system ourselves. Where Frigate It will help us to centralize each camera and configure what we need. Frigate will be responsible for detecting the objects that we said, how people are detected, any type of animal, Cars, Registration… If we want, it will store the clips and videos for the time we indicate.. And then those events that are generated we can send them to Home Assistant and depending on a series of factors (We're out and about, We are sleeping…) that alerts us via Telegram or whatever we want.
Frigate will run on a Docker container, and depending on the number of cameras we have, it will need to use a lot of CPU and it is even advisable to use accelerator hardware that improves the performance of detections. Everything will depend on many factors, If there are many pixels that change in the cameras, we can always create zones to avoid their analysis; the number of cameras or the count we give it, since it can run on a Raspberry Pi. For 4-5 cameras with the Google Coral USB Accelerator We're doing well, It's a co-processor, an external TPU that will help us move the load.
Coral USB Accelerator,

Well, because with this more or less the fish is sold, Let's start if you like 🙂. The first thing will be to have a machine with Docker, This post is based on a Raspberry Pi 4, and the second installs the drivers of the Google Coral USB Accelerator (or the one we use). To do this,, we download the Google repository:
ECHO "Deb https://packages.cloud.google.com/apt coral-edgetpu-stable main" | sudo tee /etc/apt/sources.list.d/coral-edgetpu.list curl https://packages.cloud.google.com/apt/doc/apt-key.gpg | Sudo apt-key add -
Sudo apt-get update
We installed the runtime and the PyCoral library:
SUDO apt-get install libedgetpu1-std #Para maximum performance --> sudo apt-get install libedgetpu1-max sudo apt-get install python3-pycoral -y
Ya estamos listos para probar si la Raspberry Pi ya reconoce al dispositivo, podremos bajarnos un modelo de ejemplo y validarlo:
mkdir coral && cd coral git clone https://github.com/google-coral/pycoral.git cd pycoral bash examples/install_requirements.sh classify_image.py python3 examples/classify_image.py \
--model test_data/mobilenet_v2_1.0_224_inat_bird_quant_edgetpu.tflite \
--labels test_data/inat_bird_labels.txt \
--input test_data/parrot.jpg
Y si va todo bien recibiremos algo como esto:
----INFERENCE TIME----
Note: The first inference on Edge TPU is slow because it includes loading the model into Edge TPU memory.
11.8ms 3.0ms 2.8ms 2.9ms 2.9ms -------RESULTS--------
Ara macao (Scarlet Macaw): 0.75781
Desplegar Frigate,
Como hemos comentado anteriormente Frigate no se instala, We will deploy it in a container, so remember that we need to have Docker installed previously. And before we start we need to create the Frigate configuration file. In my case I'll leave it at '/mnt/config.yml’ And this is a minimal example, where I tell you who the MQTT server is to send the events, The BD path, Logs, (optionally) we indicate if we have a Coral accelerator and then we add the cameras, I insist on a minimum example:
MQTT:
  host: DIRECCIÓN_IP_MQTT port: 1883
  user: USUARIO_MQTT password: CONTRASEÑA_MQTT database:
  path: /media/frigate/frigate.db logger:
  default: info logs:
    frigate.event: Debug

Detectors:
  coral:
    type: Edge tpu
    device: USB

Cameras:
  NOMBRE_DE_LA_CAMARA:
    ffmpeg:
      inputs:
        - path: RTSP://USUARIO_RTS:CONTRASEÑA@DIRECCION_IP_CAMARA:554/av_stream/ch0 detect:
      width: 1280
      height: 720
Currently Frigate is in the 0.10.1, and these are the different images that they give us depending on the machine we have:
- x86: blakeblackshear/frigate:0.10.1-amd64
- x86 w/ nvidia (For ffmpeg only): blakeblackshear/frigate:0.10.1-amd64nvidia
- Raspberry Pi 3/4 (32bit): blakeblackshear/frigate:0.10.1-Armv7
- Raspberry Pi 4 (64bit): blakeblackshear/frigate:0.10.1-aarch64
We have to create and start the container, we will pass you the USB device, we increase the size of the Shared memory, We pass you the directory where you will save all the data that Frigate needs (Clips, Recordings…), We pass the configuration file to you, hour, RTSP password and the port we will use for its management (5000TCP), followed by that, The image we want; from a Raspberry Pi 4 Execute:
Sudo Docker Run -D --Name Frigate --Restart=Unless-Stopped --Mount Type=tmpfs,target=/tmp/cache,tmpfs-size=10000000000 --device /dev/bus/usb:/dev/bus/usb --shm-size=128m -v /media/frigate:/media/frigate -v /mnt/config.yml:/config/config.yml:ro -v /etc/localtime:/etc/localtime:ro -e FRIGATE_RTSP_PASSWORD='PASSWORD' -p 5000:5000 -p 1935:1935 blakeblackshear/frigate:0.10.1-aarch64
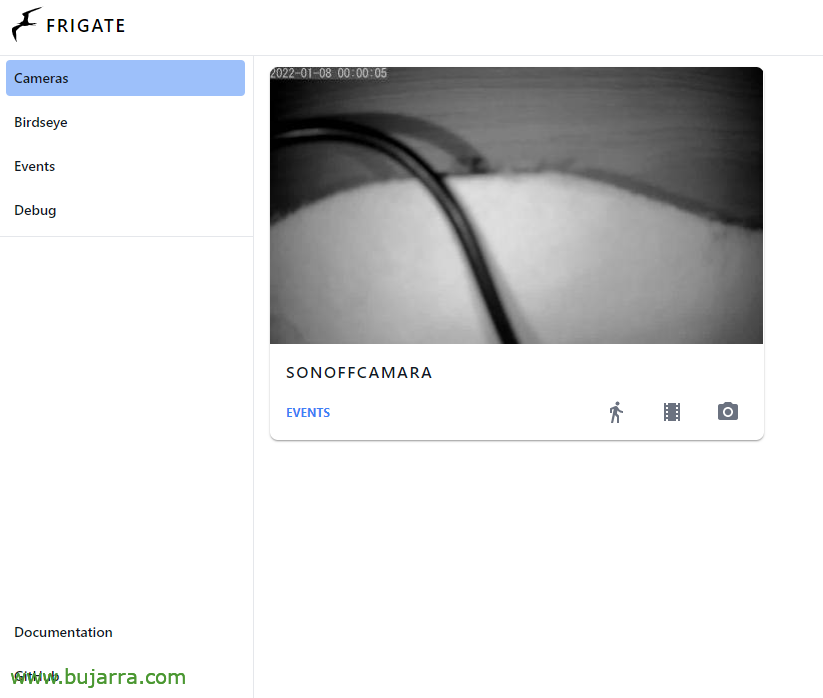
And after a few minutes that everything is unloaded and the container starts, we can connect to Frigate, Through a browser we access HTTP://DIRECCION_IP_DOCKER:5000 And we'll have something like this image above.
Allow me to leave you some Docker commands that you may need for R+D:
Sudo Docker PS -a		# Lista contenedores sudo docker stop ID_CONT	# Apaga contenedores sudo docker start ID_CONT	# Arranca contenedores sudo docker restart ID_CONT	# Reinicia contenedores sudo docker rm ID_CONT		# Elimina contenedores sudo docker system prune -a 	# Delete caches and other rubbish, be careful!
Sudo Docker Logs ID_CONT -f	# View logs generated by the container
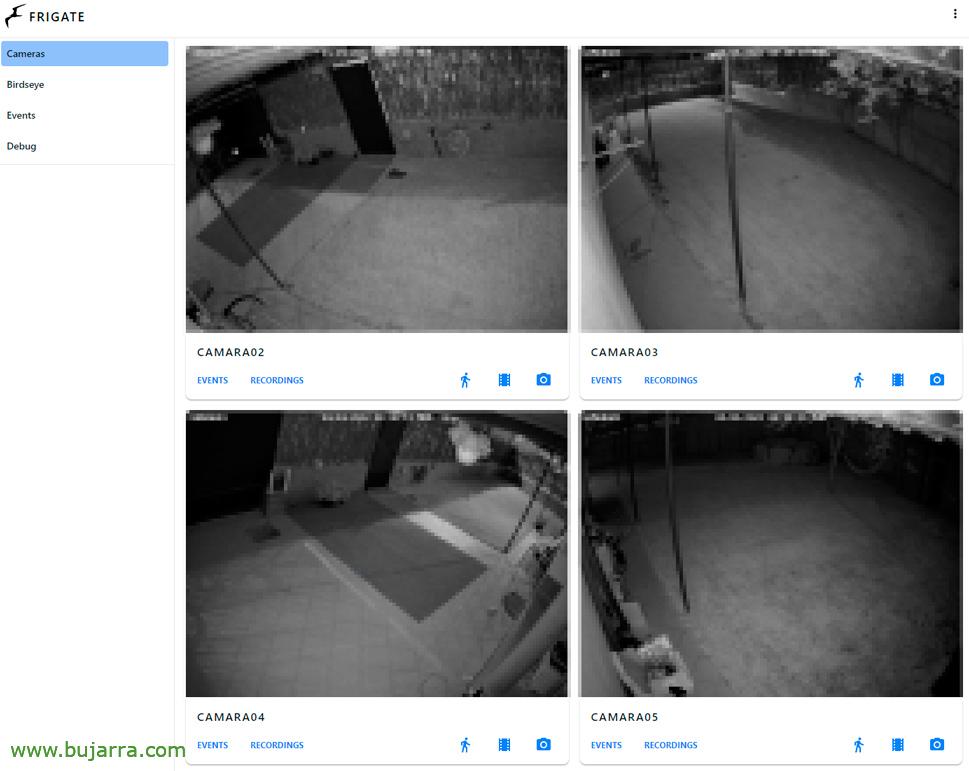
And then everyone will have to develop their Frigate to their liking, I leave you the link with the configuration file and all its possibilities. We will be able to see all the cameras from Frigate, or use the Birdeye, which is a screen off and turns on when there is movement in a camera, or view the events you've collected…

We have so many possibilities, In each camera we can create masks to prevent it from scanning uninteresting areas that may have some movement, to minimize false positives, because it is useless to detect a person outside, On the street, or a moving pot that generates unnecessary computation… Or create zones to unify different cameras… has quite a few possibilities. I leave you in case the configuration I am using with my cameras serves as a guide, and you can see the roles of each camera, What kind of objects to track, The resolution, FPS, Storage time for images, The videos… :
CAMARA03:
  ffmpeg:
    output_args:
      record: -f segment -segment_time 10 -segment_format mp4 -reset_timestamps 1 -strftime 1 -c:v copy -c:A aac inputs:
      - path: RTSP://USUARIO_RTSP:CONTRASEÑA@DIRECCION_IP_CAMARA:554//h264Preview_01_main roles:
          - detect
          - Clips
          - Rtmp
          - record
          - Motion snapshots:
    Mask:
      - 1136,79,1045,62,683,33,576,55,484,69,213,114,30,161,129,278,221,370,238,673,145,709,187,834,253,960,0,960,0,0,954,0,1040,0,1280,0,1280,122
      - 1280,402,901,274,708,224,491,191,473,50,503,53,511,159,690,186,692,149,777,156,789,87,893,120,1083,156,1280,224
  detect:
    width: 1280
    height: 960
    Fps: 5
  objects:
    track:
      - person
      - Cat
      - dog
      #- Bird record:
    enabled: True retain_days: 0
    Events:
      retain:
        default: 10
  snapshots:
    bounding_box: true enabled: true timestamp: True Retain:
      default: 10
Frigate Integration with Home Assistant
As you have been able to see, I haven't installed Frigate on Home Assistant directly, What could be done, but I think it depends on the environment and for performance reasons it is better to separate the components. So Frigate on its side and Home Assistant on theirs, especially since Frigate demands a lot of computing.

To install the Frigate integration with Home Assistant, the most convenient thing to do is to use HACKS. “HACKS” > “Integrations” > “Frigate” >Download and install it and restart Home Assistant after. If it is not listed, We'll add this repo 'https://github.com/blakeblackshear/frigate-hass-integration'.

Once the integration is installed, we configure it, Let's go to the Integrations, and click on add new integration, we wrote 'Frigate'…

And nothing, all we have to do is indicate the URL of Frigate, Click on “Send”. This will already create all the Entities with the cameras that we have defined in Frigate, and all that's left is to make us our control panel!

I'm sure that in a little while you'll do something better than me, This is an example of 4 cameras, where we can see in real time what is happening, If we click on the camera and it has a microphone we can also listen to it without problems. We can add some clips with the last detections made by each camera, that when you press one of them it will play the video…

And here is an example of a Home Assistant automation, that if it detects a cat at night, take a picture of him, I sent it to us on Telegram and a link to the video in case we want to see it. The automation will listen to an MQTT event and with a template we define the object we expect, in this case a cat. And then the action we want, I leave you an example in YAML that you can use to receive a photo and a link to the video:
service: telegram_bot.send_photo data:
  URL: >-
    HTTP://DIRECCION_IP_FRIGATE:5000/api/events/{{trigger.payload_json["after"]["Id"]}}/snapshot.jpg?bbox=0&crop=1 caption: >-
    {{trigger.payload_json["after"]["camera"]|Replace("frigate_","") | Upper }}
    {{trigger.payload_json["after"]["label"] | Upper }}
    [VIEW VIDEO](https://DIRECCION_IP_FRIGATE/api/events/{{trigger.payload_json["after"]["Id"]}}/clip.mp4)
  timeout: 1000

If everything has gone well, The result would be something like this, because at a particular time to know the visits we receive, Obviously this can be applied to people or other types of objects, animals…
As you can see, everything we can do is quite malleable, each one will depend on their particularities or what they want to complicate… I hope you found it interesting, It is really not very expensive to set up your own system, without taking private images outside or a third party can manipulate them. I am also sure that we get better performance than with any commercial solution.
Frigate is the pear and Home Assistant an all-powerful God, nothing, I hope that, that you liked, Try, Be happy and thank as always those of you who move this type of content through social networks. A hug to tod@s!