Ollama, Getting started with local AI

For a few months I was tinkering with a local and open source AI; And I wanted to share with you a little in a series of posts some of its possibilities in our day to day. But in this first document we will see how we can set it up and some basic notions of its possibilities.
First things, If you like, I'll tell you what I use it for today in case it can serve as an idea; For now, exclusively to generate text, He can be poor, But it's a very wide world. Ranging from receiving any notification or alerting system, the alert makes you more human or can suggest where to start its resolution. To send periodic emails, Emails sent by my organization daily, Monthly… Well, it gives them another touch, it feeds them with certain data and makes them very real. Also for the home automation system, allows me to have conversations with the Home, It alerts me, Using the voice, Different phrases…
For now, As I said, to generate text; But the possibilities are many, such as the connection to databases and that allows us to make queries with a natural language. Or the possibility of engaging in conversations and questions regarding a document that we have sent to the AI, or an image and that he describes what he sees… Throughout the document I will give some simple examples so that something enjoyable can be done.

The second, Not bad, What is this called… As you can imagine, there are many options and possibilities, I'm going to talk to you about Ollama (Open-source Library for AI Models and Applications). Ollama will allow us to use LLM (Large language model), This is, language models trained for AI, they can be open source or paid, may be 100% offline or not, to taste. Obviously, and depending on the LLM we use, we will need more or less power, This is, have a GPU so that responses are immediate. We will be able to use the Ollama API to ask questions remotely with other systems, Very very powerful. And I recommend you Open WebUI as a GUI interface for Ollama, so with our browser we will have the interface you expect to be able to work with your AI comfortably.
What I said, we will need a GPU to have the best possible performance, it will depend on the LLM we use and the GB required by each model, in this way the responses will be immediate. As for the compatible hardware, it is quite extensive (NVIDIA, AMD, Apple M1…), I leave you Here is its list.
I am going to separate the article into:
- Quick installation of Ollama and Open WebUI on Windows, Mac or Linux
- Installing Ollama and Open WebUI on a Linux MV on Proxmox with Docker
- Access via Open Web UI and getting started
- Image recognition
- Interacting with documents
- Several
Quick installation of Ollama and Open WebUI on Windows, Mac or Linux
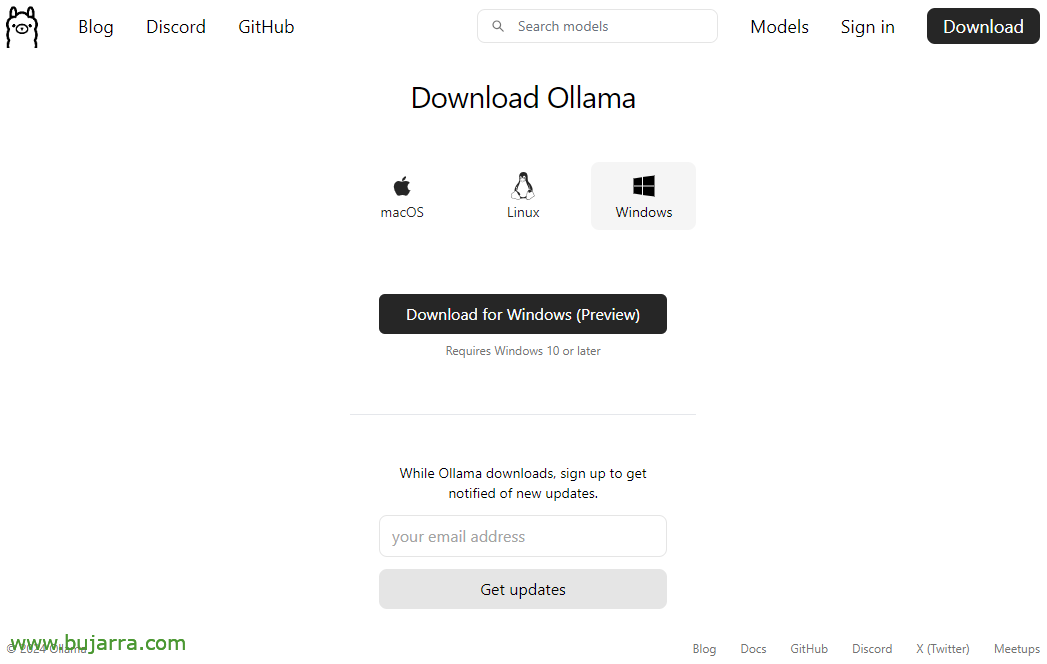
If you want to prove it, And fast now, This is the option, since you will be able to install Ollama on your Linux, Mac or Windows, In case you want to run it locally, with your GPU. We will go to the Ollama download website, we will select our OS and download it to us, Next, Next and Installed.
On Linux we will download and install it as follows:
curl -fsSL https://ollama.com/install.sh | Sh
>>> Downloading ollama...
######################################################################## 100,0%##O#- #
>>> Installing ollama to /usr/local/bin...
>>> Creating ollama user...
>>> Adding ollama user to render group...
>>> Adding ollama user to video group...
>>> Adding current user to ollama group...
>>> Creating ollama systemd service...
>>> Enabling and starting ollama service...
Created symlink /etc/systemd/system/default.target.wants/ollama.service → /etc/systemd/system/ollama.service.
>>> NVIDIA GPU installed.
Y podremos directamente si queremos desde shell bajarnos un LLM y probarlo:
ollama run mistral pulling manifest pulling e8a35b5937a5... 100% ▕█████████████████████████████████████████████████████████████████████████████████████████████████▏ 4.1 GB pulling 43070e2d4e53... 100% ▕█████████████████████████████████████████████████████████████████████████████████████████████████▏  11 KB pulling e6836092461f... 100% ▕█████████████████████████████████████████████████████████████████████████████████████████████████▏   42 B pulling ed11eda7790d... 100% ▕█████████████████████████████████████████████████████████████████████████████████████████████████▏   30 B pulling f9b1e3196ecf... 100% ▕█████████████████████████████████████████████████████████████████████████████████████████████████▏  483 B verifying sha256 digest writing manifest removing any unused layers success
>>> Hello, hello! That means "Hello" in Spanish.
If we want it to respond to API queries, we must edit the service file 'nano /etc/systemd/system/ollama.service ‘ Adding:
Environment="OLLAMA_HOST=0.0.0.0:11434"
And we recharge the service:
sudo systemctl daemon-reload sudo systemctl restart ollama
And if we want to have the GUI to manage our AI from the browser, we will have to set up Open WebUI, the fastest and most convenient in a Docker container:
git clone https://github.com/open-webui/open-webui.git CD open-webui/ sudo Docker compose up -d

And we can open the browser by attacking the IP of the machine at port 3000tcp (Default).
Installing Ollama and Open WebUI on a Linux MV on Proxmox with Docker
And this part I tell you why… My idea is to have a machine for centralized AI, a machine that different systems can point to to make different queries, for this, Must be a virtual machine (on the subject of advantages, high availability, Backup, snapshots…), a VM that we passthrough the graphics card to and has the GPU for it. For this we will use Proxmox, (one day we talked about VMware's suicide) and the VM will be an Ubuntu Server 24.04. And while we're at it,, in that VM it will run Ollama and Open WebUI in Docker containers.
Here are the steps I followed to passthrough the graphics card in Proxmox, I don't know if they are the most correct, but it works perfectly.
After installing Proxmox 8.2, Configure it minimally, have run the Proxmox VE Post Install of the Proxmox VE Helper-Scripts, we're going to tell Proxmox not to use that PCIe Graphics, we started editing GRUB with 'nano /etc/default/grub’ and we modify the following line:
#GRUB_CMDLINE_LINUX_DEFAULT="quiet"
GRUB_CMDLINE_LINUX_DEFAULT="quiet intel_iommu=on iommu=pt vfio_iommu_type1 initcall_blacklist=sysfb_init"
INTEL--> GRUB_CMDLINE_LINUX_DEFAULT="quiet intel_iommu=on"
AMD--> GRUB_CMDLINE_LINUX_DEFAULT="quiet amd_iommu=on"
And we execute
update-grub
We added the following modules with 'nano /etc/modules':
I live vfio_iommu_type1 vfio_pci vfio_virqfd
We lock the drivers with 'nano /etc/modprobe.d/blacklist.conf':
Blacklist Nouveau Blacklist NVIDIA Blacklist NVIDIA* Blacklist Radeon
We write down the IDs with: 'spci -n -s 01:00’, As you can see, If there is any curious person, in my case it's an NVIDIA RTX 3060 12GB connected to PCIe 1.
01:00.0 0300: 10of:2504 (Rev A1)
01:00.1 0403: 10of:228and (Rev A1)
We edit 'nano /etc/modprobe.d/vfio.conf’
KVM Options ignore_msrs=1x Options vfio-pci ids=10de:2504,10of:228e disable_vga=1
We edit 'nano /etc/modprobe.d/kvm.conf’
KVM Options ignore_msrs=1
And finally we edited 'nano /etc/modprobe.d/iommu_unsafe_interrupts.conf’
Options vfio_iommu_type1 allow_unsafe_interrupts=1"
I'm telling you that I'm sure I'll have a step left over for the graphics card passthrough in Proxmox, but after restarting the host you will see how you can perfectly add the GPU to a VM.

The next step, will be to create the VM in Proxmox, Here are some things I had in mind; in the 'System' tab’ We must indicate 'Q35’ as a machine type, and in the BIOS options choose 'OVMF (UEFI)’,
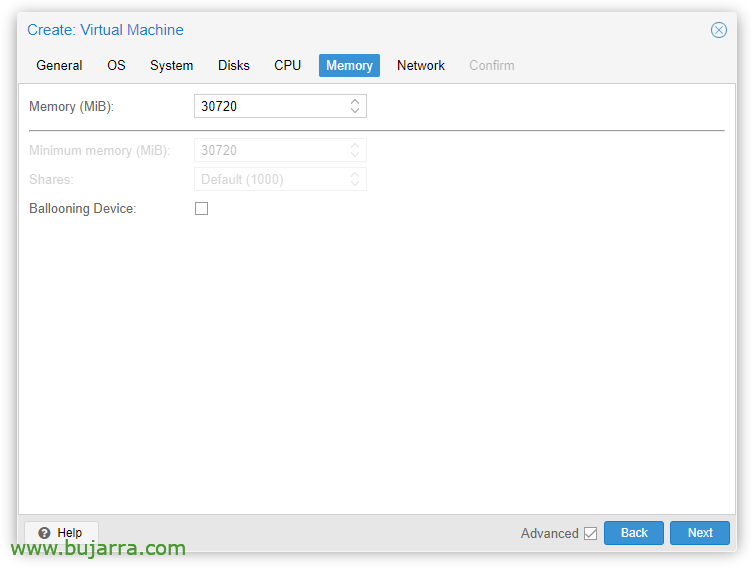
In the 'Memory' tab’ we must uncheck 'Ballooning Device’
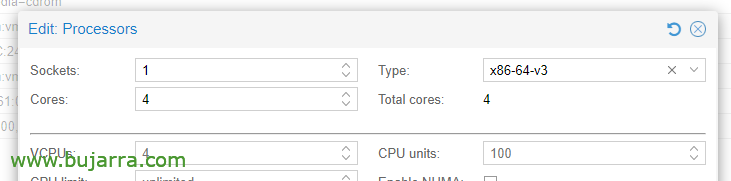
In CPU Options, Editing the processors, in the Type, We must choose at least x86-64-v3.
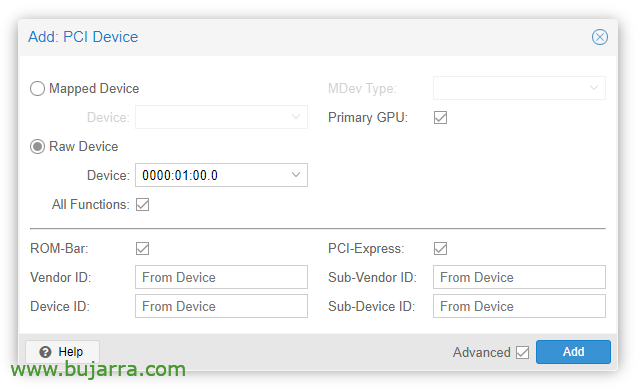
Once the VM is created, we can add a PCI device to it, we edit the VM hardware and “Add” > “PCI Device”. We check All Functions, ROM-bar, Primary GPU and PCI-Express.
Obviously in that graphics card we will connect a monitor to install the OS (Ubuntu Server 24.04) and see it on screen. We will also have to passthrough a USB keyboard/mouse to do the installation.
Then we can install the OS in the VM, we must take into account to install the drivers, in Ubuntu Desktop I think they are installed during installation and in the Server also marking a 'tick', otherwise, we can still install them:
sudo ubuntu-drivers install sudo apt-get update sudo apt-get upgrade sudo reboot
Tras reiniciar la MV vemos si ha cargado correctamente con ‘cat /proc/driver/nvidia/version’
NVRM version: NVIDIA UNIX x86_64 Kernel Module 535.171.04 Tue Mar 19 20:30:00 UTC 2024
GCC version:
Continuaríamos con la instalación de Docker (doc oficial) en la MV Ubuntu:
sudo apt-get update sudo apt-get install ca-certificates curl sudo install -m 0755 -d /etc/apt/keyrings sudo curl -fsSL https://download.docker.com/linux/ubuntu/gpg -o /etc/apt/keyrings/docker.asc sudo chmod a+r /etc/apt/keyrings/docker.asc echo \
  "deb [arch=$(dpkg --print-architecture) signed-by=/etc/apt/keyrings/docker.asc] https://download.docker.com/linux/ubuntu \
  $(. /etc/os-release && ECHO "$VERSION_CODENAME") stable" | \
  sudo tee /etc/apt/sources.list.d/docker.list > /dev/null sudo apt-get update  sudo apt-get install -y docker-ce docker-ce-cli containerd.io docker-buildx-plugin docker-compose-plugin
Debemos instalar ahora el NVIDIA Container Toolkit (doc oficial) y lo habilitamos para Docker:
curl -fsSL https://nvidia.github.io/libnvidia-container/gpgkey | sudo gpg --dearmor -o /usr/share/keyrings/nvidia-container-toolkit-keyring.gpg curl -s -L https://nvidia.github.io/libnvidia-container/stable/deb/nvidia-container-toolkit.list | sed 's#deb https://#deb [signed-by=/usr/share/keyrings/nvidia-container-toolkit-keyring.gpg] https://#g' | sudo tee /etc/apt/sources.list.d/nvidia-container-toolkit.list sudo apt update sudo apt -y install nvidia-container-toolkit sudo systemctl restart docker sudo nvidia-ctk runtime configure --runtime=docker sudo systemctl restart docker
Y ya es hora de desplegar los contenedores de Ollama y Open WebUI, for this:
git clone https://github.com/open-webui/open-webui.git cd open-webui/
And we added these changes to the Ollama container, so that I can use the graph and open up the port for the APIs (Nano docker-compose.yaml):
Runtime: NVIDIA Environment:
  - NVIDIA_VISIBLE_DEVICES=all ports:
  - 11434:11434
And finally we unload and start the containers:
sudo docker compose up -d
And then we can open the browser by attacking the IP of the virtual machine, to port 3000tcp (Default).
Access via Open Web UI and getting started

The first time we access Open WebUI we can create an account by clicking on “Enroll”, We will create an account by simply entering our name, email and a password, Click on “Create an account”.

And from here it will be from where we can interact, as we can see we can create new Chats and consult them with what we need,
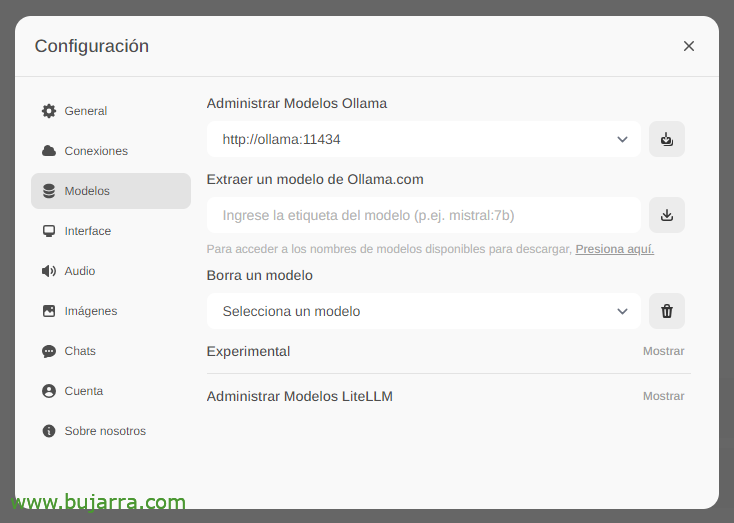
The first and most important thing will be to download the large language models (LLM), from 'Settings'’ > 'Models’ We can extract them directly from Ollama.com we type, for example, Mistral:7b, although of course I will recommend that you visit the top LLM most used, All you have to do is type the model you are interested in and click on the download icon. I recommend you (to this day) llama3, It's a real blast.
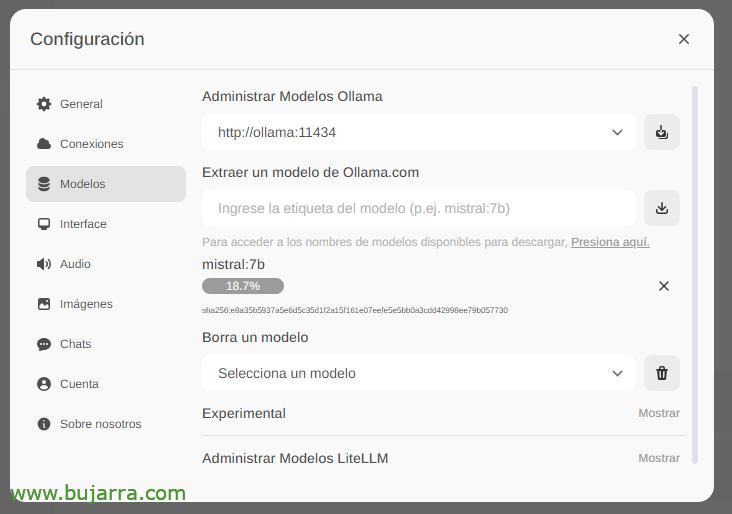
We wait while it downloads… And of course we can go down as many as we want.

And when you create a New Chat, you can choose any downloaded model to start interacting.

And nothing, We started tinkering, We can throw any questions at you….
Image recognition

If, for example, we use the Llama2 LLM, we can send you an image in a conversation or by API and ask you to describe it to us, an impressive example with a Grafana cutout… I don't give you any more clues…
Interacting with documents

To see another quick example of its possibilities… From 'Documents’ We can upload any document and then have conversations about its content. You can upload a book and ask it things or advice, go, It depends on what the book is about… Or this mere example that I upload a whitepaper of an Active Directory migration, and…
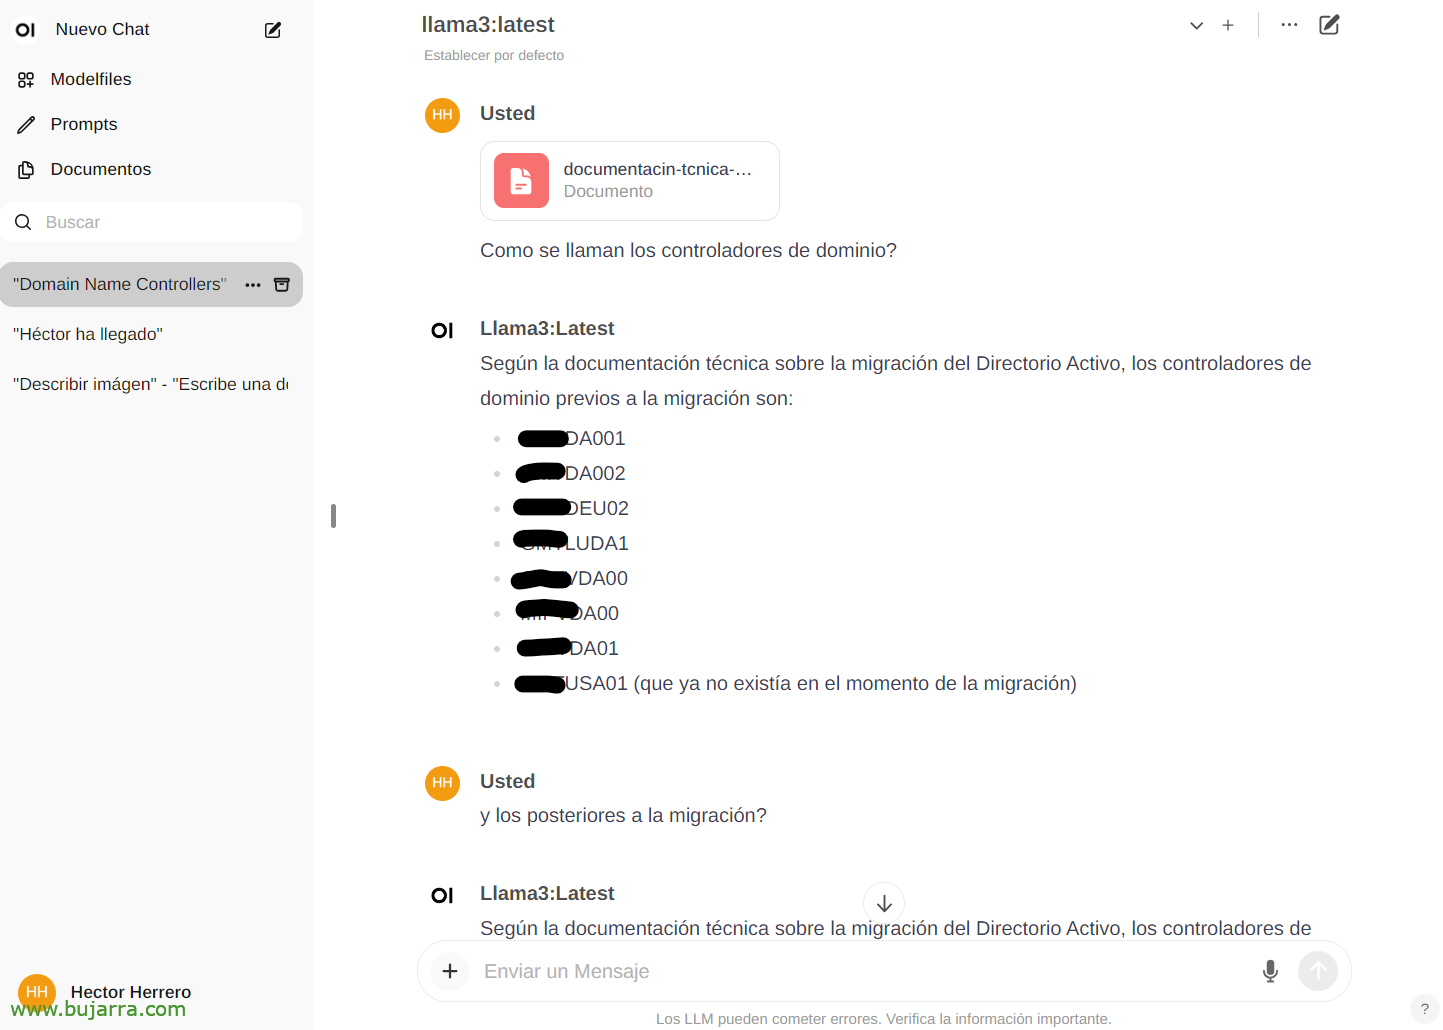
And then in the chat we can consult you about a specific document by typing the # and selecting the tag that we have put on the doc. Impressive…
Several
And well for finalizing the document, We will see things in the future, It looks very very good, Not only this that we have seen, if not all its possibilities with the API for example and being able to integrate any system with our AI. A safe AI, local, free, Ollama is here to stay!
In future posts, thanks to this API we will be able to integrate Centreon's notifications, by Elasticsearch, of our smart home with Home Assistant, and I do call her on the phone and ask her questions, Control any device in the home in an intuitive way, receive very curious alerts and a long etcetera…

If we want for example with curl to throw an example query:
Curl HTTP://localhost:11434/api/generate -d '{ "model": "mistral:7b", "prompt": "Do you know Athletic Bilbao?", "Stream": False }'
    {"model":"mistral:7b","created_at":"2024-03-29S12:38:07.663941281Z","response":" Yes, I know Athletic Club de Bilbao, is a Spanish professional football club based in the city of Bilbao, Basque Country. It was founded on 14 October 1894 and currently plays in LaLiga, The Spanish First Division of Football. He is known for his style of play based on his philosophy, which prioritizes the development of promotion players from the club's youth categories. Its stadium is the San Mamés."
Or being able to put parameters to choose the model, the temperature to make you more or less hallucinating, Lengths… We will see more examples:
Curl HTTP://XXX.XXX.XXX.XXX:11434/api/generate -d '{ "model": "mistral:7b", "prompt": "Do you know Athletic Bilbao?", "Stream": False, "temperature": 0.3, "max_length": 80}'
Well, I don't get involved anymore, to get an idea of the possibilities I think it is worth 🙂 it We will see more things and curious. And the truth is that I have to omit some things because I use them in my business and they are differential values that many times you already know what happens with rival suppliers…
A hug and wish you a very good week!