RustDesk and RustDesk Web Client

In this document we will see the complete deployment of the RustDesk solution, As many of you already know, it is the best open source solution for remote controls, the free alternative to TeamViewer. In the post we will see how to make your own local installation, where without the need for third parties, Have your own control.
What I said, we will start the document by deploying the RustDesk server on our infrastructure, and then deploy the RustDesk clients already preconfigured on the computers that we want to control remotely in our organization, are the users' PCs to offer them support through a remote control, or to connect to our servers. In the end, we will also deploy the RustDesk Web Client service, which as its name suggests and you can imagine, is a RustDesk web client, to be able to connect to any computer from a website, It's that easy.
Of course, in principle everything is local, will work on your network; but if you are going to want to connect to the computers from the Internet (If you're outside the organization), or the equipment to be controlled is out, then you're going to have to open some ports on your perimeter firewall to allow access. The necessary ports are 21115tcp to 21117tcp, as well as the 21116udp; and if you're going to want to use RustDesk Web Client, then also from 21118tcp to 21119tcp.
You will see how fast everything is, and thanks to Docker, since we are going to deploy RustDesk services in Docker containers, so to start the document you will need a Linux machine, an Ubuntu Server is fine, with Docker installed and Docker Compose, as well as the usual, an established machine name, Static IP address, NTP… and, Started!
To deploy the RustDesk server, all you have to do is create your docker-compose.yml file, I'll put it in a folder I'll create called 'Rustdesk'’ In my home. I leave you the example that comes in the official documentation, we will take into account that if we want access from the outside we must indicate our FQDN in the 'command’ of the 'HBBS' container:
version: '3' Services:
  hbbs:
    container_name: hbbs image: rustdesk/rustdesk-server:latest ports:
      - 21115:21115
      - 21116:21116
      - 21116:21116/UDP
      - 21118:21118
    #command: hbbs command: hbbs -r FQDN. DOMAIN. THAT:21117
    Volumes:
      - ./date:/Root Networks:
      - rustdesk-net depends_on:
      - Hbbr restart: Unless-stopped HBBR:
    container_name: hbbr image: rustdesk/rustdesk-server:latest ports:
      - 21117:21117
      - 21119:21119
    command: HBBR Volumes:
      - ./date:/Root Networks:
      - rustdesk-net restart: unless-stopped networks:
  rustdesk-net:
    external: False
Once the file is created and saved, it's time to deploy the RustDesk containers, We do it by executing:
sudo docker compose up -d
List! We already have the server running :-), the next thing will be to deploy the RustDesk clients,

We can download the RustDesk client from your GitHub, there is a client for Windows, Linux, Mac and Android among others. The client installation has no mystery, following, following, and once installed it will be functional, but with RustDesk's public servers, and not with our own.
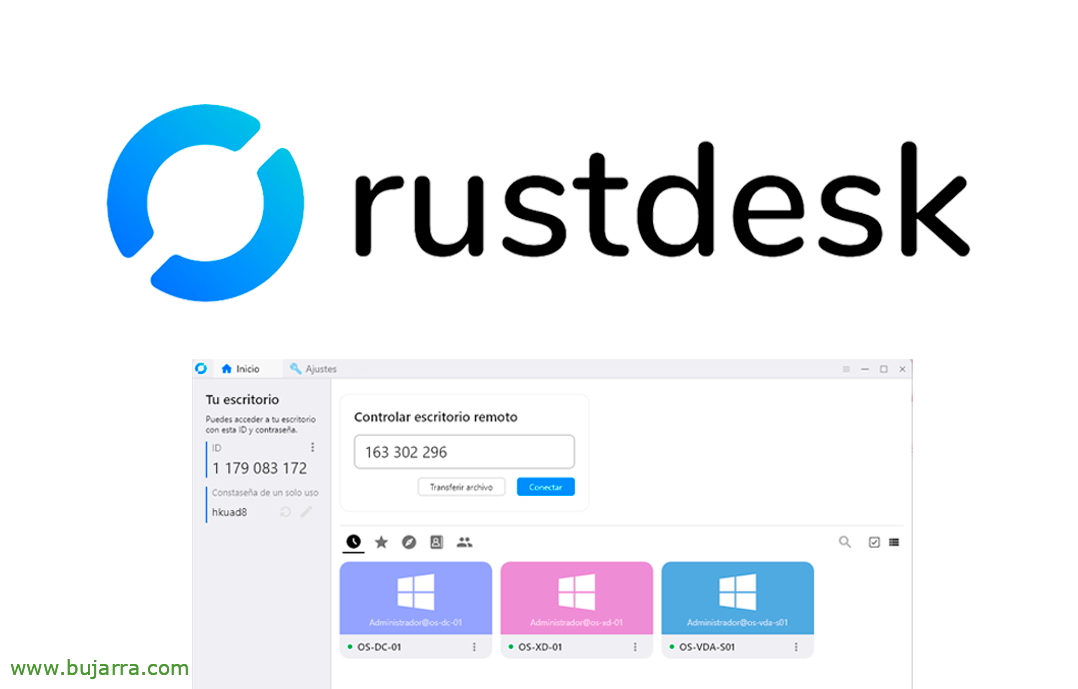
Using the RustDesk client is very simple, it's just like TeamViewer.

To do this,, We'll have to go to “Settings” > “Net” and there we will fill in the “ID Server” and the “Key” which we can obtain from the file '/home/user/rustdesk/data/id_ed25519.pub’ (Or wow, where the container's data volume has been mounted). We apply and that's it. We could also copy this configuration that you have just made by clicking on the 'copy' icon’ to deploy it to other teams faster.
To deploy the RustDesk client in bulk on Windows computers we could rely on this script called 'instala_rustdesk.cmd', that can be executed using a GPO to deploy it unattended and leave it already configured. Please note that we may indicate a manual access password, as well as paste the exported churro with the RustDesk configuration obtained in the previous step.
@echo off if not exist "C:\Program FilesRustDesk" (
  Set rustdesk_pw=CONTRASEÑA__DE_ACCESO_MANUAL Set rustdesk_cfg="CHURRO_EXPORTADO_CON_LA_CONFIGURACIÓN_DE_RUSTDESK"
  rustdesk-1.2.3-1-x86_64.exe --silent-install timeout /t 20
  CD "C:\Program FilesRustDesk"
  rustdesk.exe --install-service timeout /t 20
  for /f "delims=" %%I in ('rustdesk.exe --get-id ^| more') do set rustdesk_id=%%i rustdesk.exe --config %rustdesk_cfg% rustdesk.exe --password %rustdesk_pw%
) else (
    echo RustDesk is already installed. The script will not run.
)
Or you could even rename the RustDesk client installer executable to this format so that it also installs unattended: 'rustdesk-host=FQDN_O_IP_SERVIDOR_RUSTDESK,key=CLAVE_PUBLICA.exe’
The customers 🙂' part is also ready
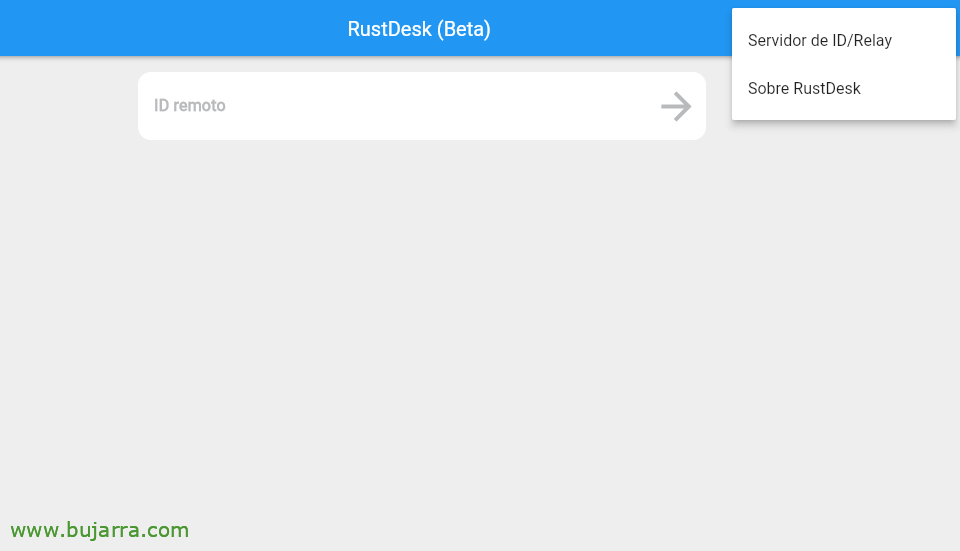
If we are interested in having a website to be able to access RustDesk computers, we can use the RustDesk Web Client; Like this, if we do not have the RustDesk client installed locally to connect to another workstation, We will use the website.
We will be able to download the only Docker image that is published for now, Running:
Sudo Docker Pull Keyurbhole/flutter_web_desk:v1.0.0 sudo docker run -p 5000:5000 keyurbhole/flutter_web_desk:v1.0.0
Once it has started, we will now be able to open a browser to the port we indicate, In this case at 5000TCP.
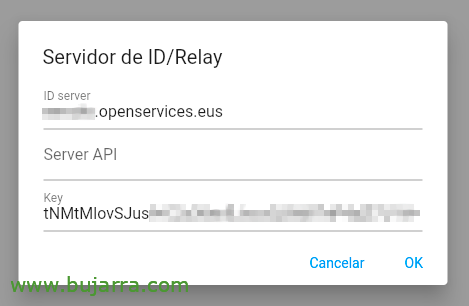
We must configure in the upper right corner the data of our “ID server” and the “Key”, as if it were another RustDesk customer.

And we'll try entering the remote computer ID to connect,

Enter the access password that we have indicated in the RustDesk client of the remote computer…

And that's it! we also have remote web access to PC desktops, computers or servers, Anyway, Our in-house solution, Secure and Open Source! The truth is that it is wonderful, does and does what he says!
I know I'm a tiresome, But as always, I hope this post has been useful to you, If you've come this far by reading, At least I'll send you a greeting; wishing you the best possible, Take care of yourselves and be happy!