Rhasspy – Secure voice control in Home Assistant (in Spanish)

For all those of us who have a Home Assistant and are interested in being able to control it by voice, say, an alternative to Alexa or Google Home, Well, we have Rhasspy. And why Rhasspy? Why Our Microphones Won't Connect to the Internet, No one will listen to us and it will be totally secure and customizable, ¡Started!
One obsession I have is to see microphones everywhere that control modern homes, These home automation or smart. Microphones that listen in our homes and we do not know who is behind it or for what purpose they give us a free service ;-). At home I once tried one of these microphones from Google or Amazon and I was amazed by the number of connections and traffic they generate 24 hours a day, I think it is not normal that with this IoT we have to share data of any kind with third parties, if we put the washing machine on, or how many m2 the vacuum cleaner cleans, or geolocating us… Let's avoid being the product.
So after a long time looking and trying alternatives, the best by far is Rhasspy, It's simple, it is very complete, We can do a lot of little things, Send shares, Ask questions, Conversations… and then act and integrate it with Home Assistant to run automations. And of course we will be able to speak it in Spanish (Spanish) or any other supported language (English, German, Spanish, French, Italian, German, Russian, Greek, Hindi, Mandarin, Vietnamese, Portuguese, Swedish or Catalan among others.)
Rhasspy can be installed in let's say local mode, all in one Raspberry, This is, that has the microphone in it, that is waiting for a keyword to 'wake up', that records what we asked/ordered and then manages it to understand and call the corresponding Hassio automation. But the ideal, is that we don't have a microphone alone at home, if not several scattered throughout the rooms, so Rhasspy can be installed let's say in client mode with the bare minimum, go, that is waiting for the keyword and records our question/order and then sends it to a central Rhasspy who will be the one to process it and send it to Home Assistant. The idea of this client/server is to have several satellites with microphones and a single central configuration (and not every Raspberry Pi with a different configuration). And in my particular case the central Rhasspy, being important (it has the configuration and does the calculation) Run in a virtual machine, as it does not require a microphone… And finally,, in case anyone is interested, could be installed directly on Home Assistant
Well, I think that with this we situate ourselves and take the idea, as Rhasspy runs in a container, So it will take us 2 minutes to have it deployed wherever we need it. I am going to segregate the post into different situations so that everyone can choose their ideal scenario.
Lonely Rhasspy
This scenario is that of having 1 Raspberry Pi alone, let her take care of the whole process; ideal perhaps if we are going to make a robot or similar, that heeds the trigger word 'Bender’ For example. We start, we need to have Docker installed, If we don't have it, Is:
curl -sSL https://get.docker.com | Sh
We have to create a configuration file for the Raspberry Pi sound card to work in Docker, We can call it '/home/pi/asound.conf.txt’ And we put this content on it:
pcm.!default {
        Type Hw Card 1
}

ctl.!default {
        Type Hw Card 1
}
And nothing, We lift the container with Rhasspy image, indicating in the profile the language with which we will work:
sudo docker run -d -p 12101:12101 \
      --restart unless-stopped \
      -v "$HOME/.config/rhasspy/profiles:/Profiles" \
      -v "/home/pi/asound.conf.txt:/etc/asound.conf" \
      --device /dev/snd:/Dev/SND \
      synesthesiam/rhasspy-server:latest \
      --user-profiles /profiles \
      --profile en
Once the Rhasspy container is started, we will be able to test that the container effectively accesses the microphone correctly, that is functional and records. We opened a bash and tasted:
Sudo Docker exec -it ID_CONTENEDOR_RHASSPY bash arecord -r 16000 -c 1 -f S16_LE test.wav

We will be able to open the Rhasspy management now, through a web browser we connect to: HTTP://DIRECCION_IP_RHASSPYl:12101
In the top menu, we will be able to see the services that run on this Rhasspy and having said that it is a solitary Rhasspy they should run all of them. In the case that we will see later, of a networked installation with multiple microphones, The roles will be different.
Also from this initial interface we will be able to do voice recognition tests, Let's see if he understands us well…

The first option for sound recording or Audio Recording will basically be the sound card that we will use to record.

In Wake word we will select the option that interests us for keyword recognition, or activation; I recommend you to try them all to see which one recognizes you best, or depending on the keywords that already exist or we like, as well as we can create our own. In the example of the uncomplicated image, the keyword would be 'Alexa'.

In Speech to Text we will indicate the recognition model, by default Kaldi works without major complications.

Intent Recognition we'll use to work with the custom statements file that we'll then create.

Then Text to Speech will be where you convert the text to audio, NanoTTS also works like a charm, and in Language we will verify that we have the one we are interested in.

In Audio Playing we will indicate which is our sound device to play through the speakers, in case you have to throw sounds that you understand us or not, as well as some phrases…

In Dialogue Management we will leave Rhasspy.

And finally, in Intent Handling will be where we will be able to handle Rhasspy outputs, in this case that it connects to a Home Assistant and sends it events. Then we will have automations in Home Assistant listening and waiting for events to activate and perform the task that interests us.
Rhasspy Network (customer)
This other scenario would be if we want to have several microphones spread around the home, Not just one. The idea is that in each Raspberry Pi with a microphone we do the same installation and minimal configuration.

Well, as the installation would be exactly the same as the Lonely Rhasspy; simply that it will take fewer services raised locally. We must indicate that the following services run on the Rhasspy server/central:
- Intent recognition, indicating Remote HTTP and as URL: 'http://DIRECCION_IP_RHASSPY_SERVIDOR:12101/api/text-to-intent’
- Text to Speech, indicating Remote HTTP and as URL: 'http://192.168.1.216:12101/api/text-to-speech’
Rhasspy Network (server)
In this case, This machine would not need to have a sound card, since it will neither record nor play anything, So you can install it wherever you want, another Raspberry Pi, or if you can in a virtual machine, or wherever you want, total, is a Docker container… Installation would be simpler as:
docker run -d -p 12101:12101 \
      --restart unless-stopped \
      -v "$HOME/.config/rhasspy/profiles:/Profiles" \
      synesthesiam/rhasspy-server:latest \
      --user-profiles /profiles \
      --profile en

And the server configuration part is the reverse of the client, we will not have Audio Recording, or Wake Word, nor will it do the Text to Speech or Audio Playing conversion.
Sentences
Once we have the system up and running, Recognize Us Keyword, Test Phrases, well, it's time to feed a file of sentences or phrases in Rhasspy (In the case of Red, This would only be done on the server side).

From the second icon we can create our files with the phrases that we want it to intercept after listening to the keyword. The bracketed block will be the Event that will generate, and we will be able to create variables that we will send within the event data, as it can be an action (Turn on or off) and pick it up as a state (For example), and then the name of the object or place and we pick it up as 'name'. Here are some examples that you understand better, Fatal explanation:
StateLight]
(Lights | Shut down){state} the (Living Room Lamp){Name}
(Lights | Shut down){state} the (Kitchen Light){Name}
...
[RiseLowerBlinds]
(casualty | Up){state} the (Living room blinds){Name}
(casualty | Up){state} the (office shutter){Name}
...
[TempState]
what is the temperature in (house){Name}
what is the temperature in the (street){Name}
what is the temperature in the (cocina){Name}
...
[Miscellaneous Questions]
There's (Letters){Name} in the mailbox see if there are (Letters){Name}
Where is he (Hector){Name}
...
Create a Token in Home Assistant
How I'm sure you've noticed, on Rhasspy, to send the outputs to Home Assistant we do it from Intent Handling, apart from indicating the URL of Home Assistant, we must also indicate an Access Token. To generate this Token, You can follow these steps.
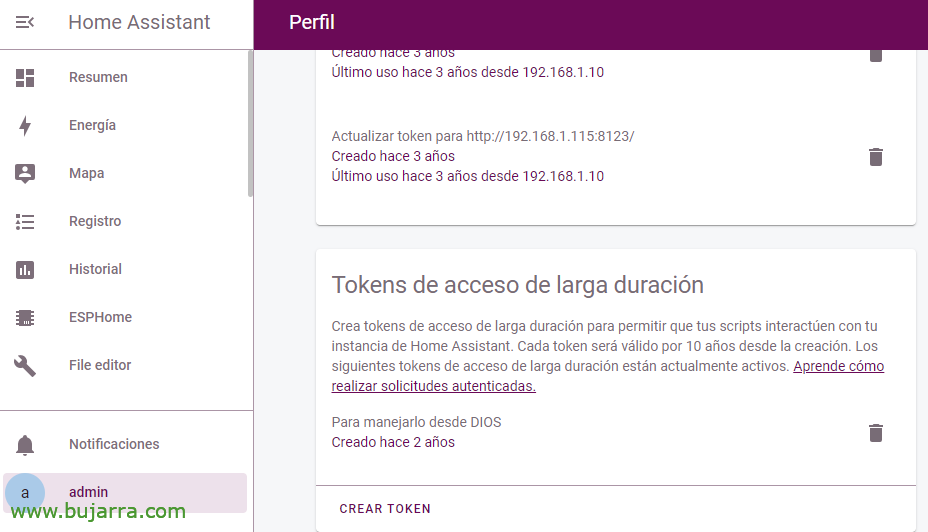
Inside Home Assistant, From the Admin Privileged User Options, we will be able to create long-term access Tokens, Click on “Create Token”,

We give it a descriptive name so that in the future we remember what and why we have this,
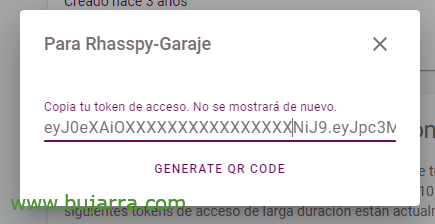
And we copy and store this Token in a safe place, which will be the one we tell Rhasspy.
Rhasspy Home Assistant Integration
And nothing, if we want Home Assistant to pick up Rhasspy messages and process them, We will make it simple, through automations.

We will create a listening automation for each action we want to perform, the only thing to keep in mind is that the automation trigger will be an 'Event', and under 'Event Type'’ we will collect the Event that generated thanks to the sentence file (with the prefix rhasspy_ ). And as event data we filter what we listen to in particular. So if we want the heating to turn on, I expect that event with the attributes corresponding to 'Heating’ and as an action it 'turns on', and then the actions to taste, you each have a lot of imagination and things you can tinker with with Rhasspy.
Total, What a long post, but I hope that many of you can guide you whenever you like to talk to the house and in order to secure it. Microphones or nothing connects to the Internet, that no one spies on us for free… And we can customize the wake word to something closer, and above all that it has as many possibilities as we have ideas.
I send a hug to all of you, Be happy, Thank you to all of you who move this type of content on social networks.