2X Load Balancer – 2X ApplicationServer

2X Load Balancer y 2X ApplicationServer for Microsoft Terminal Services and Citrix,
This document shows how to use a Citrix alternative for application publishing use, based on the 2X software distribution company to PC's or ThinClients. It will allow us to connect to both applications, and remote desktops quickly and securely, from any device and having the applications in a centralized way.
Installing Load Balancer and 2X ApplicationServer – HERE
Configuring Load Balancer and 2X ApplicationServer – HERE
Installing the 2X ApplicationServer Client – HERE
Using the 2X ApplicationServer Client – HERE
Backup Server Configuration – HERE
2X ApplicationServer Web Portal – HERE
Installing Load Balancer and 2X Application Server,
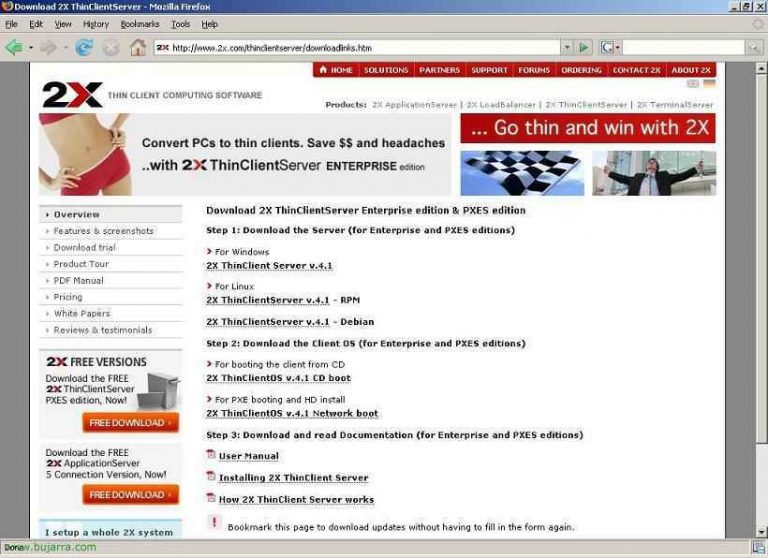
We must download the software from the official 2X website, www.2x.com, from there we will have access to the Load Balancer and the ApplicationServer, We install the package in which they both come, or only what interests us.

We execute the installation, and we follow the wizard, “Next”,

We accept the license agreement, “I accept the terms in the License Agreement” & “Next”,

Select the installation path for 2X, Default: “C:Program Files2XApplicationServer” & “Next”,

We have two options, if we are interested in a single server, only publish applications to a single Terminal Server, Mark “Small to Medium Business Edition”. And if we have several servers, which is normal and we want to do load balancing and have multiple servers with published applications we will install “Enterprise Edition”, “Next”,

Select the components we want to have installed, in my case a complete installation: “2X ApplicationServer and LoadBalancer” which is the service that will allow us to publish apps and balance this load, “2X Terminal Server Agent” for the balancing issue we need all TS servers to have it installed, and “2X Client Gateway” Install the client and the Admin console “2X Management Console”. “Next”,

Gives us a warning that you need free port 80 for the tunnel between the client and the server, we will take it into account if we do not have it occupied with another service, otherwise, we can change the port or even use 443, “Next”,

GOOD, Pressed “Install” to install now,

… Wait a few minutes…

Successfully completed installation,
Configuring Load Balancer and 2X ApplicationServer,
In this part we will see how to configure load balancing between 2X servers, how to publish apps and some other aspects,

Open the 2X console, the “2X ApplicationServer & LoadBalancer Console”, If it is the first time we open it, it will indicate that there is no server configured, So to search for one we click on “Yes”,

He shows us these two servers (“DC” is the 2X server, The current one; and the other, DESKTOPSERVER is one that has Terminal Services installed), what we're going to do is install the agent on the second server to perform this balancing of TS sessions, Select this server and click “Install Agent”,

We indicate the credentials to install the “2X Terminal Server Agent” and click on “Install”,

… We wait while you install it…

GOOD, Click on “Donate” because it has been installed correctly,

We see that it's OK and that it shows us which services both servers use, we see that both have Terminal Server and that one of them also has CItrix Metaframe (not necessary!), “OK”,

We see that we already have both servers in the farm/community, if we want to add more we will do it from “Add…” or by searching for them from “Find…”. What we will now do is create a Terminal Server group so that when we publish the applications we do it directly on a group and not on a server, So we click on “Add…”,

We give the group a name and add the servers that interest us, Click on “OK”,

We can already see the group and the servers that belong to it.

On the “Load Balancing” we have the method that will be used to perform the balancing, the normal thing is for resources (“Resource Based”) and we can select which counters, Yes by user sessions, Used memory or CPU. In addition, we may allow users to reconnect to their disconnected sessions (“Reconnect to disconnected sessions”) or limit each user to a desktop (“Limit user to one session per desktop”).

In the part of “Publishing” is where we will see and publish the applications, Application Groups, contents, Desks, Predefined applications… Click on “Add…” to publish a,

In this case we will publish a normal program, Click on “Application” & “Following”,

Select whether it will be on only one server or on all, Ideally, all servers should have the same applications installed and in the same directories. “Following”,

And in “Target” We search for the application we want to publish from the “…”, in this case we are going to publish something quickly, Notepad, We change the parameters that interest us, How the name, Description, icon and in “Advanced Settings…” We have more interesting, we can also put parameters on the application… “Following”,

We can publish this application to the whole world or filter it by users, Groups or teams. In my case by users and I add from “Add…” the user accounts I'm interested in in Active Directory, In this case it will be to the user nheobug. “End”,

We see the published applications, in this case only the Notepad and its summary. Let's add more, to organize it into groups, Click on “Add…”

Select “Application Group”, “Following”,

We give the group a name and a description, “Following”,

We can, as before, organize and indicate who is going to see this group and who can access it, “End”,

Now we can move the apps within the group to organize it well, By pressing “Move Up” or “Move Down”. Let's publish a remote desktop, Click on “Add…”,

Select the type of application to “Desktop” & “Following”,

Select where we want to publish it from, from all member servers in the farm, “Following”,

And here we say the name of the desktop, of the destination server, we can change the icon and customize more options from “Advanced Settings…”, Set a screen resolution, “Following”,

IDEM, we customize access permissions and “End”,

More publishing options, We can publish pre-defined applications, Let's see them, since “Add…”,

Select “Predefined applications” & “Following”,

We have these possibilities, Various Control Panel Options… the most interesting is that of the printers in case they have problems setting the default (“Printers and Faxes”), Although we can take a look at this document on how to publish rare apps – HERE.

And finally, let's look at how a document is published, a file, What is a content, Click on “Add…”

Select “Document” & “Following”,

Select the type of file you are interested in, if it does not come out, we indicate the extension, In my case I will post a video, An Avi, frame “Video Film (*.avi)” & “Following”,

This video will be available on both servers, “Following”,

The first thing is to add it from “Target” by clicking on the “…” and then we modify the values that interest us, How the name, description… “Following”,

Same as before, we establish if we want users to access said content, Groups or teams. “End”,

We check the apps we have published and their details.

On the “Universal Printing” we have that servers have the universal driver enabled in case a user takes their printer and the drivers of this are not in the 2X servers.

In “Connection Settings” we have the ports that use 2X. For example “2X Client Gateway Port” will be the port that the 2X client uses to connect to the 2X Gateway server, as well as what are the RDP and ICA ports if we do not use the default ones. What I will do is encrypt the traffic between the client and the server for greater security, I will use port 443tcp HTTPS instead of 80tcp HTTP, for this I will mark “Enable SSL on Port” and I'll add a certificate for that function. Ideally, you should buy a valid certificate and add it in “Private Key file” and “Certificate file”, But if not, We can use one of ours unreliable by customers, will give you an alert and that's it, Click on “Generate new certificate…”

Select the encryption bit's, 1024, 2048 or 4096 and we fill in the data for the certificate and where we will store it, “Save”, so we will have our own certificate.

On the “Publishing Agent” they are simply the ports that agents will use to connect to each other, the defaults are 20002 for “2X Publishing Agent Port” and 20003 for “2X Terminal Server Agent Port”. We select authentication if we want it to be only for a specific domain or for all that are trusted.

And on the “Backup Servers” We will see what the backup servers are, in this case for now we have none, If this server goes down, users would not have a swing and could go to the other server, for this, we must add at least one server, Or we look for it “Find…” or manually, “Add…”

Select the server you are interested in as the backup server and click “OK”,

“Yes” to install the 2X Backup Server on this server,

We enter the credentials to install with permissions on that server and click “Install”,

… We wait while it is installed…

Pressed “Donate” since it has been installed well.

Here we check which is the Master server and which are the backups.

In “Information”, We have the “Status” where we will receive the information from all the servers, Your States…

On the “Notification” We can configure notifications and send them by email or simply leave alerts on a server…

On the “Logging” we will be able to enable everything that happens on the servers to be logged, Audit Type.

On the “Software Update” we will be able to update the 2X software from “Check Now…”

On the “Licensing” It is where we can manage the issue of licenses.
Installing the 2X ApplicationServer Client,
We can download the software from the 2X website for free, www.2x.com, this will be the software we will use to connect our PCs to the 2X servers.

We execute the installation, Skip the wizard, “Next”,

We accept the license, “Next”,

We select the installation path for the customer, Default: “C:Program Files2XApplicationServer Client”, “Following”,

If we click on “Install” Installation will begin now on the client side…

… Hope…

We mark the check “Launch ApplicationServer Client” to run the client now and test the connection against the 2X servers, “Finish”,
Using the 2X ApplicationServer Client,
Here we will show how to configure the client part to access the 2X server. It is clear that if we will access from the outside, the ports that are going to be used will depend on the configuration by the Gateway if by the 80, or on the contrary by the secure layer using SSL by the 443.

The first time we open the client it will tell us that it is not configured, if we are on the LAN we can tell him “Yes” to make it easy for you to find servers on your network. It is normal to configure it by hand, So I'll point you in “No”.

We're going to “Tools” > “Options…”

And we set up the client, from the “General”; We indicate which is the primary server, the secondary or backup server and the port it will use, In this case it will be a secure connection using only 443TCP, Connection Type: “SSL Mode”. From here we can also configure the depth of colors, It will be normal “High Color (16 bit)”. We indicate if we want from here the username and password that we will use to access these applications.

On the “Local Resources” we can configure the sound part if we want it to have or not, keyboard combinations, if we want to bring local disk drives to the servers, Printers and serial ports.

On the “2X Universal Printing” We can configure which printer we will print from this client, Yes by default, whether we will select it before printing, we can specify one or it will be directly displayed on the screen.

On the “Advanced Settings” We can customize the customer a little more, as well as select a language for it or check for updates. Accept,

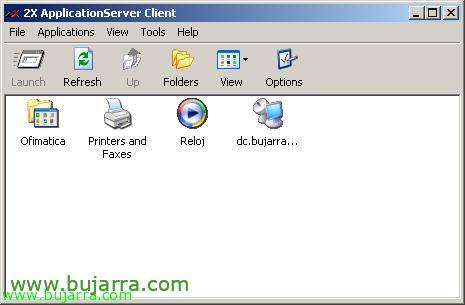
We will automatically see the applications to which we have access with the user we have connected to and now we only need to run one in particular.

The first time we open it, it will inform us that the certificate is signed by the server itself and that we know if we have to trust it, we mark the check of “Do not ask me again” and we press “Yes”. This is for not using a certificate from a trusted CA.

We will get this logon… Loading Components, Connecting…

And here we would have the remote application run from the client, All the resources go against the server and logically it will not be this type of application that we publish but something that customers do not have to have installed.
We will simply see the options we have from the backup server,

We log in to it and open the console of “2X ApplicationServer and LoadBalancer Console”, we will see a small part of “Information” with the Logs and the server status.

In “Backup” is where we will see the possibility of promoting it as a main server, if the main one were to fall for some reason, By pressing “Promote to Master”.
2X ApplicationServer Web Portal,
We can simply configure a web server to use configuration files that we can configure, These would be the steps.

If we open the server console and go to “Publishing”, We have an option called “Publish to Web…”

We set the parameters and in “Output Directory” is where we will configure the destination of the files that will create for us, Click on “Generate…”

“Yes”,

“Yes” to see the website with the results,

Here we would have the files that we would have to upload to a web server, and if a user clicks on it, they could already run the applications.
www.bujarra.com – Héctor Herrero – Nh*****@*****ra.com – v 1.0