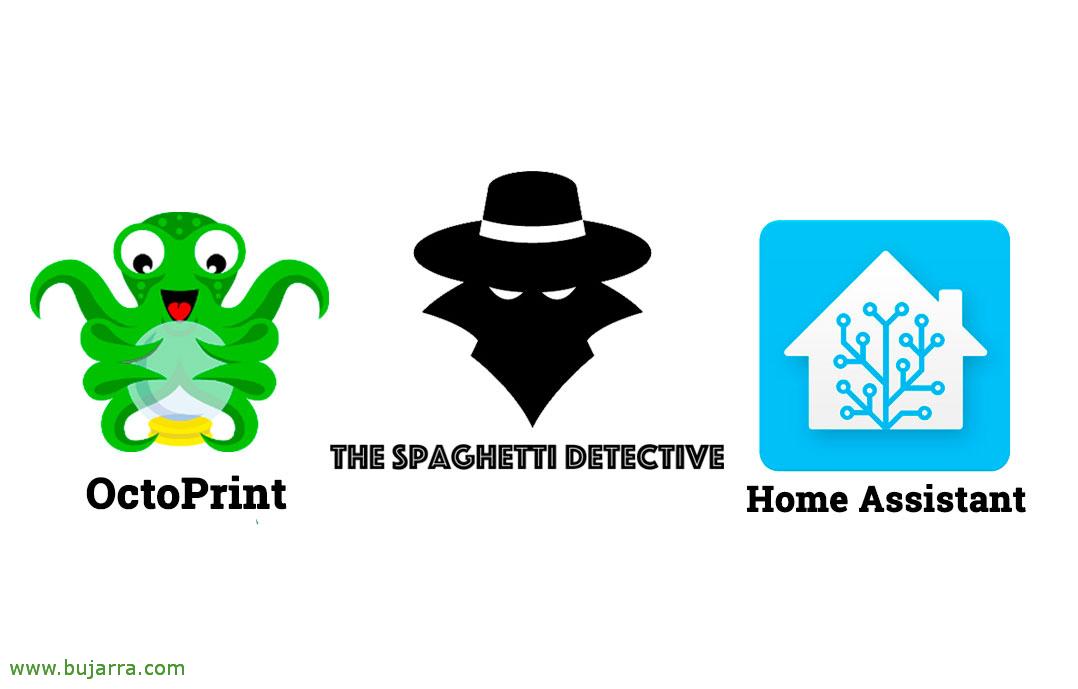
Controlling our 3D printer with OctoPrint, The Spaghetti Detective and Home Assistant

Well, I think this will be a wild post, So I'm apologizing to you from now on… Well what? We'll try to see how to install OctoPrint to control our 3D printers, we will continue with The Spaghetti Detective so that someone looks for us during the printing and if something inopportune happens stop the printing, or do what you have to do. And we ended up integrating this with Home Assistant, with the idea of creating automations and centralizing government.
In the end I was encouraged to write this post, it's not that it's the 3D printer-themed blog, but as it is perhaps common for many geeks to have them, and it is interesting that we can learn about this type of solutions and integrations between them.
We'll start with Octoprint, that we will install it on a Raspberry Pi, or if you prefer and are more comfortable, You can directly download the SD card image and that's it. This Octoprint will allow us to manage the 3D printer remotely and wirelessly, as well as the most common tasks such as sending something to print, See how it goes, Stop… Then what has been said, we will continue to set up our own server of The Spaghetti Detective, which as its name suggests will investigate and alert us in case of seeing spaghetti or if the piece moves, in certain, If printing fails, and all this through a webcam. And at the end of the post what I said, we will integrate Octoprint with Home Assistant to be able to manage it from there directly and we have the possibility of doing some automation.
.
Installing OctoPrint,
What I said, or we download the image directly and forget about these steps, or if we want, in our Raspbian we can install it, to the consumer's taste. Steps to install it manually:
Sudo apt update sudo apt install python-pip python-dev python-setuptools python-virtualenv git libyaml-dev build-essential mkdir OctoPrint && cd OctoPrint virtualenv venv source venv/bin/activate pip install pip --upgrade pip install --no-cache-dir octoprint sudo usermod -a -G tty pi sudo usermod -a -G dialout pi ~/OctoPrint/venv/bin/octoprint serve
.
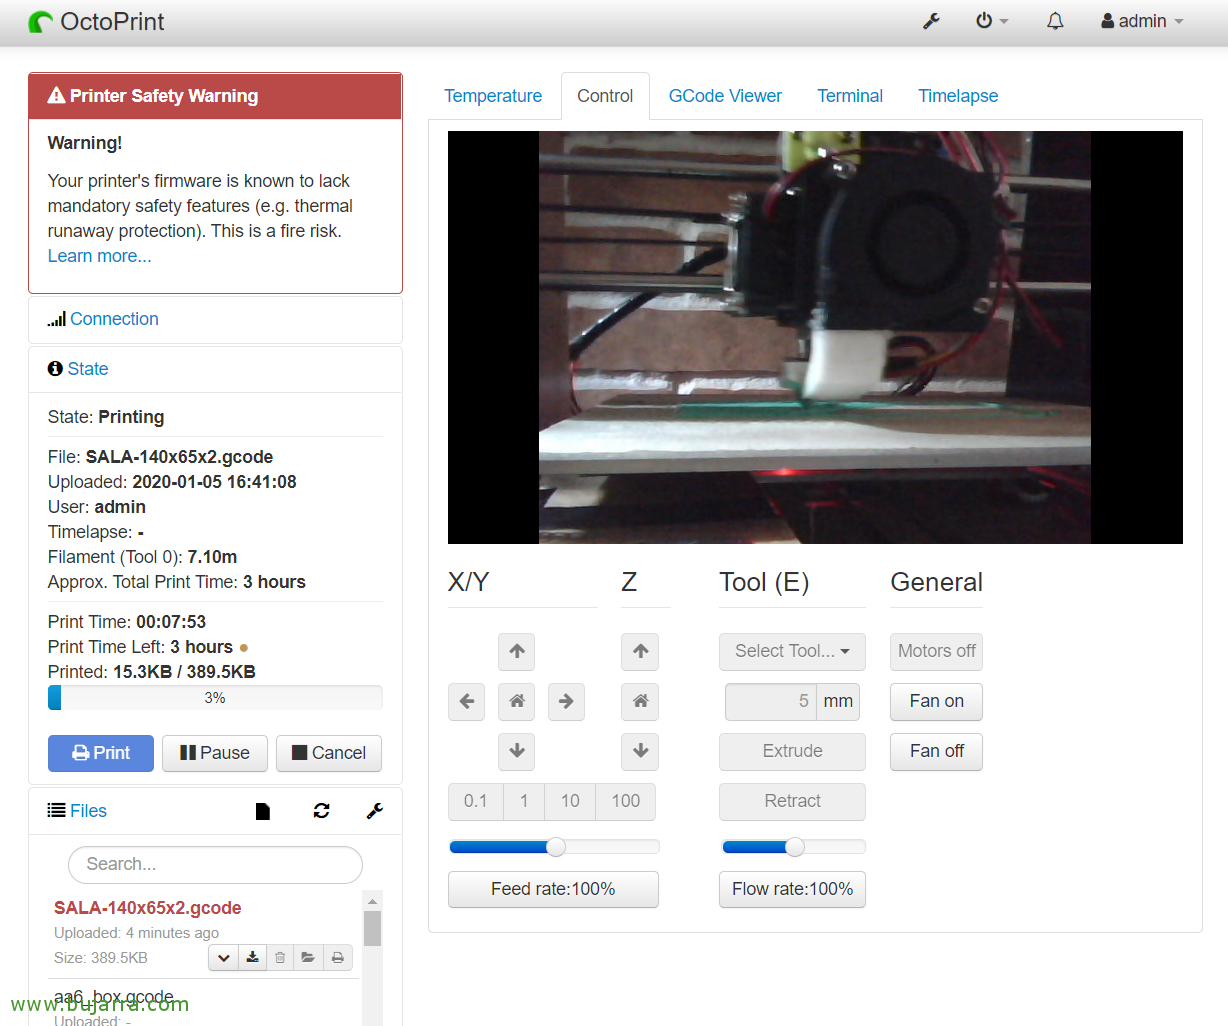
And we can open the browser against the IP address of the Raspberry Pi that OctoPrint has, after a simple initial welcome assistant, where among other options we will have briefly configured which printer we have. Remember to connect the USB cable between the Rasbperry Pi and the printer board, After that, We can connect to the printer now.
And take a look at the fact that the GUI is quite simple and very easy to use.
If you look closely, These screenshots are from a long time ago, where it even gave me an alert because the firmware that my Anet A8 used was one of those dangerous ones that could catch fire… Today that is already corrected with Marlin 🙂
.
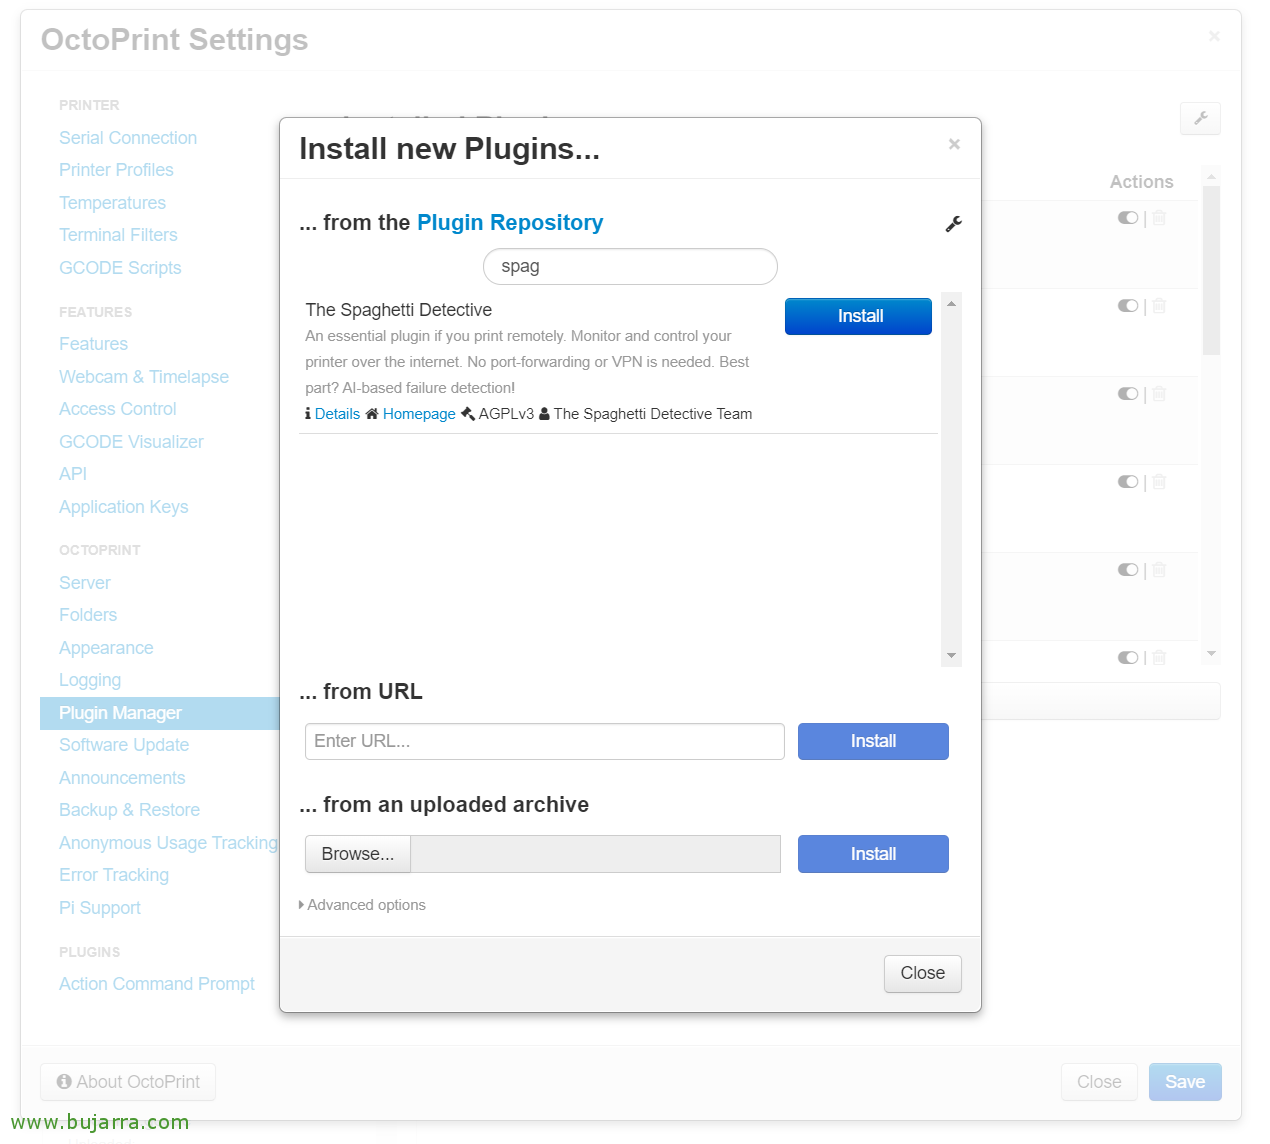
What we will have to do, will be to install The Spaghetti Detective Plugin in OctoPrint, To do this, we are going to “Settings” > “Plugin Manager” > “Get More…” and we write “The Spaghetti Detective”, will appear in the list and click on “Install…”
.

When it is finished we give it “Restart now”, for now we finish with OctoPrint, Then we come back.
.
Install The Spaghetti Dectective
TSD will require at least 2GB of RAM, so maybe if you have a Raspberri Pi prior to the 4 You won't be able to do much, in my personal case I have it running under a virtual machine. Here are the steps you'll need to have it installed, we will need to install Docker beforehand and then it will be as simple as cloning the repository and lifting the container with everything ready. If you want more info, Its official site.
apt-get install docker docker-compose git clone https://github.com/TheSpaghettiDetective/TheSpaghettiDetective.git cd TheSpaghettiDetective sudo docker-compose up -d
.

Once the container of The Spaghetti Dectective has been lifted, we can with a browser go to the Django admin website: HTTP://DIRECCION_IP:3334/Admin
Default, We will enter as rho**@*****le.com with Supersecret password
.
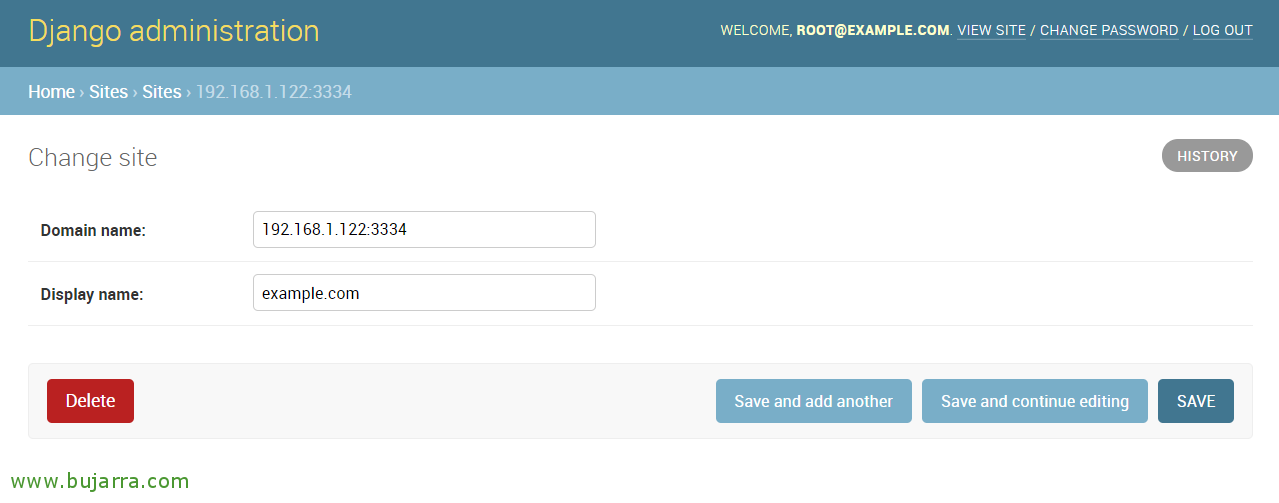
On the Django administration website, We're going to “Sites” and in “Domain Name” We indicate DIRECCION_IP_TSD:3334 and click on “Save”.
.
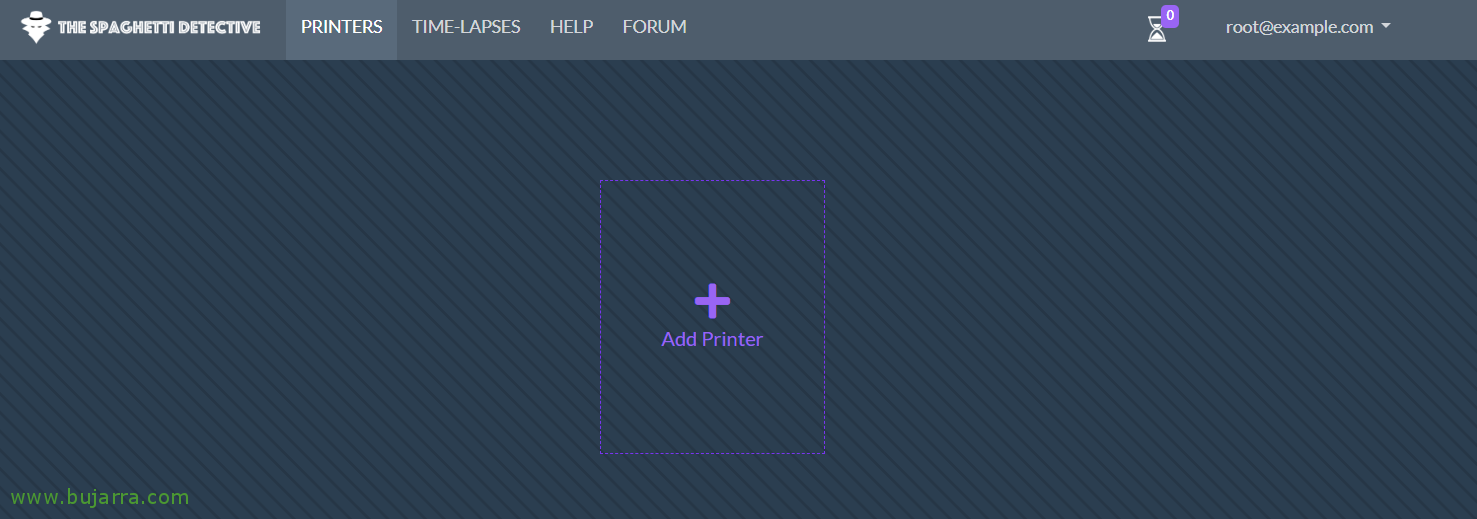
Now, If we go to the HTTP interface://DIRECCION_IP_TSD:3334/ we can add our printer from the “Printers” > “Add Printer”.
.
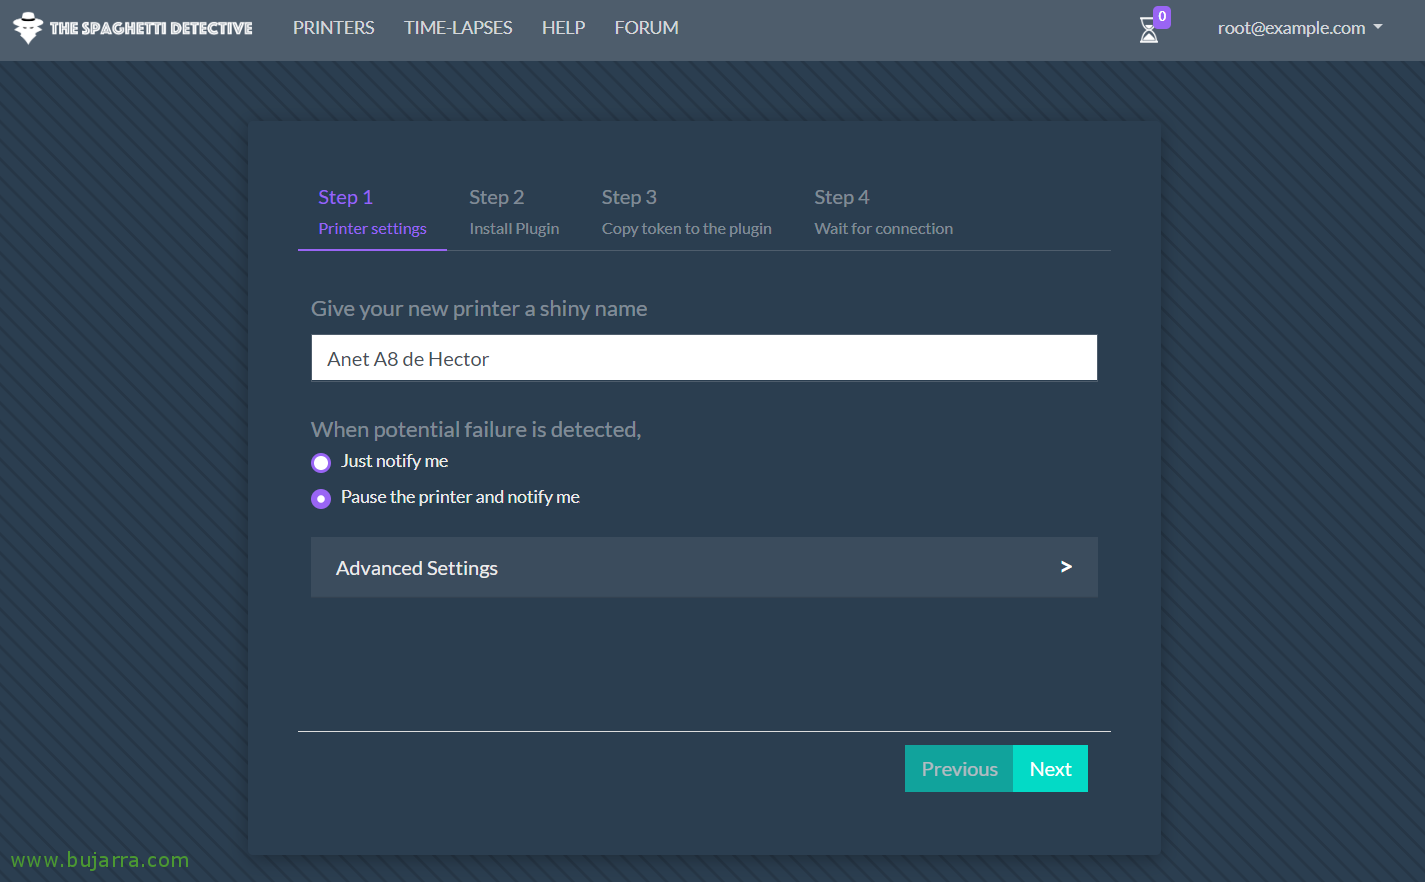
We complete the wizard, We give the printer a name and what to do in case of failure, “Next”,
.
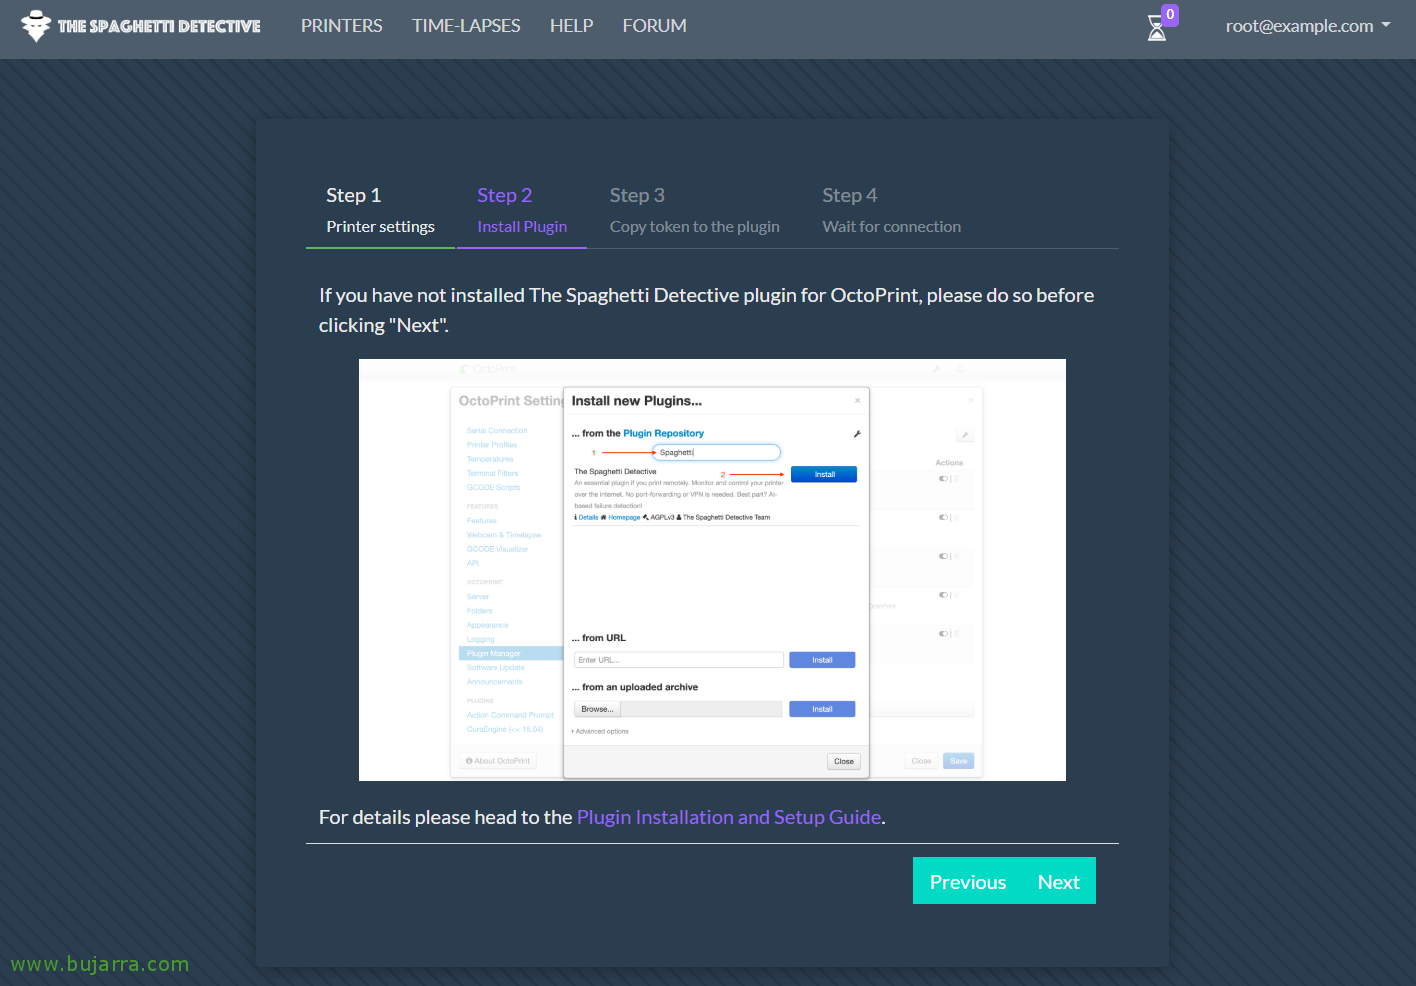
It tells us to install The Spaghetti Dectective Plugin in OctoPrint, something that we have already done before if you remember. “Next”,
.
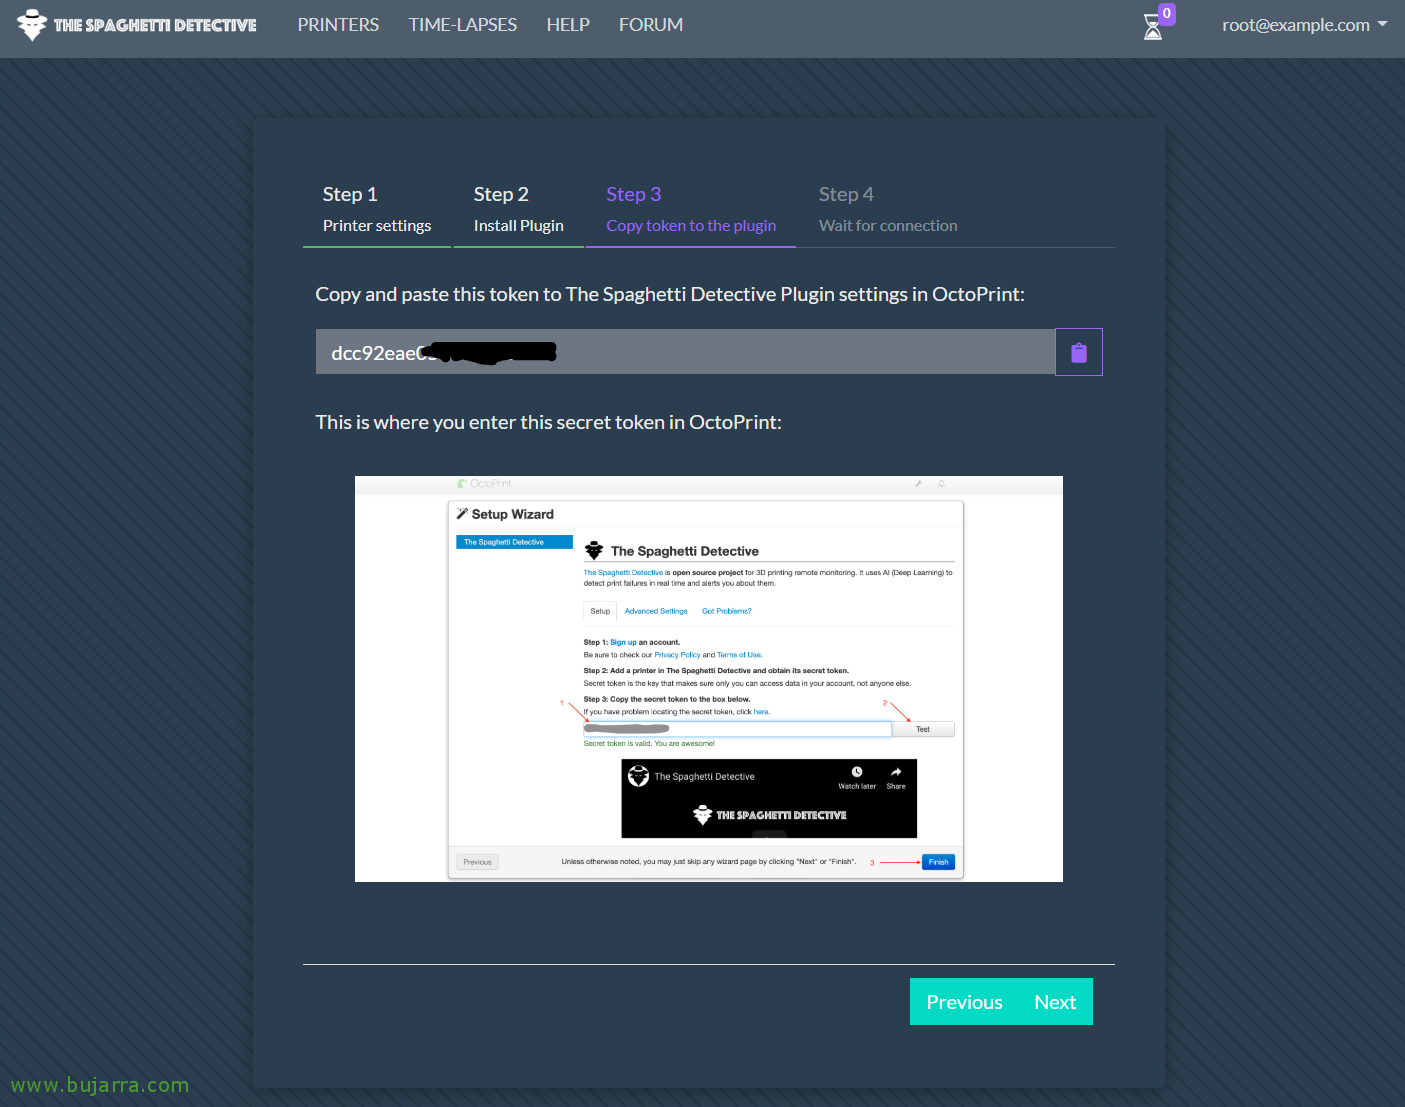
Now it asks us for the Token to have access to OctoPrint, Where do you get that from? I leave it in the following screenshot.
.
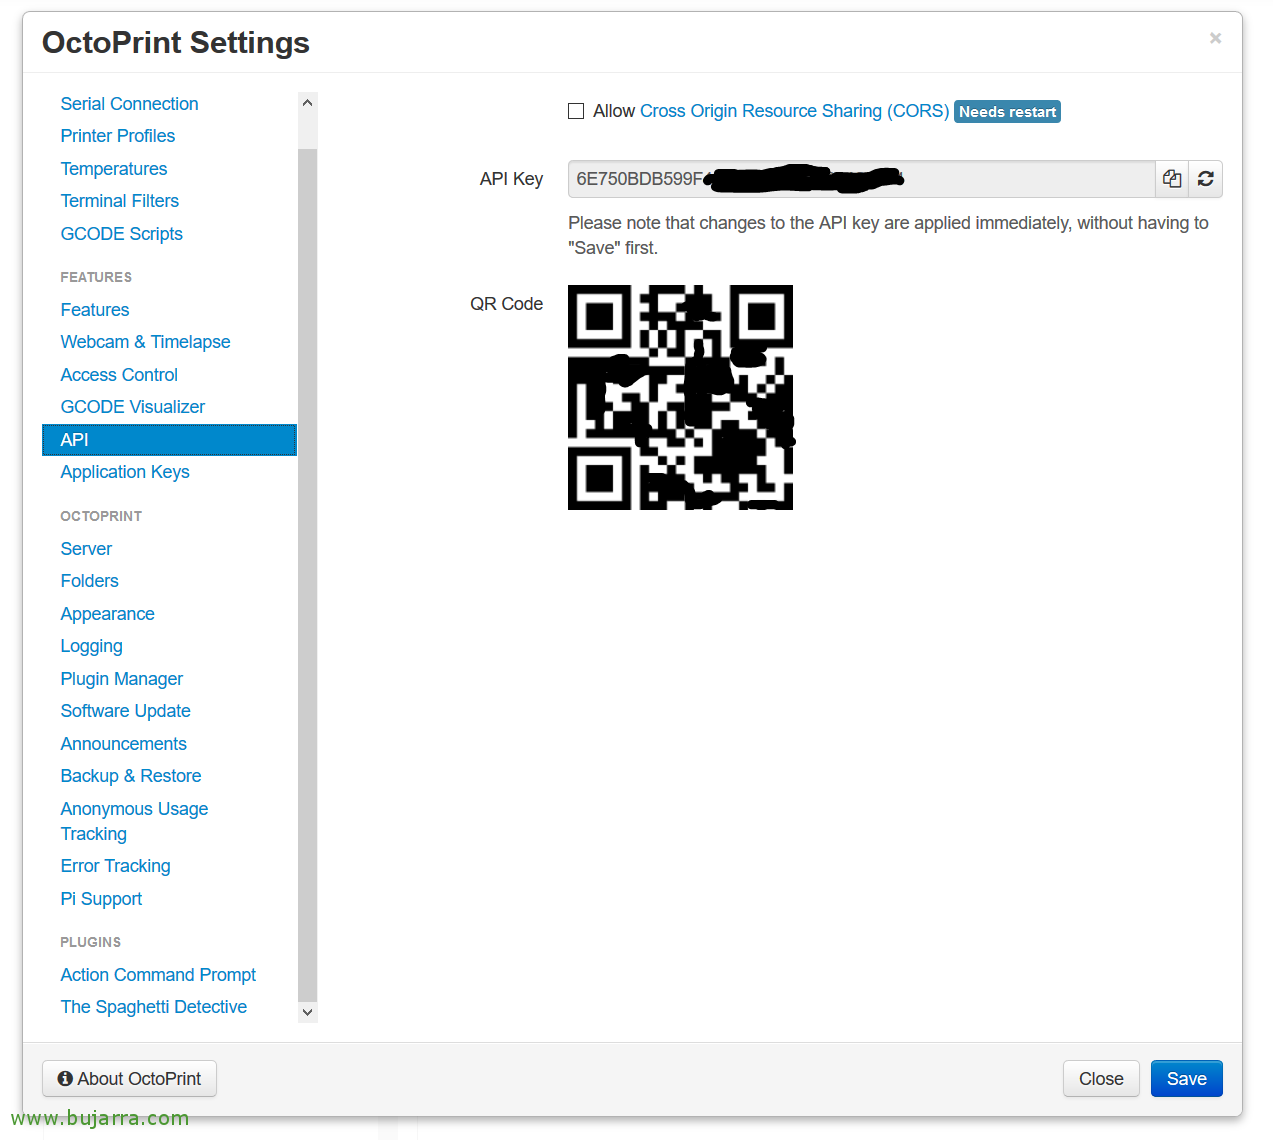
If we go to the OctoPrint Settings > “API” There you will have it. If someone is bored, the QR code is modified 😉
.

By the way, let's not forget in the OctoPrint Settings themselves to configure the IP address of The Spaghetti Dectective server. And record the changes.
.
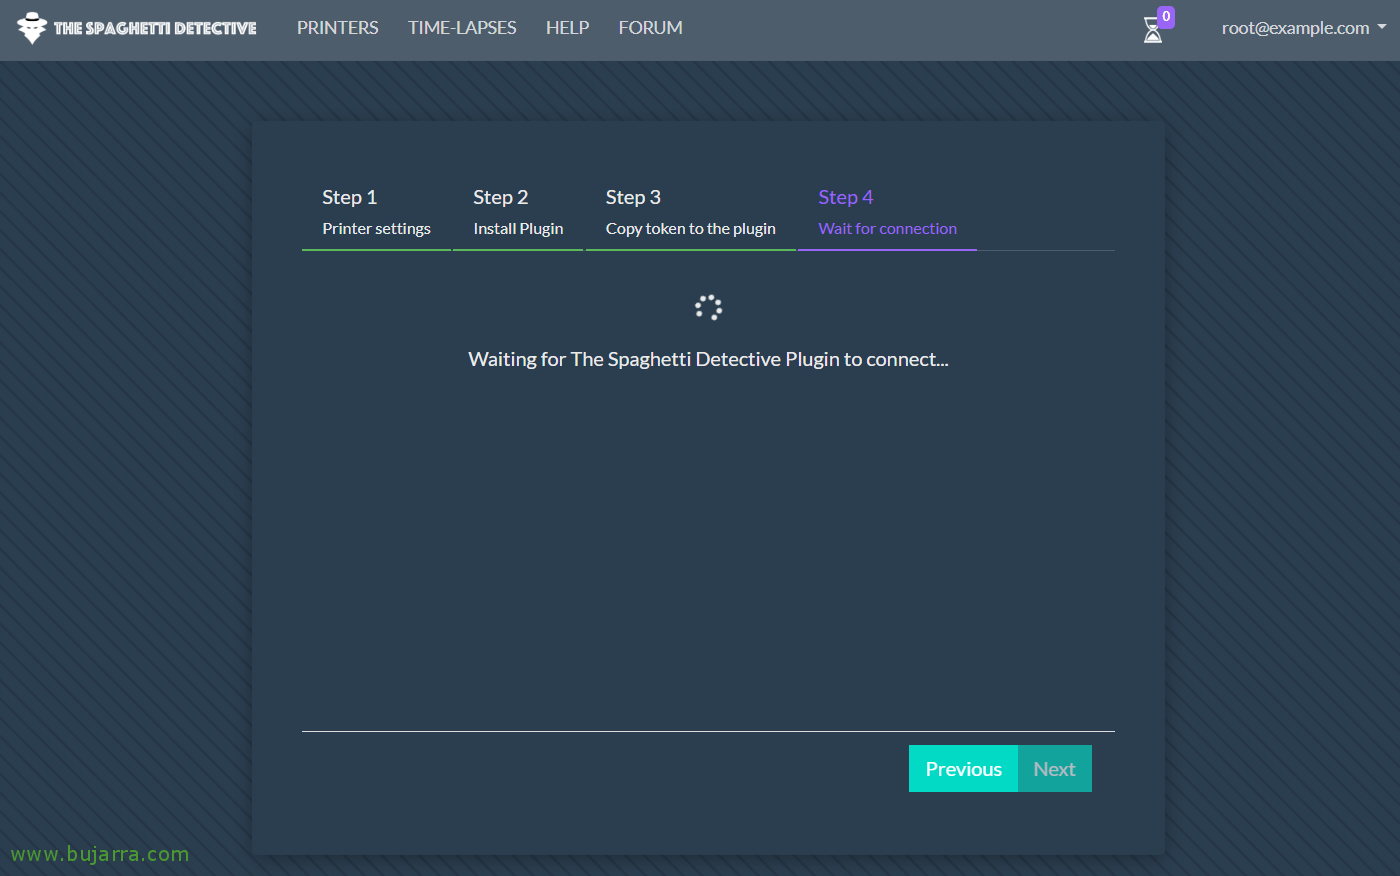
Total, that then we could continue with the assistant and wait for them to connect…
.

¡Perfect! We've got everything ready.
.
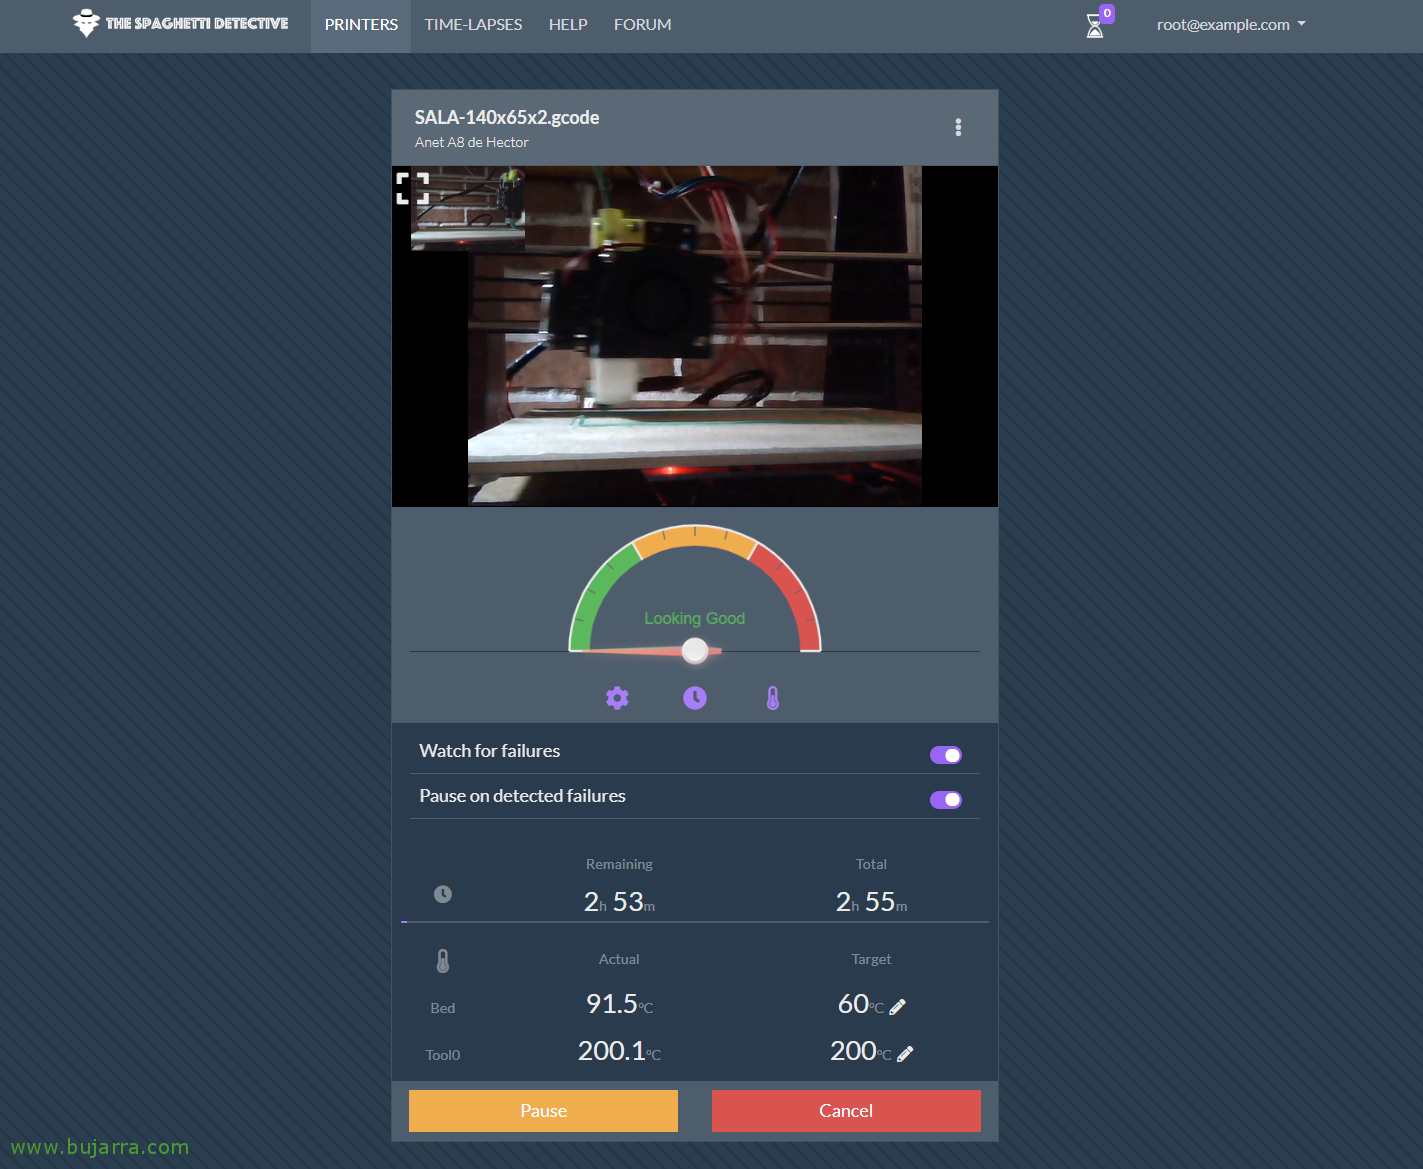
We will be able to see that TSD connects perfectly to our OctoPrint, and we'll see the print live, where we will see how it detects in real time if there is any fault… Also, remember that you can configure from here directly to make some timelapses, You'll see how cool they are.
By the way, If there is any doubt, the camera is connected to the Raspberry Pi running OctoPrint, either a generic webcam via USB or the proprietary camera module with the flexible cable.
And there's not much else left to do, With this we will have our prints and printers safe, If something happens and we're not there, We will find out.
.
Integrating OctoPrint with Home Assistant,

If we want to have this interface, to be able to know the status of our 3D printer from the Home Assistant itself, with the idea of continuing to centralize all our smart home devices… Well, we have it very easy, as usual, We edit our configuration.yaml and add the following:
Octoprint:
  host: DIRECCION_IP_OCTOPRINT api_key: XXXXXXXXXXXXXXXXXXXXXXXXXXXXXXXXXXX name: Anet A8 bed: True # true if our printer has a bed that heats up number_of_tools: 1 # Number of camera nozzles:
  - Platform: mjpeg name: OctoPi still_image_url: HTTP://DIRECCION_IP_OCTOPRINT/webcam/?action=snapshot mjpeg_url: HTTP://DIRECCION_IP_OCTOPRINT/webcam/?action=stream
.
And with that we have everything ready, we restart Home Assistant and add the entities to a card, ¡The end!

Well, With the latter we leave it for today with this post, is an example of an automation based on the condition of our 3D printer, That as we can see, when the printing is finished it will send a Telegram message and will also notify us through the speakers at home 🙂
As usual, I hope it has been of interest to you and thank all of you who give those Likes and Recommendations on social networks.