Deploying Crowdsec on a Linux machine

We continue with Crowdsec! we have already seen in previous documents the basic concepts and how to deploy it centrally and even in a Windows, so today we will see the steps we must follow if we want to install the Crowdsec agent on a Linux computer to protect it from external threats.
As you can imagine, The installation will depend on the distribution used by the machine, This document will be based on the installation on an Ubuntu Server, I think I remember a Nginx serving some web page. So let's get to it, habitually, it is understood that we will do it on a Linux server, that has a service published and we want to protect; and does not necessarily have to be published on the Internet. We'll start by installing the Crowdsec Security Engine for you, which is the agent that will be in charge of processing your logs, Make your decisions… Then we will install the bouncer (o Remediation component) for your Linux firewall, of your OS (iptables in this case), in case we are interested in acting and can register rules in it, blocking temporary access to evil IP addresses. And we'll end up registering it in the Crowdsec Console.
With that we will have it almost, as the post will continue, will be optional, but if you are going to want centralized management, You will need to take some additional steps; And that's it, A choice of yours. If you need, You must read yourself before The previous post.
This post has the following structure:
- Crowdsec Agent Installation
- Installing the Crowdsec Firewall iptables bouncer
- Registering Crowdsec vs. Crowdsec Console
- Collections
- Whitelist
- Notifications
- Testing it
- Registering Crowdsec against our LAPI server
- Registering the Crowdsec bouncer against our LAPI server
Crowdsec Agent Installation
What I said, this installation is based on an Ubuntu Server, If you have another distribution, Check out the Official Website. We started by installing the official Crowdsec repositories using:
curl -s https://install.crowdsec.net | sweat sh
And we installed Crowdsec, that as we already know, it will detect the services that we may be using on the machine and will also download its collections to protect them, Started:
sudo apt install crowdsec
Installing the Crowdsec Firewall iptables bouncer
Once the Crowdsec agent is installed, we also know that if we do not install a bouncer we will not be able to perform actions on this machine, So we'll install this remediation component, in my case being Ubuntu I use iptables, so we proceed to its installation:
sudo apt install crowdsec-firewall-bouncer-iptables
Registering Crowdsec vs. Crowdsec Console

I imagine that we will already have an account in https://app.crowdsec.net we know that we can create it to manage all our Crowdsec from a GUI console in a centralized way, Not required, and we have a Community version with which you can also do many things, Including, then view machine alerts, Your Status, we can subscribe them to different blocklists…. We continue to add our Crowdsec, installation on this Linux. We copy the command that we must execute.

And we stuck it on a system console, Run:
sudo cscli console enroll xxxxxxxxxxxxxxxxxx
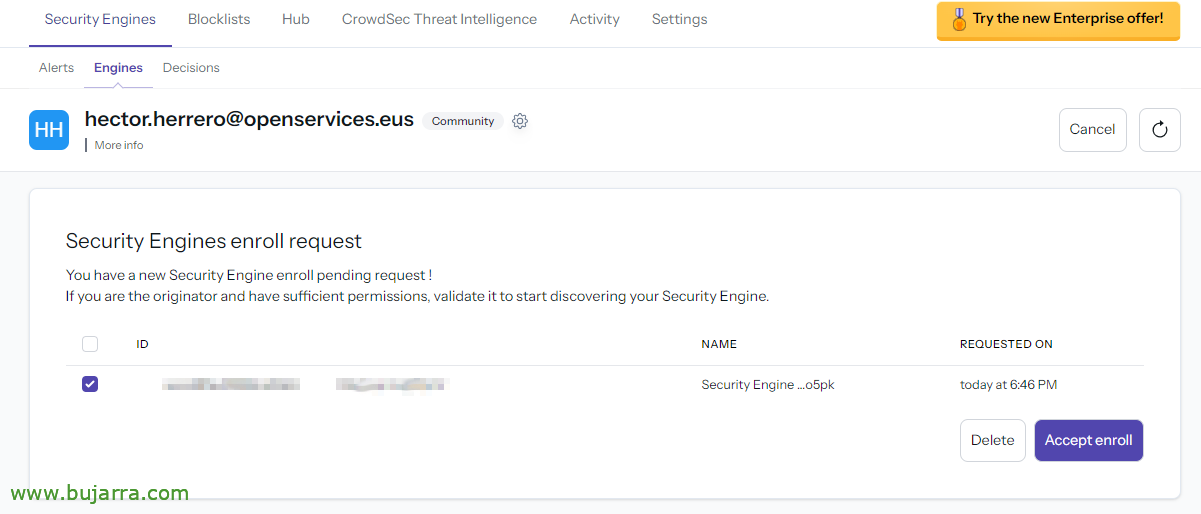
We return to the Crowdsec Console and accept the roll,
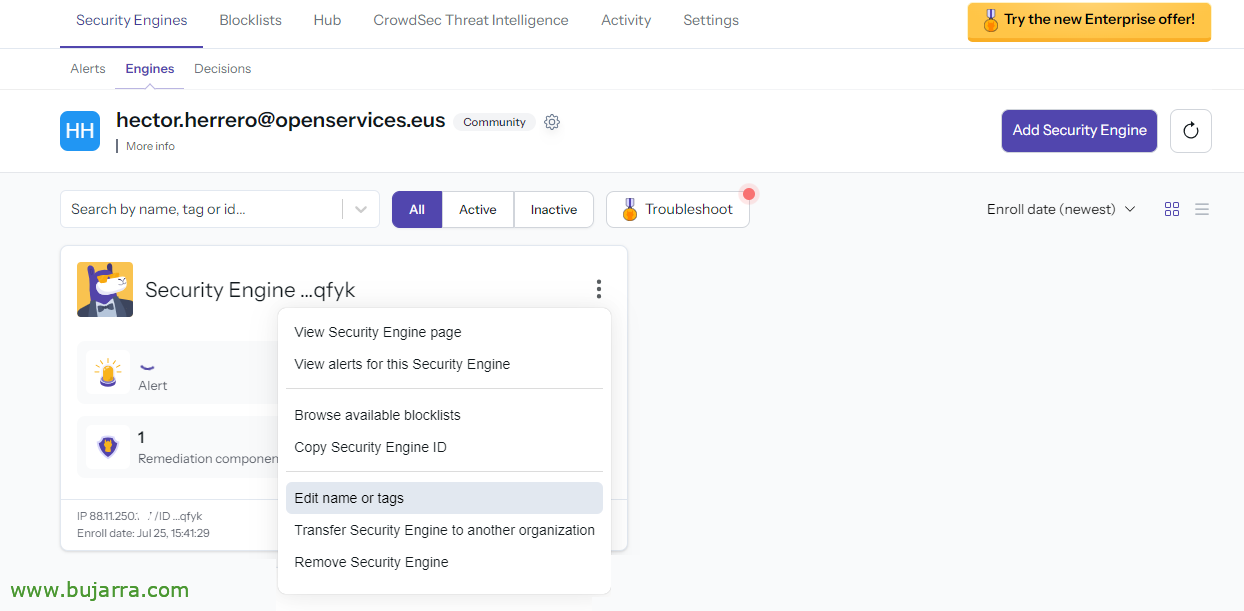
About the newly added Engine, we edit the name and we will put one that refers to who it is,

Habitually, We indicate the name of the machine, and we give “Update”,
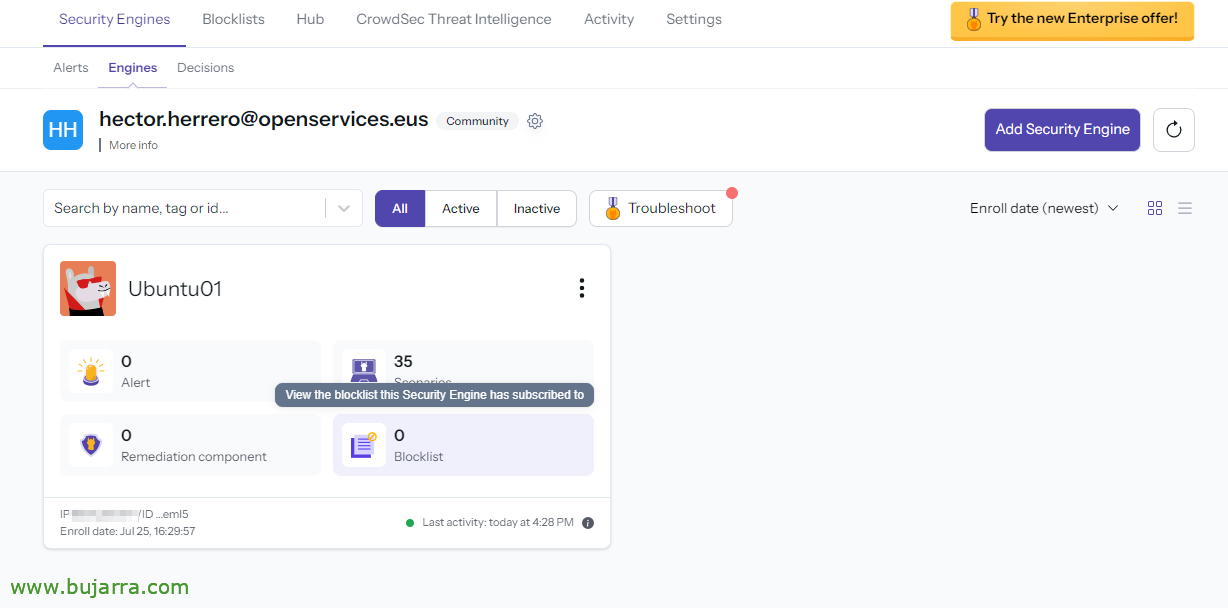
And if we want to, The next thing can be to add some blocklists, for this, We can press your “Blocklists”,

If we are already subscribed to a blocklist, we can select it from “Manage”

And click on “Add Security Engine” to add this machine to this blocklist,
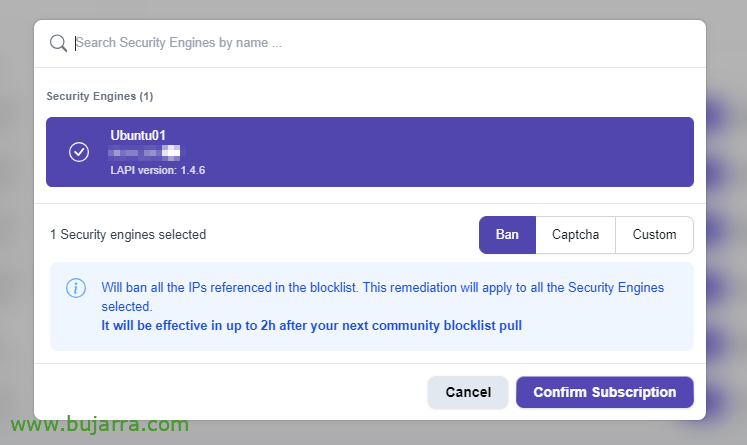
We choose a type of action and confirm. Subscribed Machine!
Remember that after registering Crowdsec against the Console you have to restart the Crowdsec service that you have.
sudo systemctl restart crowdsec
Collections

As we already know. by default Crowdsec when installed on a machine scans for the services we have installed and tries to protect them, In this case, on my Linux only the one from the base has detected me, that is, the OS and SSHd. If I had a Nginx, for example, I would have installed its collections, or for Grafana… to list the collections:
sudo cscli collection list
We will be able to search for more collections in your Hub, collections made by them or by the community, that can protect other services we have, as if for example we have installed Nginx a posteriori and we want its collection, Execute:
CSCLI Collections Install CrowdSecurity/NGINX
And we should add in your procurement file '/etc/crowdsec/acquis.yaml’ The content below, do not worry that the Hub is detailed in each case what to do, we fix the paths of the Nginx logs… and the service would also be protected.
filenames:
  - /var/log/nginx/access.log
  - /var/log/nginx/error.log labels:
  type: Gypsies
---
As well as for example if this Nginx in this Ubuntu serves Nextcloud, Well, we should also put his collection in it, and thus integrate and prevent any improper access, read and process Nextcloud logs to then make decisions.
CSCLI Collections install crowdsecurity/nextcloud
And we add the following to the file acquire.yaml (I insist this is documented in the Hub):
filenames:
 - /var/log/nextcloud/nextcloud.log labels:
  type: Nextcloud
---

Source: Reportedctl journalctl_filter:
  - "SYSLOG_IDENTIFIER=Nextcloud"
labels:
  type: syslog
---
Remember to restart the Crowdsec service when you have made a substantial change:
sudo systemctl restart crowdsec
Whitelist
The whitelist, as we already know, will help us to exclude, for example, an IP address from being banned or blocked by Crowdsec, usually they can be the IP addresses of a checkpoint, Jumping equipment, etc… As well as among others we can also exclude countries, For example.
Name: crowdsecurity/whitelists description: "Whitelist events from private ipv4 addresses"
whitelist:
  reason: "Private IPv4/IPv6 IP/Ranges"
  IP:
    - "127.0.0.1"
    - "::1"
    - "192.168.1.33"
  Cidr:
    #- "192.168.0.0/16"
    #- "10.0.0.0/8"
    - "172.16.0.0/12"
  # expression:
  #   - "'foo.com' in evt. Meta.source_ip.reverse"
The file can be found in '/etc/crowdsec/hub/parsers/s02-enrich/crowdsecurity/whitelists.yaml', and we will see that we can simply add any IP or IP range to the exclusion whitelist.
If we want to exclude countries, We must first install the GeoIP-Enrich parser that will feed the logs with geolocation data, such as countries, cities or GPS coordinates:
CSCLI Parsers Install CrowdSecurity/GeoIP-Enrich
And it will be enough to add the following expression in the whitelist file:
expression:
  - evt. Enriched.IsoCode == 'ES'
Remember to restart the Crowdsec service to reload these changes.
sudo systemctl restart crowdsec
Notifications
Notifications:
  - slack_default
  - splunk_default
  - http_default
  - email_default
We can enable notifications by editing the file '/etc/crowdsec/profiles.yaml', where we can uncomment and select the type of notification that interests us, What can they be to Splunk, to Slack, by email, or with HTTP (for example Telegram).

If we want, for example, email notifications, in the directory '/etc/crowdsec/notifications/’ we would edit the YAML file email.yaml (o slack.yaml or splunk.yaml or http.yaml), where we will configure the parameters of our mail server. Those of us from Telegram saw it in a post Old man.
Testing it
We'll end up trying it, won't we?? if not how do we trust this to work? 🙂 You can do the wrong entrance exams you want, or validate it with a vulnerability scanner, or websites… In that old document you have an example with Nikto.

You can see the decisions your machine has made with:
CSCLI Decisions List
In this case you have banned the IP address 192.168.1.122 because I have put a vulnerability scanner to check it and it has immediately detected that it was tracking things that it should not…

Or from the LAPI server if we have registered it (What comes next)
docker exec -it crowdsec-crowdsec-1 cscli decisions list

If we have already deployed the Crowdsec Mirror, we will be able to verify that the banned IP address appears in the URL where we publish our http blocklist://DIRECCION_IP_CROWDSEC_MIRROR:41412/security/blocklist
If we want to ban an IP address, We will do it with:
cscli decisions add --ip DIRECCIÓN_IP --reason "Description"
If we want to unban an IP address, We will do it with:
cscli decisions delete --ip DIRECCIÓN_IP
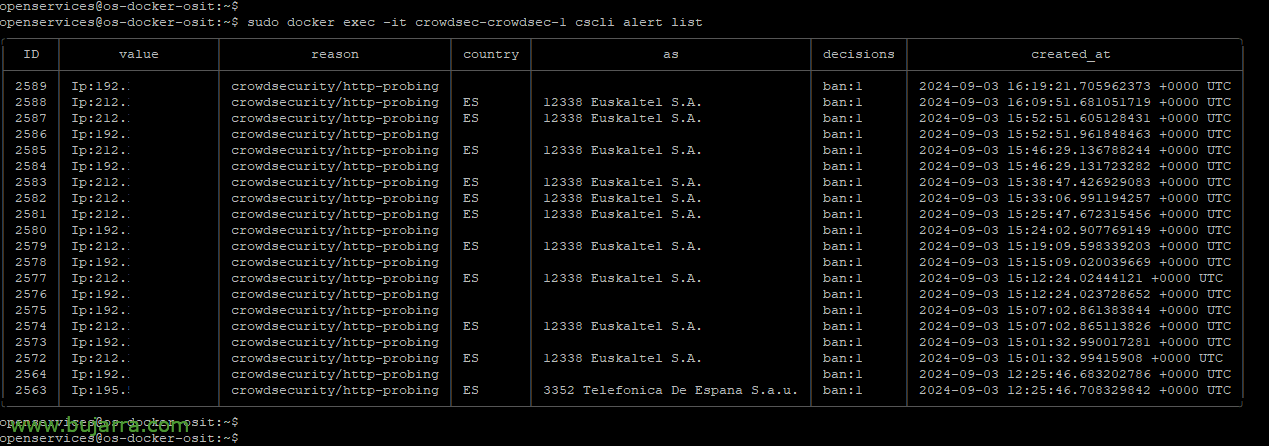
We will be able to investigate the alerts we have had with:
cscli alert list
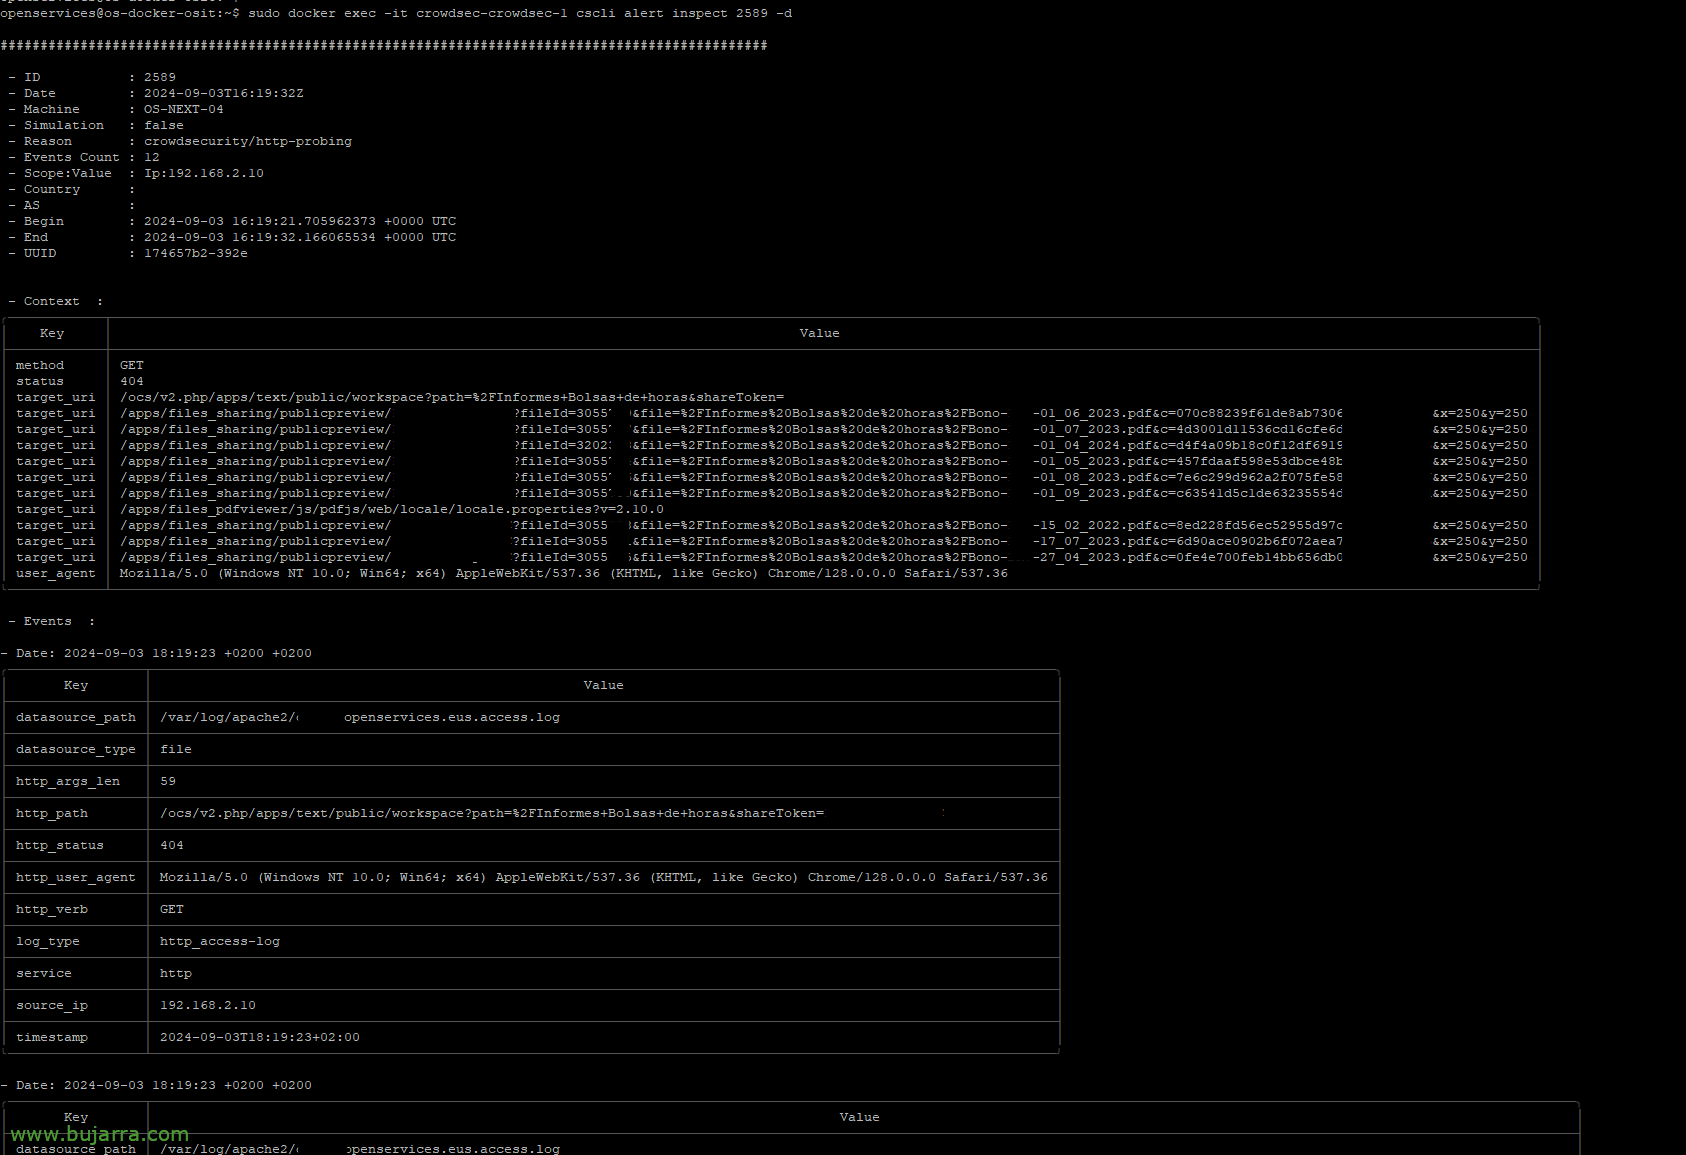
With the previous command we list them, and now selecting the ID of a particular alert and we will be able to know which log file generated it, What I was doing, The path, HTTP status… in this case of the image there are many 404 al path /apps/files_sharing/publicpreview/
CSCLI Alert Inspect ID_ALERTA [-d]
And, if we need it, create our own Whitelist file to make exclusions in cases of false positives, pej at '/etc/crowdsec/parsers/s02-enrich/whitelist-permite-pdfs.yaml, You can use these example expressions to make exclusion filters:
Name: crowdsecurity/mylistablancapdfs description: "Ignore PDFs"
whitelist:
  reason: "ignore PDFs"
  expression:
    #- evt. Meta.http_path startsWith '/apps/files_sharing/publicpreview/'
    #- evt. Meta.http_status == '404' && evt. Meta.http_path startsWith '/apps/files_sharing/publicpreview/'
    - evt. Parsed.request contains '/apps/files_sharing/publicpreview/'
As usual, without forgetting to restart the Crowdsec service with each configuration change.
Registering Crowdsec against our LAPI server
API:
...
  Server:
    enable: False
...
We need to disable the local LAPI, Editing the file '/etc/crowdsec/config.yaml', We added the enable false.

Then we register against the LAPI server that we have deployed on the network:
Sudo cscli lapi register -u HTTP://DIRECCION_IP_CROWDSEC_LAPI:8080 --Machine NOMBRE_MAQUINA

On the LAPI server we will be able to see the registration request of the Linux machine, We list with:
Sudo Docker Exec -it CrowdSEC-CrowdSEC-1 CSCLI Machines List

We accept the registration request and relist to confirm the status:
Sudo Docker exec -it CrowdSEC-CrowdSEC-1 CSCLI machines validate NOMBRE_MAQUINA
Now our Crowdsec on Linux will communicate and read from the LAPI server any decision, therefore using the central server. If the rest of Crowdsec's agents would do the same, all of them would have the same information in common, and therefore, when a machine suspects an IP is evil, the rest of Crowdsec's agents will know it instantly.
Always remember to restart Crowdsec after any modification:
sudo systemctl restart crowdsec
Registering the Crowdsec bouncer against our LAPI server
And to conclude, we must also register the bouncers we have, in this case the Ubuntu firewall bouncer, for iptables; if we want that bouncer to read from the central LAPI, We must follow these steps, This is what has been said, when someone or something adds an IP to the central LAPI, this operating system firewall will make a rule denying access to said malicious IP.

From the LAPI server, We can first if we want to list the bouncers that we have registered with:
Sudo Docker exec -it crowdsec-crowdsec-1 cscli bouncers list
And to register the firewall bouncer of this Ubuntu, Execute:
sudo docker exec -it crowdsec-crowdsec-1 cscli bouncers add NOMBRE_MAQUINA-FW
We write down the API Key that has given us,
...
api_url: HTTP://DIRECION_LAPI_SERVER:8080
api_key: xxxxxxxxxxxxxxxxxxxxxxxxxxx
...
We edit the file /etc/crowdsec/bouncers/crowdsec-firewall-bouncer.yaml and put the IP of the LAPI server, its port and the API Key that gave us the previous command. Save the file and restart the firewall bouncer service:
sudo systemctl restart crowdsec-firewall-bouncer

And the FW of the registered Ubuntu team will come out, we verify it with:
Sudo Docker exec -it crowdsec-crowdsec-1 cscli bouncers list
I hope you found it interesting, I wanted to make a guide to 3 base documents and with this it is settled, we have already learned how to install Crowdsec on a Linux computer, on a Windows, and we have generated a centralized management where all the agents talk to each other and tell each other if there is an attacker, in addition, with lists published to perimeter or internal firewalls so that they can block them too and isolate any possible attacker. Well, the usual, It's getting late, Look at what times… 😉 Have a great week!