Protecting our machines with Crowdsec – Part I

Be careful, this is the… I am sorry, But it's true… For those who still don't know it, in a series of posts I intend to show some of the wonders of Crowdsec and how we can protect our infrastructure from attacks or improper access.
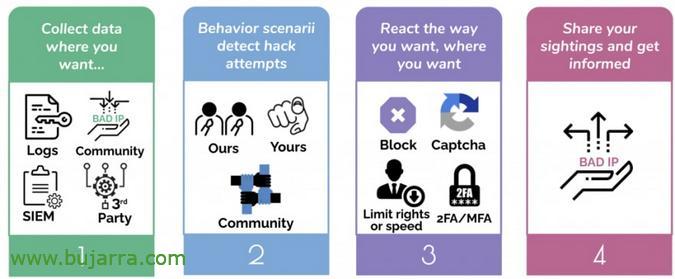
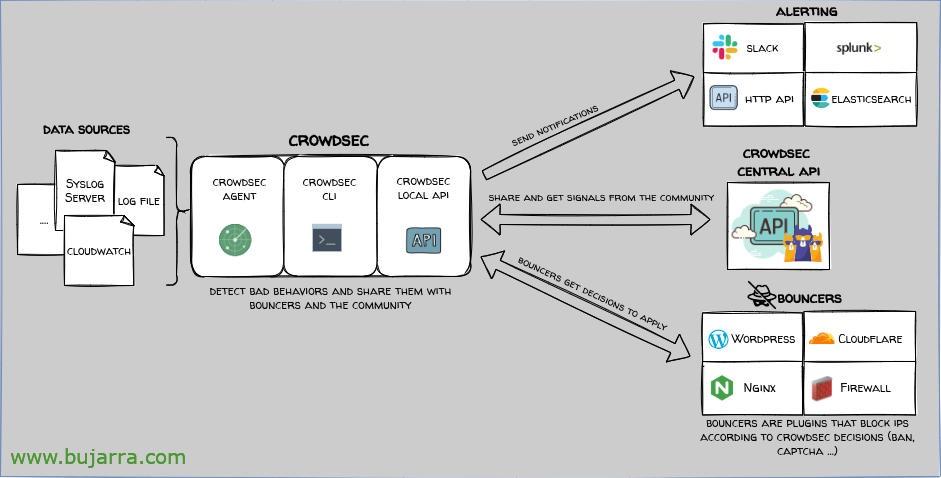
Before you start describing the product as such, of its architecture… Let's start thinking that I was a happy fail2ban user until I discovered Crowdsec. It turns out that Crowdsec, is an IDS and an IPS, Detects and blocks access to machines, I don't care if it's a machine on a LAN, than a service published on the Internet, be a Linux, Windows or Container. Crowdsec if it detects a DDoS attack, a port scan, A vulnerability scan, or simply incorrect accesses (To that website if it is a website, to that RDP if it is a Windows, SSH, CIFS…). Crowdsec will detect that improper access and take an action, The most normal thing, Get him banned, ¿how? well, among others, from the OS's own firewall (Windows, Linux…). So Crowdsec will create a rule in the OS's FW to block that source IP. In addition, Obviously,, Crowdsec will also read the logs of our apps, services… and based on what I see, Act, Watch out attackers.
Well, If only that were, I didn't tell you it was the, Still, Still… Crowdsec is free software, which has a commercial part if you want and we will not see in this series of posts, So what we're going to see in this series will be all open. Total, that Crowdsec detects behaviors, Reputation-based and threat management, but it also has a public IP address blacklist, shared and nurtured by all of us who use Crowdsec; so when there is a majority who detect a threat, We will all be alerted and forewarned!
Wait we ain't done, it turns out that Crowdsec can be installed as we have said on Windows, macOS, Linux, Kubernetes, Docker, OpenWRT… well, thanks to the Crowdsec API, our machines will also be able to share a blacklist of IPs with each other. That is, that if someone attacks me a machine, the rest will block your access before you try, curious… Well, Crowdsec will actually detect and the 'bouncer'’ Act (Then let's get to that).
There's a lot more to go, we will see it little by little, what if notifications by Telegram, the web console you have, that integrates with Prometheus, Grafana… But, Do you want to know, in my opinion, the most curious thing of all?? Maybe you think it's bullshit, For me it's the bomb. ¡¡¡Attentive!!! for it is, that if we have a corporate firewall in the company, A real perimeter, a Fortigate for example, a pfSense… We can make these firewalls feed on those blacklists as well! Oh! And have rules in our firewalls (On top of everything) that deny access to said black IPs to other machines, Network Segments… ¡Oh my God!
It's lightweight, modulate, Simple to set up… Well, Let's start because I talk a lot 😉
In this first post we are going to know: How to Install Crowdsec on a Linux, The Basic Commands, How to Install Crowdsec on a Windows, Using the console, we do a test attack and finally how to manage alerts by Telegram. Next to nothing.
In other posts we will see how to do a multi-server installation, This is, that our machines share information, or integrate it with our Fortigate firewall…
Needless to recommend its official doc: https://docs.crowdsec.net
Install Crowdsec on Linux
Installation is very simple, let's start from an example that we want to protect an Nginx that runs on an Ubuntu, We install with:
curl -s https://packagecloud.io/install/repositories/crowdsec/crowdsec/script.deb.sh | Sudo Bash sudo apt install crowdsec -y
   ...
   INFO[11/12/2022:04:24:15 PM] crowdsec_wizard: Installing collection 'crowdsecurity/linux'    INFO[11/12/2022:04:24:21 PM] crowdsec_wizard: Installing collection 'crowdsecurity/nginx'    INFO[11/12/2022:04:24:24 PM] crowdsec_wizard: Installing collection 'crowdsecurity/sshd'
   ...
As we can see, when installing the Crowdsec agent for Linux, detects that we have SSHd and Nginx services, and therefore automatically and without doing anything else, it will already detect anomalies.
The next thing is, if we want an action to ban the source IP addresses, as we need to have a firewall installed and erected on the OS, that usually everyone brings it, We understand that we use iptables, It would also support NFTables, Ipset or P, depends on our OS. And we install the corresponding bouncer:
sudo apt install crowdsec-firewall-bouncer-iptables -y
Well, in principle now it would be ready, Machine Protected! 🙂 Take it now! Let's now do the same process on a Windows, to see the similarities, and then we follow in more detail perhaps the most interesting commands, we'll talk about the API… It is true that we have other details, that we will see.
Install Crowdsec on Windows
What I said, We do the same exercise, install Crowdsec on a Windows machine, with the aim of protecting it. And if someone tries to access by RDP and enters the wrong password (Default 5 times) Well, ban him, or by CIFS, Or whatever you want, Have a scan 😉

Before anything, download and install the .NET Runtime requirement: https://dotnet.microsoft.com/en-us/download/dotnet/thank-you/runtime-6.0.11-windows-x64-installer (or a higher version, It depends when you read this).

And we can proceed, we downloaded the MSI installer from https://github.com/crowdsecurity/crowdsec/releases/
“Following”,
“Yes baby”,
“Yes”,

We wait a few seconds while it installs…
And finish! We already have Crowdsec installed!

But beware, we are not finished, likewise Crowdsec will detect but will not be able to perform actions, for this we will need the bouncer for the Windows firewall. So, We download and install it: https://github.com/crowdsecurity/cs-windows-firewall-bouncer/releases
“Install”,

…

And now it is. Protected Windows PC!
Perform Test Attack
Before anything, Why don't we validate that this works? This is how we see some initial first commands. Nothing, Very simple, fearless, How to test it?
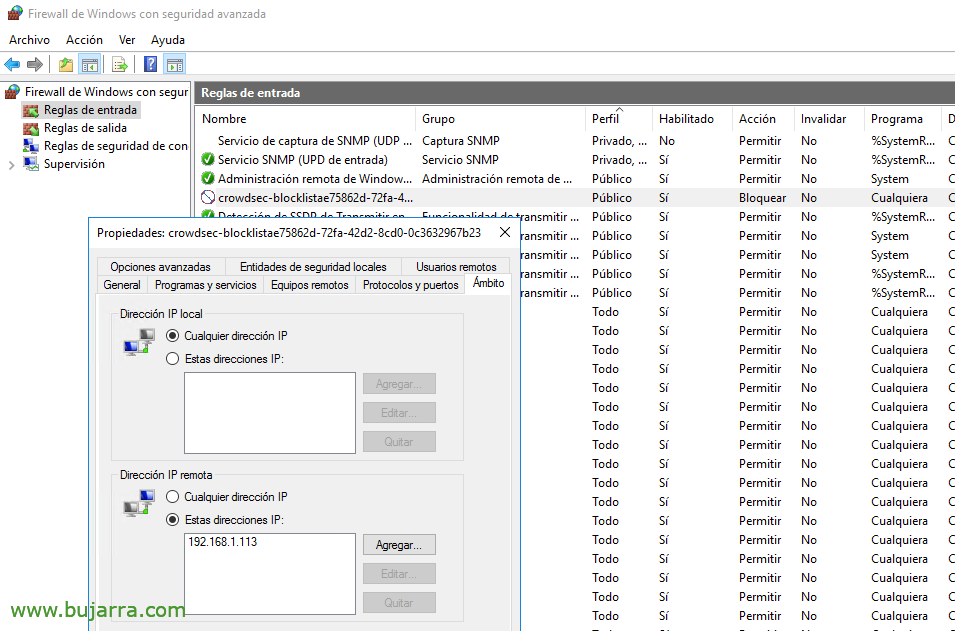
Well, the Windows computer itself tries to validate you 5 times with incorrect credentials by RDP (Remote Desktop), or through CIFS and a shared folder… If you want, you complicate it and do a port scan, or vulnerabilities… you'll see how the Windows machine blocks you.
It will create a rule in the native firewall with an exception denying any access from said malicious IP.
And the Linux team, if, for example, it carries a Nginx as was the previous case, Well, we can download Nikto which is a web server scanner, and we check if it detects it:
git clone https://github.com/sullo/nikto cd nikto/program git checkout nikto-2.5.0 ./nikto.pl -h https://XXX.XXX.XXX.XXX
After this the same thing, The Linux machine will deny us access immediately with an exception in the firewall.
Basic Commands
As an excuse we move on to the next point of the document, Minimum commands that we may be interested in knowing (We will know more later):
View the list of bans or blocks:
sudo cscli decisions list

And this will return to us that there are no bans, If we didn't do the test.

Or that it has detected a block and shows us its IP, Your reason, Blocking Time…
Manually banning an IP:
sudo cscli decisions add --ip DIRECCIÓN_IP --reason "Description"
Deban, or unblock an IP address:
Sudo cscli decisions delete --IP DIRECCIÓN_IP

Con 'sudo cscli alerts list’ we will see the alerts that have gone off, con 'sudo cscli alerts inspect ID’ we would have more details of each alert.

Con 'sudo /usr/share/crowdsec/wizard.sh -c’ we can enable/disable services to be monitored with Crowdsec.
In this file '/etc/crowdsec/parsers/s02-enrich/whitelists.yaml’ We will have the possibility of excluding a machine and whitelisting it, By default it brings 3 excluded ranges and if you were not detected by the test attack, Maybe you're going to shoot 😉 around here
Name: crowdsecurity/whitelists description: "Whitelist events from private ipv4 addresses"
whitelist:
  reason: "Private IPv4/IPv6 IP/Ranges"
  IP:
    - "127.0.0.1"
    - "::1"
  Cidr:
    #- "192.168.0.0/16"
    #- "10.0.0.0/8"
    - "172.16.0.0/12"
  # expression:
  #   - "'foo.com' in evt. Meta.source_ip.reverse"
Telegram notifications
Well, this last one and another day we will continue, that there is a lot to see and tell 🙂 By default and without messing up Telegram we could send notifications to Slack, Splunk, Email…
We edit the profile file '/etc/crowdsec/profiles.yaml’ And we uncomment on these 2 lines:
Notifications:
  - http_default
We edit as it says in '/etc/crowdsec/notifications/http.yaml’ Staying something like that, we must take into account changing the ID of the Telegram group and the Token:
type: http name: http_default log_level: Info Format: |
  {
   "chat_id": "-ID_CHAT_TELEGRAM",
   "text": "
     {{range . -}}
     {{$Alert := . -}}
     {{range . Decisions -}}
     {{.Value}} will get {{.Type}} for next {{.Duration}} for triggering {{.Scenario}}.\rn https://www.shodan.io/host/{{.Value}}
     {{End -}}
     {{End -}}
   "
  }

URL: https://api.telegram.org/botTOKEN/sendMessage method: POST headers:
  Content-Type: "application/json"
As usual, any changes you have to restart the Crowdsec service:
sudo systemctl restart crowdsec

Et voila!! Telegram messages will arrive instantly!
Come, Another day we continue, This is going to hell, We leave many things to see, We must talk about more commands, API, from their dashboard or web console that I told you we would see, But please… This is very long We 🙂 have to make all our agents talk to each other, (if it were to be of interest), the part of integrating it with our perimeter firewalls… See the Prometheus part, Grafana…
Well, I hope it is a solution of interest, that I am sure that many of us have published services to the Internet without this protection. Or why not, implement it on our organization's internal machines, between them they make a mesh and protect each other…
Well, What a big hug!