Taking LED strips to another dimension with WLED and LedFx, NodeMCU and Home Assistant

Well, This post is loaded, where we are going to see different products that also combine them make magic. We're going to connect a WS2812B LED strip to a NodeMCU and load WLED to get some really cool effects, we will also mount LedFx to move the LEDs with audio and we will end up presenting everything through Home Assistant for home automation control.
What I said, NodeMCU is an Arduino board with the ESP8266 chip and Wifi module that many of you will know, And if not, I encourage you to make it your first album to introduce you to this exciting world. We're going to download a wonderful firmware called WLED that we'll load onto the chip, With this we will be able to control the strips from an app, from our mobiles or a browser, This firmware has a lot of effects to control this kind of LED strips, in addition to having a lot of settings and possibilities. We will add the LED strips we have to our Home Assistant to be able to control centrally or make automations. And to put the icing on the cake we will use LedFx, which is nothing more than another wonderful project that we can run on any machine and all the audio that the machine picks up through a microphone will make the LEDs move at its own pace.

The first thing will be connectivity, we will connect the WS2812B LED strip to our Arduino, I leave you this outline so that you can get a little idea, the D4 of the NodeMCU v3 is the GPIO2 connect it to the LED strip data pin. Then we can connect the 5V directly to the board (in this case to the VIN) to avoid using another external power supply and thus power the LED strip as well. And finally we connected the earth to the GNDs.
COUNTRY

Next we'll download WLED, a super interesting project that implements a web service in the ESP8266/ESP32 that allow you to control the Neopixel strips that are LED diodes of type 5050 with WS2812B controllers, WS2811, SK6812 or APA102. For now the latest version we have is the 0.8.5, downloaded from GitHub the file for ESP8266, In this case “WLED_0.8.5_ESP8266.bin”. And we load it with ESP Easy Flash or some similar utility from any computer, be careful with selecting the correct COM port and selecting the firmware well.

If we connect everything, when starting NodeMCU, create AP named WLED-AP with password: WLED1234

We connect and access with a browser to your default IP: http://4.3.2.1/
We must configure our Wifi, Click on “Wifi Settings”

And nothing, we indicate our SSID and Wifi password, we indicate whether we want static or dynamic IP using DHCP, we enter your DNS name… “Save & Reboot”.
 |
 |
 |
We will be able to manage WLED either with a browser, accessing the new IP that you have taken once you have restarted and connected to our Wifi AP. Or we can also manage it from our mobile with an app called “COUNTRY”, we can look for it in the “Play Store” and I suppose that for iOS there will also be 🙂
As we can see, we will simply have to click on the “+” and it will directly detect the LED strips that we have on and connected to the network. We will be able to play with the styles, Apply a solid color, or use the predefined effects that are infinite, as well as personalizing ours. Something important that we will have to do will be, in “Settings” > “LED Preferences” configuring the number of LEDs we have, This will tell us the amperage needed to power it correctly, as well as we can specify the maximum that our transformer gives. And don't forget to specify a name or description, since we do have many strips, we can then join them into groups (via UDP sync port) and to be able to have the same effects on all of them.
Home Assistant

If we have an updated Home Assistant or Hassio, we can add WLED control directly from the Integrations, for this, in the search box when typing “COUNTRY” we will search for it and select it.

We specify the IP address of this LED strip, the IP that our Arduino has and click on “Send”,

Perfect, How simple… We can associate it with an area if we have defined the rooms of the house, Click on “Finish”.

It will show us the entities that it has created for us, to be able to control the LED strip, calculate your consumption in mA, Free memory… in addition to the automations we can do.
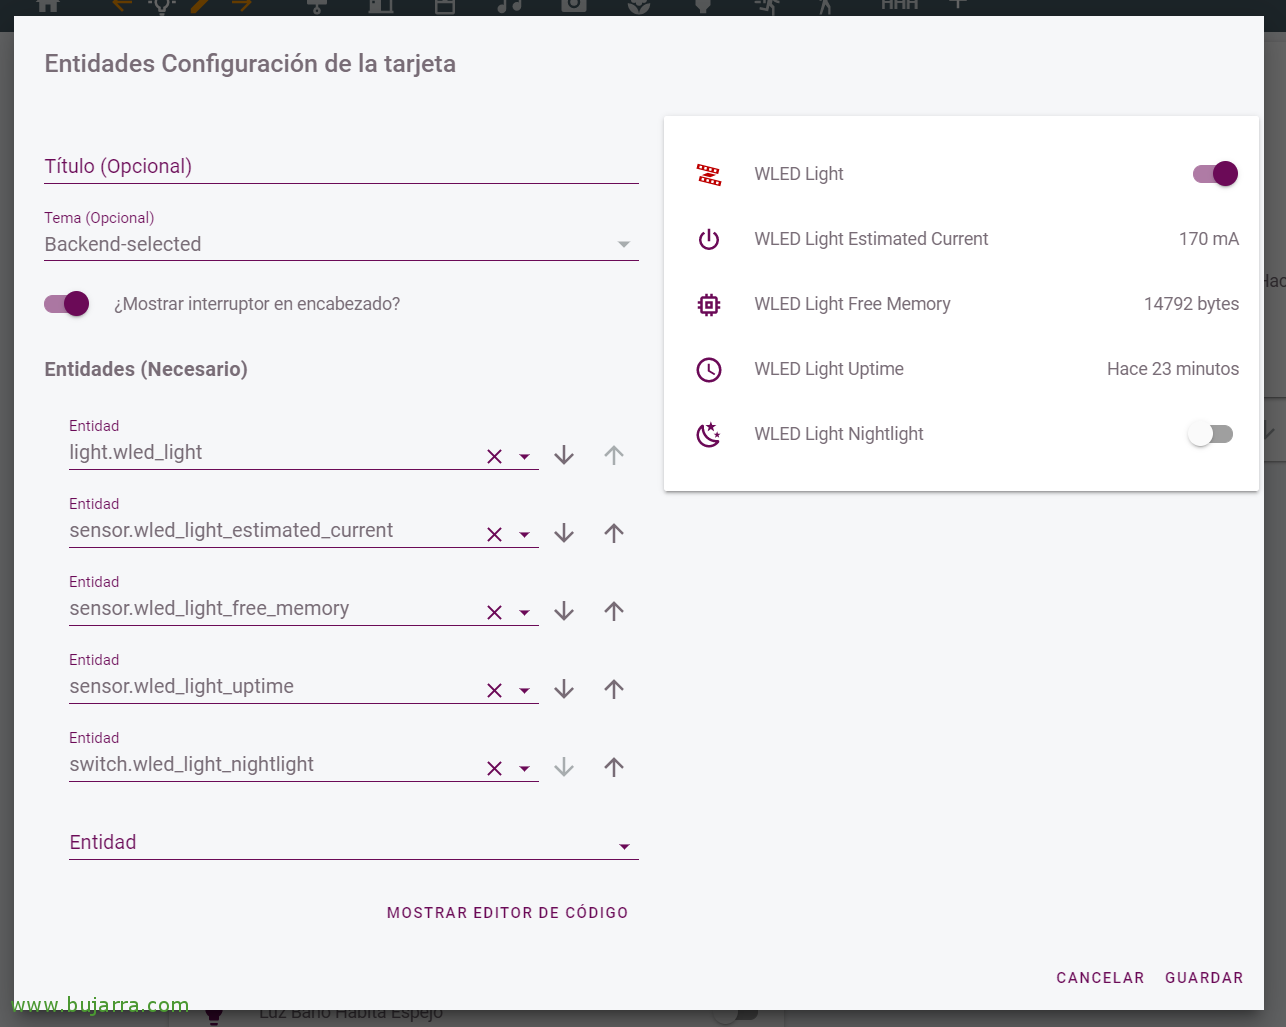
And well, from Home Assistant views, As always we create our cards as we are interested, This is an example of the entities that he has created for us.

And when we click on the main WLED entity we can set the color that interests us in this strip, or set an effect… It's cool, ¿No?
LedFx
Well, and if we want to place (For example) a Raspberry Pi with a microphone lying around and that what this microphone hears causes the LEDs to move one way or another, If we put on music so that they dance to their tune, or with the voice that make some effects… Although we can put a sound sensor in the Arduino itself if we want to do it individually, The idea of doing it with a 'networked microphone'’ is that several strips move in the same way.

We have to install LedFx, we can do it quickly under a Windows or Linux.
On Windows maybe quick to try, Need Anaconda installed, and in a Terminal that we start we will activate a virtual environment and load it:
[SourceCode]conda create -n ledfx python=3.6
Conda Activate LEDFX[/SourceCode]
We install LedFx and its dependencies:
[SourceCode]Conda config –add channels conda-forge
Conda install Aubio Portaudio Pywin32
pip install ledfx[/SourceCode]
And we carried it:
[SourceCode]LEDFX –open-ui[/SourceCode]
Under Linux, The installation would be:
[SourceCode]sudo apt-get install portaudio19-dev -y
PIP3.6 Install LEDFX
LEDFX –open-ui[/SourceCode]
If you need more info about its installation, Check out their official documentation: https://ahodges9.github.io/LedFx/

We're going to “Device Management”, here we will be adding all the LED strips that we have with WLED, click on the “+”,

Indicate “e131” in the Type, we provide you with a name and the WLED IP address, as well as the number of LEDs that the strip has. Click on “Add”,

And nothing, we can enable or disable it, as well as if we click on a strip to see how it works.

It will show us the audio that it is listening to from the microphone and paint it in waves, It's that easy, We have the LED strips dancing! We can also change the different types of effects, very very complete. As usual, I hope you found it interesting,