Make a VPN Between Two Fortigates Using IPSEC

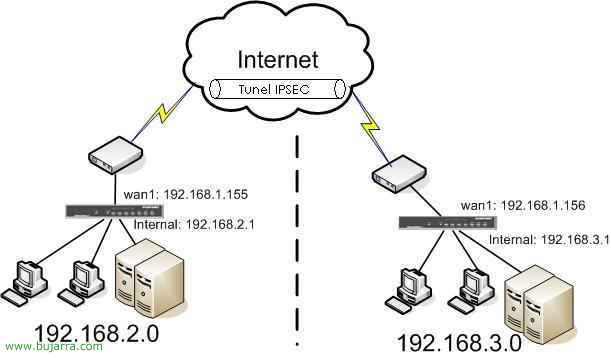
This procedure explains how to connect two separate networks using a VPN between two Fortigate. The example is based on the following image:

We have a network 192.168.2.0/255.255.255.0 where the firewall is the 192.168.2.1 and a network PC is the 192.168.2.2; We have another network with the 192.168.3.0/255.255.255.0 where the firewall is the 192.168.3.1 and a network PC is the 192.168.3.2. And in between we have the internet. What we want is for the two networks to see each other and be able to access the resources of both networks quickly and securely with a VPN. Eye, we see that the IPs of the WANs are 192.168.1.X, are for this example, we see that they are private IPs, we have to assume that they are public IPs.

First, We connect to one of them, to the 192.168.3.1 For example. Let's go in the menu on the left “VPN” > “IPSEC” and we created the first phase from “Create Phase 1”.

We give you a name, in “Name”, for example vpn_1. In “Remote Gateway” it will be to the Fortigate destination that will connect, to your public IP, in my case it's a fixed IP, he indicated the public IP of the other delegation. In “Local Interface” We put which one it will come out of, normally “wan1”, We modify the type of authentication, Put “Preshared Key” and a key that we will then have to put in the other fortigates the same. Click on “Advanced…” to see more options. We modify the “DH Group” and we only scored 1 and 2. We click OK, this is enough for us.

Now we need to create a phase 2, since “Create Phase 2”.

We give you a name, In this case “tunel_vpn_1” and in “Phase 1” We point you to the one we have just created “vpn_1”, Click on “Advanced…” to see more options and modify the “DH Group” a 2. And we enable the “Auto Keep Alive” so that the connection does not drop and always keeps it connected. “OK”.

We have to create the addresses of the networks in “Firewall” > “Address”, since “Create New”

And in Address Name we indicate first one network and then the other, In my case now “IP3 Network” and in type I indicate that it is a subnet, in “Subnet / IP Range” I tell him what rank he has, in my case 192.168.3.0/255.255.255.0. Pressed “OK”.

We see that he has created it correctly for us and now we create the other network, in my case the 192.168.2.0 since “Create New”

I give him a name “IP2 Network” in my case and I specify the subnet of this LAN, 192.168.2.0/255.255.255.0. “OK”

Now simply, we have to create a rule in the firewall to give access to the VPN. So from “Firewall” > “Policy” > “Create New”

In “Source” > “Interface” Indicate “Internal” (which means from which network you will access which and where. From within the network 3, We will go online 2 By the wan1). In “Destination” “wan1” and “Address Name” We put which, in my case “IP2 Network”. “Schedule” in “Always” and all services “ANY”; in Action we have to put “IPSEC” and in “VPN Tunnel” The VPN Tunnel “vpn_1”, We accept both traffic entry and exit by dialing “Allow inbound” and “Allow outbound”. “OK”

Now this rule, being a VPN, we have to put it first., so we put it first or as high as possible. “OK”. We've already finished with the Fortigate of the network 192.168.3.0, now we have to configure the VPN in almost the same way in the other firewall.

So let's go to the network firewall 192.168.2.0 and we start to configure it in the same way. We connect to it 192.168.2.1. Let's go in the menu on the left “VPN” > “IPSEC” and we created the first phase from “Create Phase 1”.

We give you a name, in “Name”, for example vpn_1. In “Remote Gateway” it will be to the Fortigate destination that will connect, to your public IP, in my case it's a fixed IP, he indicated the public IP of the other delegation. In “Local Interface” We put which one it will come out of, normally “wan1”, We modify the type of authentication, Put “Preshared Key” and a key that we will then have to put in the other fortigates the same. Click on “Advanced…” to see more options. We modify the “DH Group” and we only scored 1 and 2. We click OK, this is enough for us. We see that in this case we put the other Remote Gateway IP and we have to put the same password that we have used before.

Now we need to create a phase 2, since “Create Phase 2”.

We give you a name, In this case “tunel_vpn_1” and in “Phase 1” We point you to the one we have just created “vpn_1”, Click on “Advanced…” to see more options and modify the “DH Group” a 2. And we enable the “Auto Keep Alive” so that the connection does not drop and always keeps it connected. “OK”.

We have to create the addresses of the networks in “Firewall” > “Address”, since “Create New”

And in Address Name we indicate first one network and then the other, In my case now “IP3 Network” and in type I indicate that it is a subnet, in “Subnet / IP Range” I tell him what rank he has, in my case 192.168.3.0/255.255.255.0. Pressed “OK”.

We see that he has created it correctly for us and now we create the other network, in my case the 192.168.2.0 since “Create New”

I give him a name “IP2 Network” in my case and I specify the subnet of this LAN, 192.168.2.0/255.255.255.0. “OK”

Now simply, we have to create a rule in the firewall to give access to the VPN. So from “Firewall” > “Policy” > “Create New”

In “Source” > “Interface” Indicate “Internal” (which means from which network you will access which and where. From the Internal Network 2, We will go online 3 By the wan1). In “Destination” “wan1” and “Address Name” We put which, in my case “IP3 Network”. “Schedule” in “Always” and all services “ANY”; in Action we have to put “IPSEC” and in “VPN Tunnel” The VPN Tunnel “vpn_1”, We accept both traffic entry and exit by dialing “Allow inbound” and “Allow outbound”. “OK”

Now this rule, being a VPN, we have to put it first., so we put it first or as high as possible. “OK”. We're done with both Fortigates. (192.168.2.0 and 192.168.3.0).

Now simply, We have to force firewalls to connect, so from one of them, We're going to “VPN” > “IPSEC” > “Monitor” and we raise the connection from the “Arrow”.

And we see that the connection is already up.

Now simply from a network PC, We can check it with a Tracert and see what the traffic is really coming and where it is going. Everything works!!!