StoreFront Load Balancing with Citrix NetScaler

In a Past document we saw how to create a StoreFront pool to have the site in high availability with the same configuration on all nodes; and in this document we will look at a very simple way of how to use NetScaler as a balancing to distribute the load of customer requests to our StoreFront servers using a virtual server.

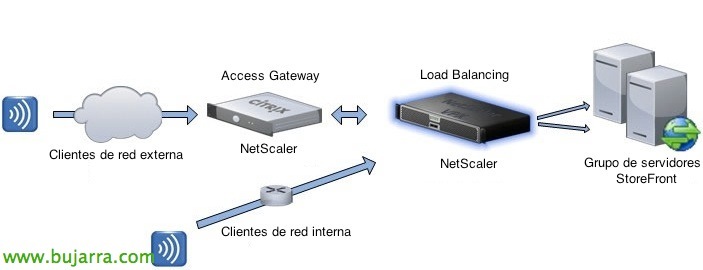
This will be the basic scheme, we will create a VIP in the NetScaler that will be attacked by internal and external customers, will be essential for high-availability environments where NetScaler will analyze the health of each StoreFront server and balance user sessions.

The first thing will be to have Load Balancing enabled from “Basic Features” inside “System”. Then we can start registering the StoreFront servers in our NetScaler, for this, since “Traffic Management” > “Load Balancing” > “Servers” > “Add…”, Start!

We'll add all StoreFront servers, providing a name and your IP address & “Create”,

List! we confirm that they are OK,

We will need to create a monitor that controls the StoreFront site, since “Monitors” > “Add…”

We indicate a name to the monitor and from NS 10.1 we will already have the 'STOREFRONT' type, we select it, We will indicate if the access is secure,

In “Special Parameters” we will indicate in 'Store Name’ the name of our Store, and we scored “StoreFront Account Service”, Click on “Create”.

Next we will create the service, “Services” > “Add…”,

We will give the StoreFront service a name, we'll create one for each StoreFront server, we will indicate if it is HTTP or SSL access, We also select the monitor that we have just created.

On the “Advanced” We will enable “Client IP” and we'll use the 'X-Forwarded-For Header'’ to create an additional header and pass the client's real IP address to app monitoring and the NetScaler IP does not come out. “Create”.

We confirm that everything is OK and the services UP!

Finally we will create the VIP for the StoreFront service and it will be balanced by this IP, we will confirm that in the internal DNS the fqdn of the internal/external site points against the VIP we are going to create! “Virtual Servers” > “Add…”,

We give it a name, IP address, we will indicate if it is HTTP or SSL, We select the services we have just created,

On the “Method and Persistence” we chose as a method of balancing 'Round Robin'’ or 'Least Connection'. In 'Persistence’ we select 'SOURCEIP’ and the 'Time-out'’ while we have configured, default in the StoreFront are 20 minutes.

And finally, If it's a safe site, We must specify the certificate that will be presented, from the “SSL Settings” We select the certificate & “Add >”. List! This virtual server is already properly created and will load balance against our StoreFront servers, the VIP will be attacked by internal users using an internal DNS name that resolves against it and external users by indicating it in the NetScaler Gateway configuration!