Enabling two-factor authentication with SMS2 (free) and NetScaler Gateway

In this post we are going to see something fabulous, let's see how to enable 2FA or two-factor authentication in NetScaler Gateway, forcing users to use an additional Token for corporate access to the organization. We will use SMS2 which is a free tool, which through RADIUS will validate the user tokens, we'll use software tokens using the Google Authenticator app on mobile, A blast!
What I said, we will rely on the TOTP algorithm (Time-based One-time Password), or time-based one-time password, Normally these codes are updated every 30 Seconds. On employees' mobile devices, it will be enough to install (For example) Google Authenticator and whenever they access the Citrix site externally, that will present your applications or desktops, Well, we will put one more factor of authentication, an extra level of security to prevent access even if they know the user's password. Lately, we are getting to know, Every day more password theft, what are you waiting for to try to secure your environment a little more?
NPS Configuration,
We must have the role of Network Policy Server or NPS (Network Policy Server) installed and configured to allow RADIUS queries.

Install “Network Policy and Access Services” and its characteristics, either by GUI or via PowerShell:
[SourceCode]Install-WindowsFeature -Name npas[/SourceCode]

Open the console “Network Policy Server. The first thing we will take into account will be in the “Network policies” Go to policy properties “Connections to other access servers”,
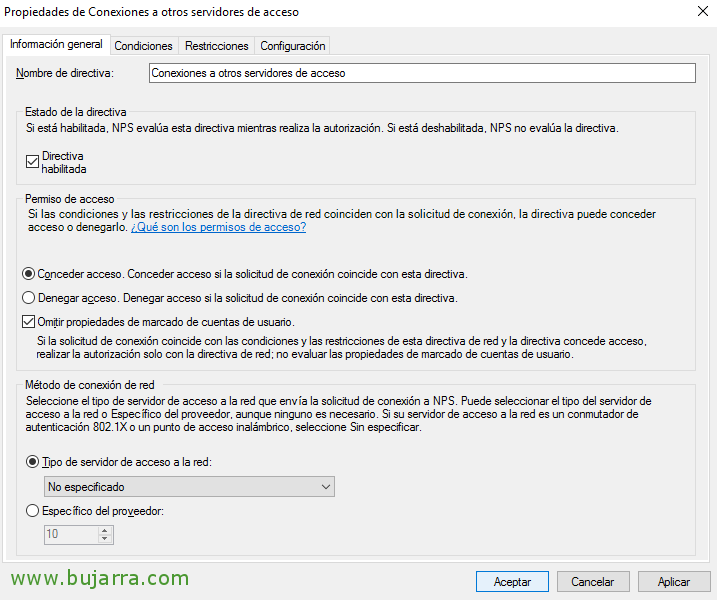
Select “Grant access” and we scored “Bypass User Account Markup Properties”,
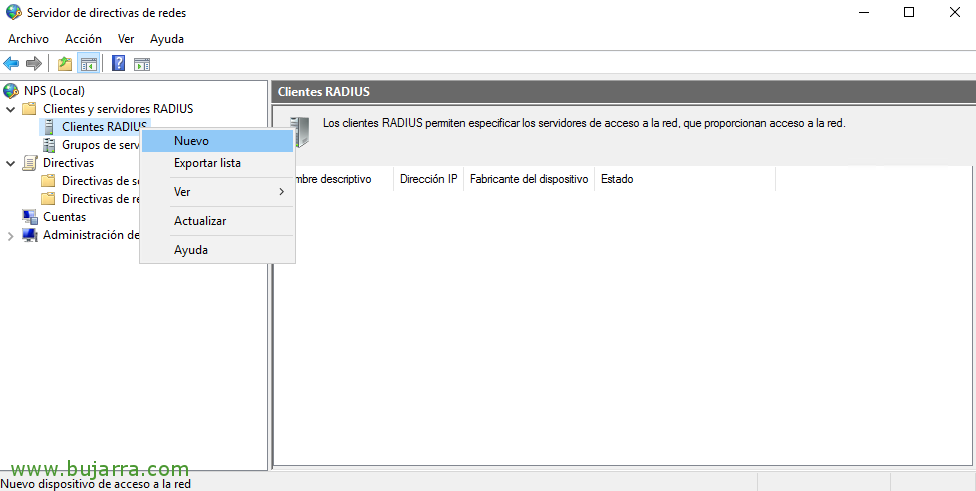
Now we must register all RADIUS customers, that is, all the machines that will make inquiries, in principle with creating the machine where we have the role installed (for future testing) and the NetScaler Subnet IP will do the good, since the NetScaler will query NPS with that adapter. Therefore, in “RADIUS Customers” > “New”,

We indicate the name of the machine and the IP address that it will use to allow you to query, we will also indicate a secret that we will use to authenticate ourselves.

And we create all the teams, As I said, with the IP of the machines that will make queries it will be enough, well us locally to test and the SNIP IP address of the NetScaler.
Installing and Configuring SMS2,
Wright SMS2 will be the application we use to allow this 2FA, We can install it on one or more computers, usually next to the NPS, or in a DC. This utility is free and available on their website: http://www.wrightccs.com/support/download/

We begin the installation, “Next”,

Select “Custom”,

And we removed the CloudSMS part and verified that we installed all the clients, or at least the kind we are interested in, “Next”,

Click on “Configure AuthEngine”,
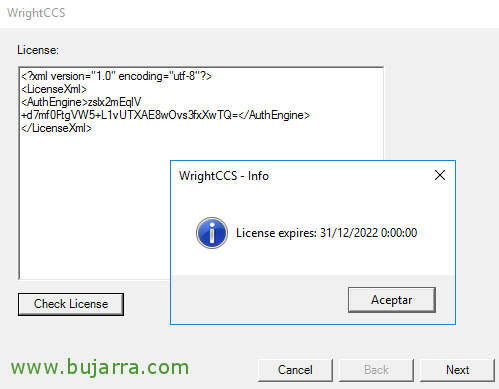
We introduce the free license they give us, at least until December 2022, we can download it from here or use this same one:
[SourceCode]≪?xml version="1.0" encoding="utf-8"?≫
≪LicenseXml≫
≪AuthEngine≫zslx2mEqlV+d7mf0FtgVW5+L1vUTXAE8wOvs3fxXwTQ=≪/AuthEngine≫
≪/LicenseXml≫[/SourceCode]
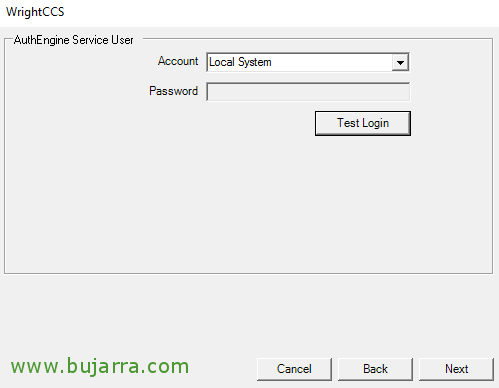
We leave the Local System account for the AuthEngine service, “Next”,

We instruct the AuthEngine to attend to any IP (0.0.0.0) using the 9060. We indicate the FQDN of our LDAP server or domain controller, we indicate a specific user account that we will use for RADIUS queries, In my case we'll call it “usuario_radius”, we indicate their AD password and indicate which is the BaseDN that we will use as a filter to search for users. “Next”,
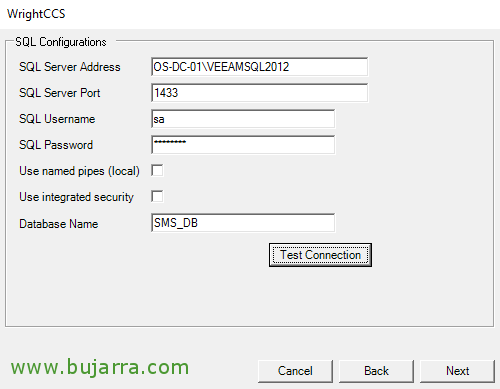
We'll need a SQL server somewhere, We will indicate your name and instance, port, SQL user or if we want to use built-in authentication, in addition to the name of the DB that will generate. “Next”,
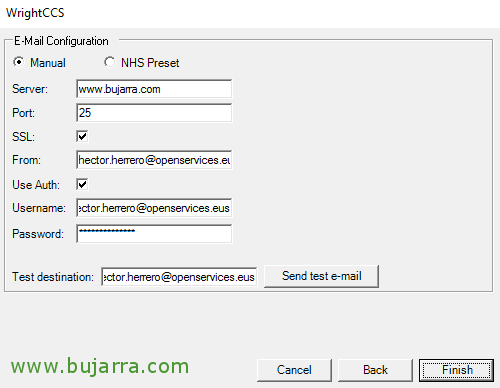
We can configure the mail server here for mail alerts or if we want the token via mail, Not our case, we can ignore it, “Finish”.

We continue in the installation wizard, Now we click on “Configure OATHCalc”,

We left the Local System account for the OathCalc service, “Next”,

We leave the defaults, “Finish”,

We follow, Let's go now to “Configure AdminGUI/Clients”,

We indicate the local IP address of the server with which we will offer the service and the port 9060, “Finish”.

We will be able to continue with the assistant, “Next”,

As I indicated that I will install all the clients and this one also comes with the files of the obsolete Web Interface, we can indicate where we want them to leave them. In principle, we will not use these files. “Next”,
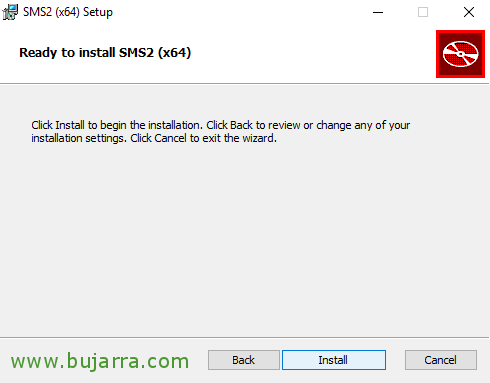
And finally, Click on “Install” to get started with the installation of SMS2,

… Wait a few seconds…

“Finish”, Correct installation!

We must edit the configuration file, located by default in “%ProgramFiles%WrithCCS2SettingsConfiguration.xml”. We will usually make the following modifications, “AuthEngineChallengeResponse” We'll leave it at “False” to be able to use Google Authenticator, in addition, in the “AuthProviders” we must disable them all and leave OATHCalc enabled and default, Staying:
[SourceCode]≪Name≫CloudSMS≪/Name≫
…
≪Enabled≫False≪/Enabled≫
≪Default≫False≪/Default≫
…
≪Name≫OATHCalc≪/Name≫
…
≪Enabled≫True≪/Enabled≫
≪Default≫True≪/Default≫
…
≪Name≫PAINT≪/Name≫
…
≪Enabled≫False≪/Enabled≫
≪Default≫False≪/Default≫
…
≪Name≫Email≪/Name≫
…
≪Enabled≫False≪/Enabled≫
≪Default≫False≪/Default≫
…
≪Name≫Static≪/Name≫
…
≪Enabled≫True≪/Enabled≫
≪Default≫False≪/Default≫
…[/SourceCode]
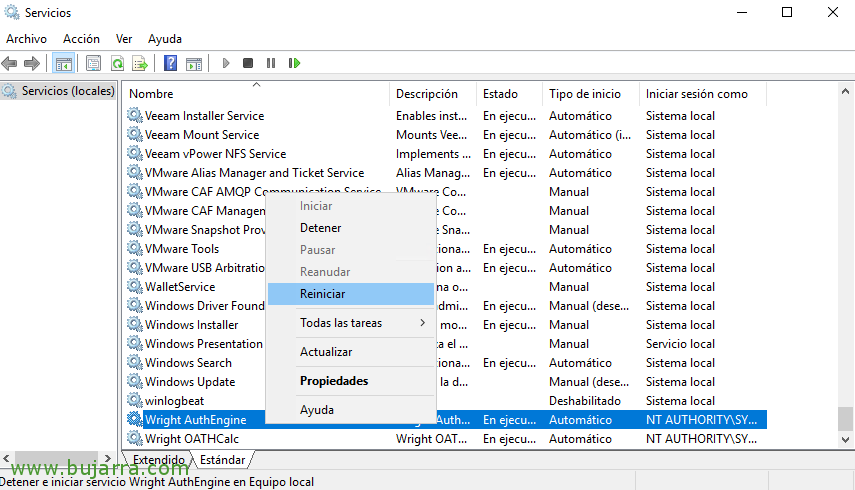
After the changes, We save the file and restart the services “Wright AuthEngine” and “Wright OATHCalc”.
Testing SMS2

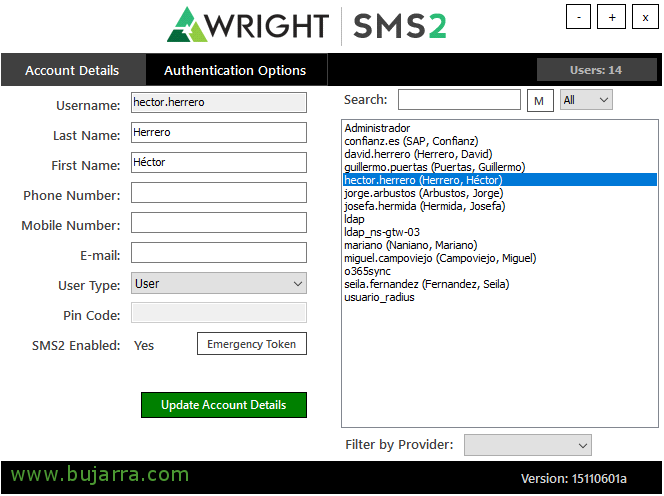
We will now be able to open the SMS2 Administration Console. ¡Eye! What, To open this console, there must be a group called “Administrators” in the Built-In folder of our Active Directory, if the group does not exist (which in Active Directories in Spanish is called Administrators) or you are not a member of it, You won't be able to see all users. The first thing we will do is to “usuario_radius” put a static numerical token on it (Pej 123456) to do a test below. Previously, Select the user and click on “Authentication Options”,

On the “Auth Options” Pressed “Static” and we put the numerical token that we want, We will need it so document. “Save Configuration”. And then “Update Account Details” to save changes to the specific user.
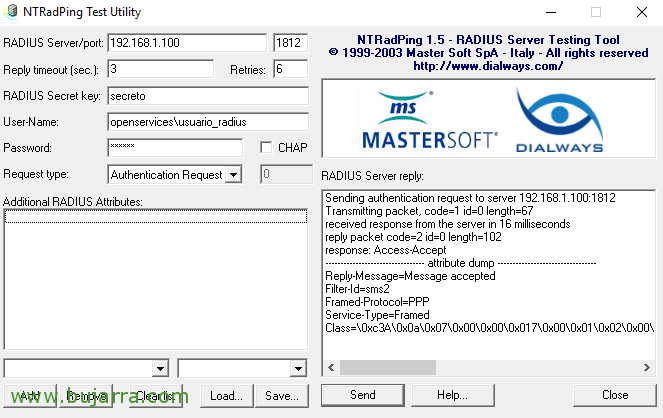
GOOD, Let's test if SMS2 is working properly, for this, we will be able to download NTRadPing 1.5, which is a utility for RADIUS testing, we can download it from: https://thwack.solarwinds.com/thread/14486. We will do this test from one of the machines that we have registered on our NPS server, in RADIUS clients, If you remember we set up a secret then, We'll need it now.
Therefore, Once downloaded, we run it and enter the IP address of our RADIUS server and the port 1812, in “Radius Secret key” we will indicate the secret we use when defining the RADIUS Client, We enter the user's name “usuario_radius” and in “Password” we must indicate the numeric Token that we have just set in the previous step. Click on “Send” and if everything has gone well, We'll see that you validated the authentication correctly.
Configuring NetScaler,
Although I'm going to leave the minimum steps, where we'll create authentication policies that we'll apply to our NetScaler Gateway, This process could be longer, since it is recommended to monitor with Load Balancing and offer the RADIUS service from here, therefore I will avoid creating the Monitor, Services, LB Servers and Virtual Servers for RADIUS Service. We'll go straight to creating the policies and applying them to the Gateway,

We will first of all register the RADIUS server, since “Citrix Gateway” > “Policies” > “Authentication” > “RADIUS” > “Servers > “Add”, we indicate the IP address of the RADIUS server and the port 1812, as well as the secret we used when we registered the NetScaler's IP Subnet in the NPS. We can give “Test RADIUS Reachability” To test validation, I should go ok, Click on “Create”,
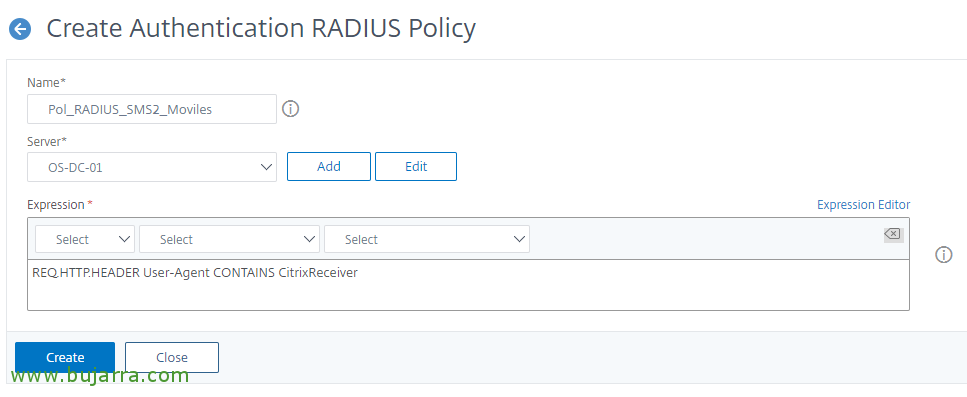
Now let's create the RADIUS policies, since “Citrix Gateway” > “Policies” > “Authentication” > “RADIUS” > “Policies” > “Add”, we create a policy for devices that use Citrix Receiver, we associate it with the newly created RADIUS server and indicate the following expression:
[SourceCode]REQ. HTTP. HEADER User-Agent CONTAINS CitrixReceiver[/SourceCode]
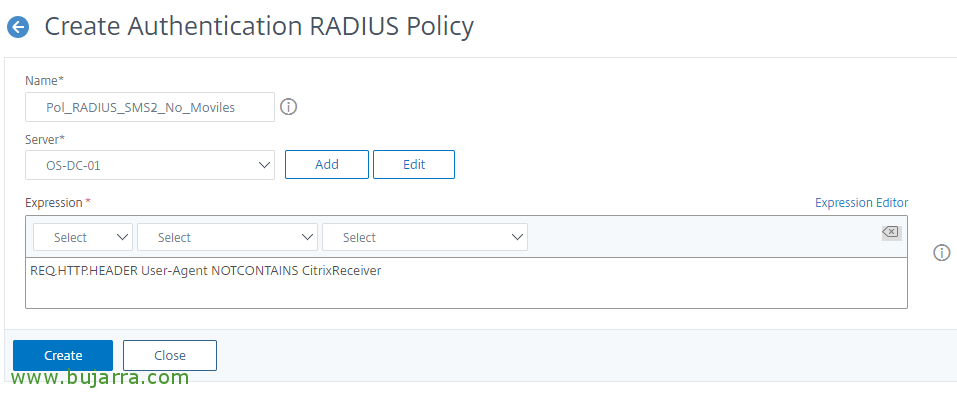
We've created another one for devices that don't use Receiver (o Workspace), with the following expression:
[SourceCode]REQ. HTTP. HEADER User-Agent NOTCONTAINS CitrixReceiver[/SourceCode]

And the same for LDAP, We will create two equal policies, one for access with Citrix Receiver devices, since “Citrix Gateway” > “Policies” > “Authentication” > “LDAP” > “Policies” > “Add”, with the following expression:
[SourceCode]REQ. HTTP. HEADER User-Agent CONTAINS CitrixReceiver[/SourceCode]

And we're done with the last policy for devices that don't use Receiver,
[SourceCode]REQ. HTTP. HEADER User-Agent NOTCONTAINS CitrixReceiver[/SourceCode]

And now we'll go to our NetScaler Gateway Virtual Server and link them together, We'll create primary and secondary authentications, to serve users who connect to us, we will leave as Primary with priority 100 the LDAP No Receiver Policy, and with priority 90 RADIUS Receiver Policy; as secondary authentications, We'll use the other way around, This is, with priority 100 The RADIUS No Receiver Policy, and with priority 90 LDAP Receiver Policy.

We must modify the session policy that will already exist and be applied in our Virtual Server Gateway, in my case the default 'AC_OS_X.X.X.X', there, on the “Client Experience”, in “Credential Index” we must indicate “SECONDARY”. And verify that the other session policy (which will also already exist), in this case the 'AC_WB_X.X.X.X’ Used “SECONDARY”, that it will be so by default.

On the NetScaler Gateway, as we surely know and have applied a corporate theme, and if you haven't, you should give a personalized and pleasant image to your users, Reviewed This post If you need it. Well, what I said, We will be able to customize the text of the text fields that users will see, to indicate for example in the 2 that he does not ask “Password 2” to the user if not “Token” and thus better assimilate what a password is and what a Token is. This is what I said, we will do it on our Virtual Server, in the Topic section, by clicking on it we can add the “Login Page” and customize these fields with better text.
Enabling Tokens for Active Directory Users,
Back to SMS2, It's time to try this! We are going to register a user!
Now we must select the users we are interested in enabling 2FA authentication, for this, We open the ” SMS2 Administration Console”, about each user we are interested in, we select it and we are going to “Authentication Options”,

We enable “OATHCalc”, we instruct you to use the TOTP Type Token, in Authenticator we can directly tell you to use Google Authenticator and click on “Generate Shared Secret”, it will give us a secret or a QR code that we must send to the user so that from their mobile device they can register their account.

Now finally, having a mobile phone at hand, installed the Google Authenticator app and added the account using the QR code, this user would already be able to access their Citrix portal and apart from indicating their username and password, you will need to specify the temporary Token that you get only from this mobile device. Armored entrance to our company! Go for more!