Raspberry Pi – Relay use, X10 and Motion Detector

In this document we are going to launch a Raspberry Pi with some very practical functions that can make us think about implementing a home automation system, Super simple and cheap. On the one hand, we will connect a relay that will allow us to switch circuits like the lights at home, and on the other a motion sensor that will allow us to perform the function we are interested in, such as turning on those same lights and therefore not having to turn on the lights in the house anymore =)

Controlling a relay with a Raspberry Pi,
In this document on the one hand, We'll see how to connect a relay to a Raspberry to be able to control circuits. You can use it as a switch to control certain lights in the house, The heating thermostat… In eBay we can find 5V relays to close or open 220V circuits, for 2€ each module, We can have up to 8 Modules in a relay to control 8 Circuits!

I leave you a couple of screenshots with permission from the blog of RSPPI where it is also explained in a great way how to set it up. This image shows us on the right side the connectors with the Raspberry, the GND we will ground, with the IN1 we will control the K1 channel (IN2 for K2…) we'll connect them to a GPIO; The VCC is connected to the 5V of the Raspberry. On the left side we will control the circuit where we will connect the wires, If we close the circuit between 1 and 2, The circuit will normally be 'open', If we close it between the 2 and the 3, The circuit will normally be 'closed'.
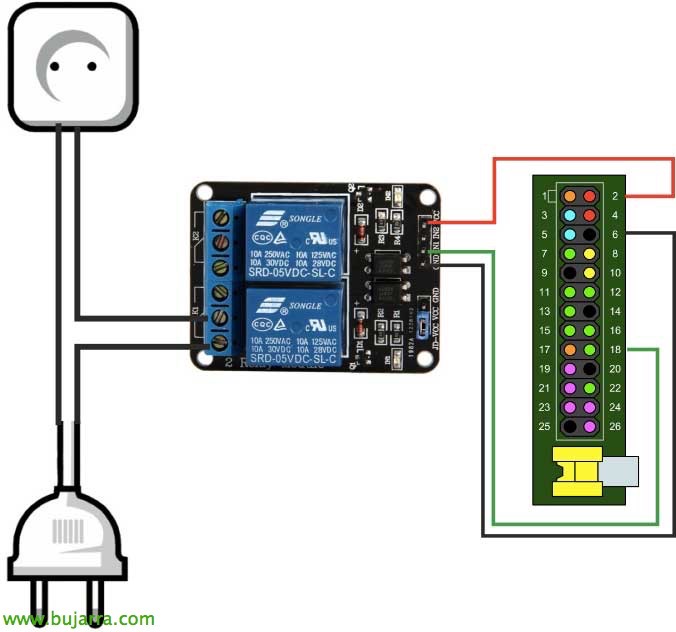
And in this image we see an example 220V circuit that will normally be closed, via the GPIO 18 of the Pi we will commute it =)
Now, we will install WiringPi on the Raspbeyry:
[SourceCode]WGET HTTP://project-downloads.drogon.net/files/wiringPi.tgz
tar xfzv wiringPi-xxx.tar.gz
cd wiringPi-xxx
./build[/SourceCode]
We can use the following example commands:
[SourceCode]Good game readall –> It takes away the status of all GPIOs.
GPIO -G Mode 24 out –> Turn on GPIO24.
GPIO -G Mode 24 in –> Turn off the GPIO24.
GPIO -G Read 24 –> Get the status, on 0, off 1.[/SourceCode]
Plug a motion sensor into a Raspberry Pi,
For just over €1 we can buy at eBay passive motion detectors or PIR that we can use for whatever we want when they detect a movement, whether it is putting a camera to record or even telling the previous relay to turn on a light.
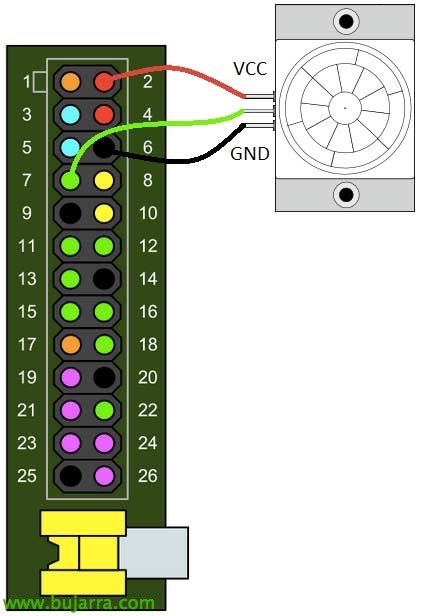
In this image we will see the connection between the pins of the PIR detector and the GPIO of the Raspberry, we connect the VCC to the 5V of the Pi, GND to ground and the OUT to a control GPIO to read its status using a Python script. Once a motion is detected, we can decide what we want to happen =)
First, we downloaded the Python script and tested it:
[SourceCode]WGET HTTP://www.raspberrypi-spy.co.uk/archive/python/pir_1.py[/SourceCode]
We will modify in the file 'GPIO_PIR = ‘ by the correct GPIO number where we have connected the OUT of the PIR sensor.
[SourceCode]sudo python pir_1.py[/SourceCode]
We will be able to modify the script to our liking with the code that interests us, for example the next one would run 'entrada_enciende.sh’ when detecting a movement and would turn on the light during 5 Seconds, where it will check again if there is still movement to leave the light on or turn it off:
[SourceCode]…
if Current_State==1 and Previous_State==0:
# PIR is triggered
print " Movement at the entrance! We turn on the light and wait for 5sec"
# Record previous state
Previous_State=1
import subprocess
cmd='/home/pi/entrada_enciende.sh’
subprocess.call(Cmd, shell=True)
# Hold on 5 Seconds
time.sleep(5)
elif Current_State==0 and Previous_State==1:
# PIR has returned to ready state
Previous_State=0
print " Ready again, There is no movement"
import subprocess
cmd='/home/pi/entrada_apaga.sh’
subprocess.call(Cmd, shell=True)
# Wait for 10 milliseconds
…[/SourceCode]
To start this script for example every day at 7 pm and it is 12 hours waiting to detect a movement (To turn on a light) We can use our cron, with 'crontab -e’ we will add the following line:
[SourceCode]00 19 * * * sudo timeout 12h python /home/pi/detector_entrada_enciende.py[/SourceCode]
X10 Protocol,

If you are thinking that using a relay is perhaps very uncomfortable because of the wiring issue, the simplest would be to use an X10-based wireless system, a little less economical too. We can get a controller-receiver, for example the CM15PRO (or the CM15A or CM19A) from Marmitek for about €75 that will help us manage wireless switches such as the AW12 (On/Off switch) which costs €45 each or an adjustable dimmer such as the LW12 for about €49 although we can also use other switches or devices, Of course!
The connection of the receiver to the raspberry would be via USB and the installation of the modchad daemon, The switches must be configured with a code each in addition to connecting them to the electrical network as indicated in the manual in a very simple way.
We install and compile mochad:
[SourceCode]sudo apt-get install libusb-1.0-0-dev
wget -O mochad.tgz http://sourceforge.net/projects/mochad/files/latest/download
tar xf mochad.tgz
cooldown cooldown*
./Set
Make
sudo make install[/SourceCode]
We can create a script to turn a switch off or on, But first we'll try to turn it on!
[SourceCode]echo "pl a1 on" | nc localhost 1099[/SourceCode]
In the following document we will see how to manage the control of the relay from a simple web interface for our mobiles or tablets!!!