Raspberry Pi – Thermometer and home web control

In this document we will see the steps to follow to install temperature sensors on a Raspberry Pi, the creation of a database to store temperatures and a script that takes the temperature periodically. We will create a website that will allow us to obtain the current temperature as well as a graph with the temperature history. To curl the curl, We will put buttons on the website that will perform tasks such as turning on/off a thermostat!

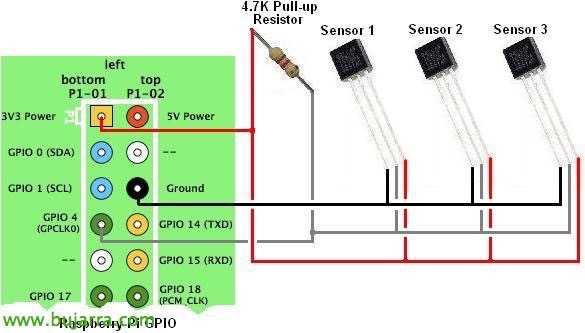
The first thing will be to get a digital temperature sensor like the DS18B20 that we get on eBay for 1€ even submersible for the aquarium, We will also need a 4.7k resistance. We could even get a humidity sensor as well to get both graphs =).
What we will do is enable the modules to use the thermometers, we will install MySQL to store the history of the temperature graphs in a database, we will create a script in Python to fill the database with information every 2 minutes and to finish we will install Apache and create a website where we can see in real time the temperatures as well as a graph with the history. And if we link to the previous document where we saw how to use a relay with the Raspberry, We can create buttons on the same website that allow us to turn a light on or off. Let's start by enabling the modules:
[SourceCode]Sudo ModProbe W1-GPIO
Sudo ModProbe W1-Therm[/SourceCode]
By the time I throw away the Raspberry I should keep it:
[SourceCode]sudo vim /etc/modules
w1-gpio
w1-therm[/SourceCode]
And we try the following command where we will see the temperature of each sensor:
[SourceCode]cat /sys/bus/w1/devices/ID_SENSOR/w1_slave[/SourceCode]
Install MySQL, requirements and create DB,
After leaving the thermometers already working, the next thing will be to install MySQL and all the requirements to create a database and store the temperatures of in my case 2 Temperature Sensors (Environment and aquarium). MySQL Server installation will ask you to set the root password:
[SourceCode]Sudo apt-get install python-pip
apt-get install python-mysqldb
sudo pip install requests
Sudo Pip Install PyMySQL
Sudo apt-get install MySQL-Server MySQL-Client PHP5-MySQL[/SourceCode]
We go into MySQL and create a database called 'Temperatures', A table called 'temps’ with 3 'Temp1' fields, 'Season 2’ and 'created_at':
[SourceCode]mysql -u root -p
Mysql> CREATE DATABASE Temperatures;
Mysql> USE Temperatures;
CREATE TABLE temps (
temp1 FLOAT, temp2 FLOAT, created_at TIMESTAMP DEFAULT CURRENT_TIMESTAMP
);[/SourceCode]
Demon to get temperature,
We continue to create a script in Python that reads the temperatures and stores them in the previous database, To do this, we can use the following script where we will modify with our corresponding sensor IDs in 'sensorids', We can call it 'temperatura_demonio.py':
[SourceCode]import requests
import hashlib
import time
sensorids = ["28-00000523e071", "28-0000052391f2"]
avgtemperatures = []
for sensor in range(len(Sensorids)):
temperatures = []
for polltime in range(0,3):
text = ”;
while text.split("n")[0].Find("YES") == -1:
tfile = open("/sys/bus/w1/devices/"+ sensorids[sensor] +"/w1_slave")
text = tfile.read()
tfile.close()
time.sleep(1)
secondline = text.split("n")[1]
temperaturedata = secondline.split(" ")[9]
temperature = float(temperaturedata[2:])
temperatures.append(temperature / 1000)
avgtemperatures.append(sum(temperatures) / float(len(temperatures)))
Aquarius = Avgtemperatures[0]
ambient = avgtemperatures[1]
import MySQLdb
db = MySQLdb.connect("localhost","root","CONTRASENA_DE_ROOT","Temperaturas")
cursor = db.cursor()
cursor.execute("""INSERT INTO temps (Temp1,Temp2) VALUES (%s,%s) """,(Aquarius,environment))
db.commit()[/SourceCode]
We run the script a couple of times to create a couple of records in the DB with
[SourceCode]Python temperatura_demonio.py[/SourceCode]
And we simply check that the database that has data with:
[SourceCode]mysql -u root -p
use Temperatures;
Select * from temps;[/SourceCode]
If everything is correct, we program the Python script to run every two minutes, We add the following line in our cron with 'crontab -e’
[SourceCode]*/2 * * * * /usr/bin/python /home/pi/temperatura_demonio.py[/SourceCode]
Installing the web server,
Once we already have a demon that is capturing our temperature in a DB, the next thing will be to put a website with Apache and put a cool portal with some JavaScript graphics. We start:
[SourceCode]sudo apt-get install apache2 php5 libapache2-mod-php5
WGET HTTP://iada.nl/en/system/files/tempmon_2_0.zip[/SourceCode]
Unzip the ZIP at '/var/www/temp/’ and we will edit in 'index.php’ All the correct connection data, as well as we will make some basic changes, In this example some German words that bring.
[SourceCode]$mysqli = new mysqli("HOST", "USER", "PASSWORD", "DATABASE");
Gem laatste 24u –> Stocking
Sensor Binnen –> Aquarius
Sensor Buiten –> Environment[/SourceCode]

And this would be what the web would look like once we restart the Apache service! pimp, ¿No?, We will access the HTTP site://IP_RASPBERRY/temp
Adding additional buttons to the website,
If we want to add buttons to the website to execute any action, In this example we will put a button to turn on the thermostat that is connected to the other side of the relay (termostato_enciende.sh) & another to turn it off (termostato_apaga.sh); plus two other buttons to turn on & Turn off the hallway light (pasillo_enciende.sh & pasillo_apaga.sh). At the end of the 'index.php' file, Before the end of bodysuit we added:
[SourceCode]
<h1>Heating</h1>
<form id="relay" action="remote_relay.php" method="GET">
<input type="button" id="TermostatosubmitOn" style="border:1px solid #000; font-size:40Px;" value="On" onClick="TermostatorelayOn()"/>
<input type="button" id="TermostatosubmitOff" style="border:1px solid #000; font-size:40Px;" value="Off" onClick="TermostatorelayOff()"/>
<h1>Aisle</h1>
<input type="button" id="PasillosubmitOn" style="border:1px solid #000; font-size:40Px;" value="On" onClick="PasillorelayOn()"/>
<input type="button" id="PasillosubmitOff" style="border:1px solid #000; font-size:40Px;" value="Off" onClick="PasillorelayOff()"/>
</Form>
<?php $state = $_GET["total"]; if ($state == "Termostatoon"){ Exec("/home/pi/termostato_enciende.sh"); } if ($state == "Termostatooff"){ Exec("/home/pi/termostato_apaga.sh"); } if ($state == "Pasilloon"){ Exec("/home/pi/pasillo_enciende.sh"); } if ($state == "Pasillooff"){ Exec("/home/pi/pasillo_apaga.sh"); } ?>[/SourceCode]
And we edit the Java script that loads 'script.js’ adding the following modifications:
[SourceCode]window.onload = function(){
buttonOn = document.getElementById('ThermostatosubmitOn');
buttonOn.onClick = ThermostatorelayOn;
buttonOff = document.getElementById('ThermostatosubmitOff');
buttonOff.onClick = ThermostatorelayOff;
buttonOff = document.getElementById('HallwaysubmitOff');
buttonOff.onClick = PasillorelayOff;
buttonOff = document.getElementById('HallwaysubmitOff');
buttonOff.onClick = PasillorelayOff;
}
function TermostatorelayOn(){
hidden = document.getElementById("total");
hidden.value = "Termostatoon";
form = document.getElementById("relay");
form.method = "GET";
form.action = "index.php";
form.submit();
}
function TermostatorelayOff(){
hidden = document.getElementById("total");
hidden.value = "Termostatooff";
form = document.getElementById("relay");
form.method = "GET";
form.action = "index.php";
form.submit();
}
function HallwayrelayOn(){
hidden = document.getElementById("total");
hidden.value = "Pasilloon";
form = document.getElementById("relay");
form.method = "GET";
form.action = "index.php";
form.submit();
}
function HallwayrelayOff(){
hidden = document.getElementById("total");
hidden.value = "Pasillooff";
form = document.getElementById("relay");
form.method = "GET";
form.action = "index.php";
form.submit();
}[/SourceCode]

And this would be the result of the website from an iPad where we will see on the one hand the current temperature of those two sensors, Remember that more can be added, or use a humidity sensor, etc… And at the bottom we can put buttons as simple as these to be able to turn a relay off or on and open or close an electrical circuit! Or whatever we can think of, go… to connect from the outside (Internet) to this website of our house, we can use free services such as DynDNS or NO-IP to know at all times the public IP we have in addition to configuring a VPN for secure access. So from anywhere we can turn on the thermostat before getting home, or any other needs we have, Like an alarm with a camera…