
Using an anemometer with Raspberry Pi

If you feel like measuring wind speed using a Raspberry Pi, This is your document! You may be thinking of setting up a weather station and this is an important issue, TRUE? We will use a script and a specific anemometer and super fast we will have it set up. Apart from, As you already know me, I will export the measurements to a MySQL database and then visualize it with Grafana!
There are two options, or you make an anemometer manually with Kinder eggs and work on a script that tells you the wind speed, or for 45€ You buy an Eltako anemometer and through a simple Python script that is already calibrated you will get the speed of the viewing in an exact way.
GPIO connection is super easy, The anemometer has 2 Cables, one we will connect to the ground and the other to the Pin 3 (or GPIO02), It doesn't matter which cable where. We assume that we have a Raspberry Pi with Raspbian installed and GPIOs enabled (sudo raspi-config…).

We unload This cool script by Patrick Rudolph from GitHub. And we tried to execute it… and simple or what?
Now everyone can modify it as they see fit, if you want to go from meters per second to kilometers per hour and put the result in a MySQL database, we will add around the line 60 something like:
[SourceCode]
…
viento_kmph = actual_windspeed_msec * 3.6 # Convert meters per second to kilometers per hour
print viento_kmph
if return == 30: # So each 30 seconds he puts him in BD
return = 0
db = MySQLdb.connect("DIRECCION_IP_MYSQL","USUARIO","CONTRASEÑA","BASE_DATOS")
cursor = db.cursor()
cursor.execute("""INSERT INTO viento (velocity) VALUES (%s) """,( viento_kmph))
db.commit()
else:
Round = Round + 1
…[/SourceCode]
Don't forget to add 'import MySQLdb’ to load Python MySQL modules (sudo apt-get install python-mysqldb if you don't have them installed). And each 30 seconds will put the speed in the wind table of our MySQL DB, It's a very silly board with 2 Fields, one for speed and one for date that is auto-completed, If you need this would be the code to create the table in this same example:
[SourceCode]CREATE TABLE 'wind' (
'speed' FLOAT NOT NULL,
'created_at' TIMESTAMP NOT NULL DEFAULT CURRENT_TIMESTAMP ON UPDATE CURRENT_TIMESTAMP
)
COLLATE='latin1_swedish_ci’
ENGINE=InnoDB
ROW_FORMAT=COMPACT
;
[/SourceCode]
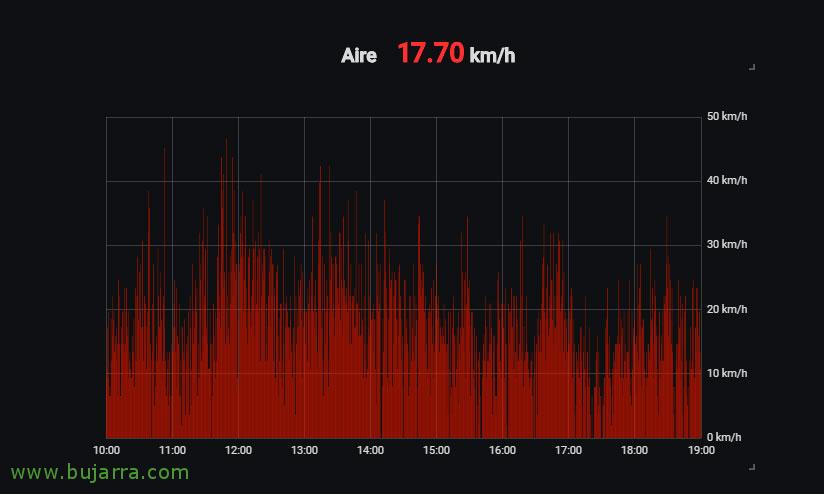
And in Grafana, in a Dashboard, if we create a Graph Panel, we select our MySQL connection against our database as Data Source and add a simple Query that paints the wind, Then we tune the graph as we like more or less, in case he guides you, the Query of this graph:
[SourceCode]SELECT velocidad as value, "Velocidad" as metric, UNIX_TIMESTAMP(created_at) as time_sec FROM viento WHERE $__timeFilter(created_at) Order by time_sec ASC[/SourceCode]
Well, I hope you like it, little by little we will put more sensors in our Raspberry Pi to set up a weather station or whatever we want, go!