Install and configure vCenter Site Recovery Manager 5 (SRM 5) with vSphere Replication

In this document, we'll look at the complete installation and configuration of VMware vCenter Site Recovery Manager 5 (SRM 5) with one of its new features, vSphere Replication, which will allow us to replicate virtual machines between a primary and secondary data center, not at the array level but thanks to a virtual appliance from the virtualization layer. This replication, cheaper than a cockpit-level replication, since in addition, no SRM-compatible cabs required (using the Storage Replication Adapter – MRS), this replication will be at the block level thanks to CBT (Changed Block Tracking) and will allow us to have the DPC replicated with a maximum loss of 15 minutes!

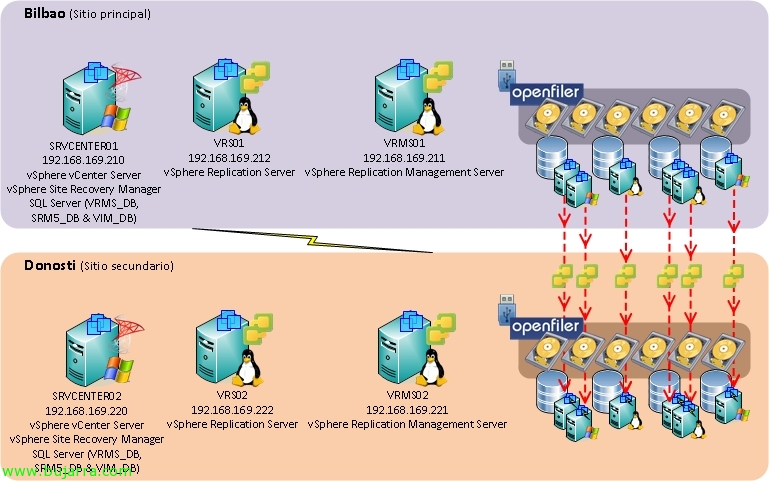
OK, In this image we can see the 2 CPD's that I have, One Main (Bilbao) and a secondary one (Donostia), each DPC has its own vCenter server 5, as well as an Openfiler storage array, which is where the virtual machines in Bilbao are stored and will be replicated to Donosti. In this scenario we will create a vRS server (vSphere Replication Server) and a vSRM (vSphere Replication Management Server) which will be the ones in charge of replicating MV to MV between the two delegations. Once we have a replication configured between both sites, we will test it and finally I will move the VC's to the backup DPC ('Cause I'll suffer a catastrophe) 😛

First of all, in the main data center we will install VMware vCenter Site Recovery Manager, (later we must carry out the same steps in the secondary data center), we can install it in the vCenter itself or we recommend using a VM for this purpose.

We accept VMware patents,

We accept the agreement,

If we are going to use replication at the array level, we will not need to install vSphere Replication (VR), in our case, yes, since it will be how we will manage the replicas of our virtual machines, So we marked “Install vSphere Replication” & “Next”,

We indicate the IP address or hostname of the vCenter server 5 primary, Your port (80TCP by default) and the credentials of a user with administrative privileges, “Next”,

We indicate the certificate you will use will be automatically generated or we will import one, “Next”,

We include the organization's information, “Next”,

Ok, We must give a name to this physical site, In order to receive notifications we will add our email address (for this you must be configured the SMTP parameters in vCenter), we will indicate the IP with which we want our SRM to respond, in addition to the ports (Default): 8095tcp for SOAP, 9085tcp for HTTP & 9007tcp for Soap APIs,

Ok, prior to this installation we must create a database on our database server and create an ODBC against it (x64), We can do this in this same step by manually entering the name of the connector, We indicate user & contraseña.

“Install” to begin the installation of VMware vCenter Site Recovery Manager 5,

…

After a few minutes of installation we have the installation finished, As I said, we will have to repeat these steps in the backup data center.

When we connect to the vCenter 5 from any of the, we will see how SRM is perfectly registered, We will have to install as usual the necessary plugin for its administration, we know it's a simple MyWife-style installation (Yes baby, Yes baby)

We'll see in our vCenter 5 that we have an icon in the 'Home’ of Site Recovery in Solutions and Applications.

Ok, the first thing will be to basically configure SRM, for this we must link the two DPCs in both directions (if we were interested, As we will see in another document, a return), but to do this we must first link SRM of the main site with vCenter of the remote site; so from the main site (Newly created) We set up the connection (Configure connection) -:)

Enter the address of the backup vCenter in question, “Next”,

It will give us a warning about the certificate since all the ones I use are self-signed and therefore we do not trust them, All alerts regarding certificate warnings have been omitted in this document.

We enter credentials with administrative privileges in the remote vCenter, “Next”,

We wait while the connection is made & “Finish”!

Ok, Now we'll log in against him; we will also set up the backup site (in my case the main one will be 'Bilbao vc01’ & the backup 'Bilbao vc02').

Once we have both sites connected with the corresponding vCenters, We will configure the mapping between the different sites, Resources (cluster, Folders, networks…), We start from the main site, 'Resource Mappings' tab’ > Source cluster & 'Configure Mapping'. These mappings will allow the machines that have these resources to know them in the other DPC, when placing them in a folder, Give you network-level connectivity…

We indicate the target cluster in this case, where we will raise the machines that we replicate to said site. “OK”,

List, we confirm that the mapping is correct, Now we must proceed in the same way between all the mapping tabs.

We will configure the mappings of the folders,

We configure the mappings between the different networks,

A small datastore will be required (Placeholder Datastore), in this store the VM configurations will be saved, Definition files (.vmx)… all hosts that need to protect/recover the VMs must have access to said LUN, in principle with the minimum size of VMFS5 it would be worth (1,2GB), we present said LUN to the hosts, We format it & we select it.

Once the steps are set up on the main site, we must do the same in the other DPC with the intention mentioned above, A possible return (not supported with VM-level replication, but by SRA with the replication of the arrays).

So we set up the mappings from the secondary site to the primary site, at the cluster level,

We configure folder mappings,

We also configure the mappings of virtual networks,

On this site we will also have to indicate which will be the datastore where the configuration files of the virtual machines will be stored, Ok, ready.

GOOD, Before you continue, we must check both in the main vCenter as well as in the secondary one the IP address that we have indicated, the vCenter administration address (from the VMware vCenter client > “vCenter Server Settings” > “Runtime Settings” > “Managed IP Address”).

Ok, Continue, Configure “vSphere Replication” if we were interested in replicating our primary data center to the secondary data center using VMware-based replicas, Click on “Deploy the VRM Server” in our main data center and later in the secondary one; in the case of having storage cabins, and we wanted to replicate the LUNs with them we would skip this step and set it up from “Array Managers”.

We will therefore deploy a VMware virtual appliance called vSphere Replication Management Server or VRMS from an OVF file. “OK”,

“Following”,

We confirm that we are deploying VMware's vapp VRMS, “Next”,

We provide you with a name and place it in our inventory, “Next”,

We select the cluster where to host the machine, “Next”,

Select the host where VRMS will run,

As well as where we will store, it can be in a local datastore,

Select the format of the disc, usually 'thin',

GOOD, We configure the root user's password, We indicate the gateway, IP address and netmask, “Next”,

If we have previously verified that we have perfectly registered our vCenter management address, we can continue since VRMS will need to register against the correct IP address of our vCenter.

GOOD, we end with the deployment of the VM, We confirm that everything is correct & “Finish”,

… We'll wait while it unfolds & Start…

We confirm that the VMware VRMS appliance has booted successfully, we confirm the URL to manage it.

We open a browser against https://DIRECCIÓN_IP_VRMS:8080, We entered as 'root'’ and the password that we indicate during the wizard.

Ok, before configuring and registering such machine against our vCenter, We will need to create a database on our database server beforehand. In addition, it will be a fundamental requirement to have mixed authentication on our SQL server (if we use one of these), we will create a SQL user & we will associate it with said DB.

And we'll set up VRMS against it, in principle it would not be necessary to create the DB beforehand since if you are supposed to perform the manual configuration it should be created by the wizard itself, after a long time of searching and to this day, Manual configuration should be indicated, create the DB before & Mixed authentication. We configure the rest of the parameters, the type of DB server, Required 1433TCP ports (in the case of SQL Server), SQL user, SQL DB, IP address of the vCenter server to which it belongs and where the VRMS will be registered, Mail for alerts, if we want another certificate… Once all the information is completed, We will go to “Save and Restart Service”, we will check that the VRM service is 'running'.
Additionally, from this interface we can: Modify network parameters, Team Name, Apply updates to the appliance, and maintenance tasks (off, restart…).

Once we have our first VRMS deployed, we must configure a connection with the VRMS of the backup delegation, To do this, we must first confirm that we have carried out the first two steps,

If we change to the remote site, we will have to repeat the steps of the virtual appliance deployment, as well as create a database on that site & finish the same steps we followed with the VRM Server of the main site, as well as register the correct IP address of management in said vCenter.

What I said, we deploy the OVF in Donosti…

… We continue the deployment…

Ok, once we have the two vSphere Replication Manangement Server's deployed, we must configure the connection between them, since “Configure VRMS Connection”,

“Yes”,

Enter the credentials with the administrator role of the remote vCenter Server & “OK”,

We take the connection for granted, “OK”,

Now we must deploy the vSphere Replication Server or VR Server,

“OK” to display from portable image,

We confirm that we are going to deploy VMware vSphere Replication Server, “Next”,

We indicate a name for the appliance and a name, “Next”,

We identify the cluster where you will reside,

As well as the host to which it will be associated and where it will be executed, “Next”,

Select the datastore where we will store it,

We also select the disc format, 'thin’ normally,

We also configure the necessary network parameters (IP, DNS, Mask & Gateway),

We confirm that everything is correct & “Finish”,

… we wait while it unfolds & Start…

We wait for the machine to start properly & tells us the URL to manage this vSphere Replication Server,

Enter the URL: https://DIRECCIÓN_IP_VRS:5480 With 'root’ and default password 'VMware',

We should modify the hostname of the appliance, We see that it's a SUSE 11, just like VRMS; In principle, we will not need more from this interface.

OK, we must register the VR server in the vCenter, for this “Register a VR Server”

We look for it by the tree & “OK”,

We confirm that we wish to register this vSphere Replication Server, “Yes”,

“OK”,

And we repeat the steps in the remote data center, we must deploy at least one VR Server appliance, we will repeat the steps similar to the main data center,

Deploying the vSphere Replication Server Equally from an OVF…

… We & We finish the wizard…

And in the same way as we recorded it previously, this VR Server must be registered in the backup vCenter.

We select it & “OK”,

From now on, we will be able to independently configure the replication of the virtual machines that we are interested in from the main data center to the backup one; As we have mentioned, this replication is at the virtual machine level (No Datastore) and it will be by modified block! to enable such replication, in each machine to be protected, Right-click “vSphere Replication…”

We will indicate the replication margin that varies from each 15 minutes to 24h, we will also indicate if we want it to rely on Microsoft's VSS when making the copy (We will use it on database servers), as well as indicate the destination LUN where this VM will be replicated, “Following”,

Select the format of the disc that will generate (thin or thick) At the destination, “Next”,

We select the VR Server that will replicate this machine,

We confirm that all parameters are correct & “Finish”,

Configuration performed on this machine, “OK”,

If we place ourselves in the “Virtual Machines” We will see the current status of the machines that are being replicated, as well as those that have already been replicated or the size of your last replica or the replica time.

Ok, Once the replication system is selected, Now we must configure its protection, where we will create a protection group of the machines we select (Our Critical Machines), We snack on “Create a Protection Group”,

We will select the protected site, as well as the replication system that we have configured, in the current case it will be VMware replication, we check vSphere Replication (VR), “Next”,

We mark the machines that we want to put in this protection group, “Next”,

We indicate a comprehensive name for the protection of our machines, “Next”,

We confirm that the config is correct & “Finsih”,

We confirm that we already have a protection group created, That his status is 'ok’ and that we have the correct number of protected MV's,

If we look at, in the destination vCenter we will already have the replicas of the machines that we indicate in the protection group ready to be booted if necessary by SRM, we check that they are off and have another icon.

GOOD, The important thing will be to create a good recovery plan, where we will add all the machines that we will protect, these machines will be replicated to the destination data center and we will have to configure a power on/off order as well as different options. Once we have the protection plan created, it will be essential to test and test it, for this we will need a private network in our backup CPD that will be where it turns on the replica VMs and connects them to said network so as not to affect production by duplicating IP's. “Create Recovery Plan”,

We select the recovery site as the backup CPD, “Next”,

We select the newly created protection group & “Next”,

We select the networks for the test, which will be an isolated network or at least separate from the production network so as not to duplicate the IPs,

We give the protection plan a name, “Next,”

We confirm that everything is OK & “Finish”.

What I said, Once the protection plan is created, Let's go to the tab “Recovery Steps” which will be where we configure the correct boot order of our VMs, indicating more or less priority… on a VC, Right Button “Set…”

We could if we were interested in raising this machine with another IP address,

Select the priority group to apply to that machine,

We could also configure dependencies between our virtual machines (who belong to the same protection group),

As a shutdown action we can indicate a timeout in case the VMware Tools do not respond in time or directly power off the source machine,

The same in the case of ignition, we will be able to indicate whether or not to start said VM in the destination, as well as whether we are interested in waiting for the VMware Tools or not, in addition to indicating a waiting time. The last two options would be some tasks/commands that we could execute before turning on the machine or after turning it on.

GOOD, Once the recovery steps have been well configured, we must test the environment to find out if this would work for us if necessary! 🙂 We hit the “Test”,

Mark “Replicate recent changes to recovery site” If we are interested in replicating the latest changes to the protected virtual machines during this test test, “Next”,

We confirm that everything is correct & “Start”!

After a few minutes, We will check the deployment of the machines, his replies, how it turns on the VMs at destination… Once our test of everything is correct, we can finish it! In addition to the periodic review of these recovery plans.

Once finished, we proceed to clean up the environment to undo all the previous steps, We perform a cleanup.

“Next” To run the Cleanup Wizard, If this wizard fails us, we will get the option to perform a “Force Cleanup” that it would continue with the cleanup even if there is any error during said execution.

We confirm that it is correct & “Start”,

List! perfect! Oh, well, now being a LAB I will do the complete recovery test on the backup DPC, pulse (And I just -:) “Recovery”

We have two options when it comes to recovering our environment, a first 'Planned Migration'’ that will move our virtual environment from the primary to the secondary data center with the latest modifications to our virtual machines, In the event of an error replicating these latest changes, the recovery plan will be cancelled. I'll select the second option, perhaps more Nazi, in case the reply fails, will continue to raise the virtual environment in the secondary DPC, “Next”,

We confirm that everything is correct & “Start”,

And that's it! We have all the steps of recovering my data center from Bilbao to Donosti without any problems