Installing and Configuring VMware SRM 5 with SRA and reprotect

This document is presented as an extension of the previous one where we saw the complete installation and configuration of VMware vCenter Site Recovery Manager 5 (SRM 5) with vSphere Replication, In this other document, we'll look at configuring replication using the arrays (we will use HP Lefthands, supported by SRM 5), later we will see another new SRM 5 that after validating a test and performing a planned migration/disaster recovery to the backup data center we will end with a 'reprotect’ rearranging all the machines in the main data center as it was originally.

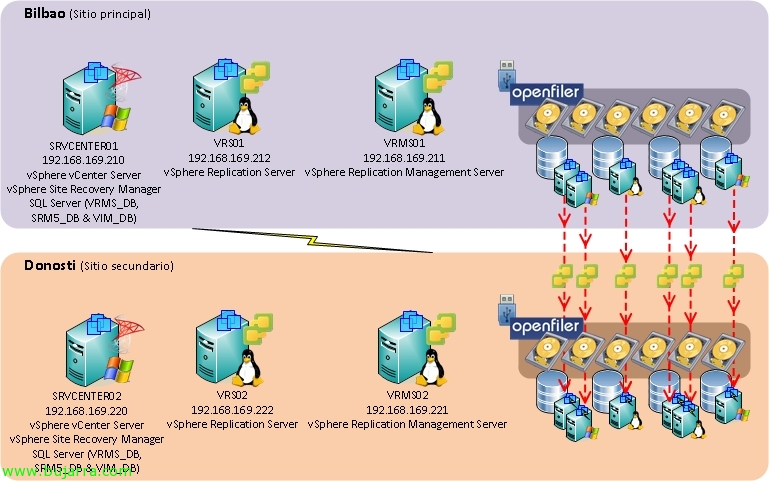
This would be the simple scenario described in the document, where we have in the main data center a VMware vCenter environment 5 where SRM is already installed 5, the virtual machines of our virtual infrastructure are stored in a pair of clustered storage arrays in the main data center, which, through the configuration of scheduled replicas, using snapshots on the VMFS volumes, will copy their contents at the block level to the secondary cluster of the HP Lefthand arrays. These arrays are iSCSI, They exist both physically and as a virtual appliance or VSA, suitable for both labs and small environments.

Este sería un pantallazo de la consola de gestión de mi entorno SAN de HP Lefthand donde vemos un par de sitios, uno que alberga al clúster principal formado por una sóla VSA (lo normal sería tener 2 VSA en mirror en cada sitio), que tiene una única LUN llamada LFT01 que contiene configurada una programación de instantáneas remotas sobre dicho volumen contra las cabinas de almacenamiento del sitio de respaldo.

Deberem0s realizar la instalación de Site Recovery Adapter (MRS) que es el software que nos facilitará el proveedor de almacenamiento, este software permitirá al SRM conectarse a la cabina de almacenamiento y mostrará las LUN’s que disponen de una replicación habilitada & programada, para que SRM pueda interactuar con las cabinas y replicar, testear y/o limpiar las LUN’s de origen o destino. Por lo que deberemos instalar el software SRA de nuestro fabricante en cada servidor SRM 5.0 (VMware vCenter Site Recovery Manager 5.0).

Una vez instalado SRA deberemos reiniciar el servicio ‘VMware vCenter Recovery Manager Server’ en cada servidor donde esté instalado SRM.

Ok, una vez que ya tenemos instalado SRM, SRA y configurados los enlaces entre los distintos vCenter deberemos de dar de alta los gestores de la parte SAN, in my case, como hemos comentado anteriormente, dispongo de un clúster en el CPD principal y otro en el CPD secundario, daré de alta en el CPD protegido el clúster de gestión de las cabinas HP Lefthand así como en el CPD de respaldo el clúster formado por las VSA de dicho sitio. Pressed “Add Array Manager”,

Indicamos un nombre y el tipo de SRA, en mi caso HP P4000 SRA. In this PDF oficial de VMware disponemos de todos los fabricantes, así como qué cabinas y con qué firmware estarían soportadas por SRM 5. En principio con la versión 5.0 de SRM los siguientes sistemas de almacenamiento serían compatibles: Dell Compellent (Storage Center); Dell EqualLogic (PS4000E, PS4000X, PS4000XV, PS4100E, PS4100X, PS4100XV, PS5000E, PS5000X, PS5000XV , PS5500E, PS6000E, PS6000S, PS6000X, PS6000XV, PS6000XVS, PS6010E, PS6010S, PS6010X, PS6010XV, PS6010XVS, PS6100E, PS6100S, PS6100X, PS6100XS, PS6100XV, PS6500E, PS6500X, PS6510E, PS6510X, PS100E, PS200E. PS300E, PS3600X, PS3700X, PS3800XV, PS3900XV, PS400E, PS50E & PS70E); EMC Celerra (NX4, NS-G2, NS20, NS20FC, NS40, NS40FC, NS80, NS-120, NS-240 NS-480, NS-960 & NSX); EMC VNX (VNX5100, VNX5300, VNX5500, VNX5700 & VNX7500); EMC Isilon (S-series, NL-series & X-series); EMC Symmetrix (DMX-2, DMX-3, DMX-4, VMAX, VMAX SE, VMAXe, DMX-4 950, DMX-4 1500, DMX-4 2500, DMX-4 4500, DMX-3 950, DMX-3 1500, DMX-3 2500, DMX-3 3500, DMX-3 4500, DMX-1000, DMX-2000 & DMX-3000); EMC CLARiiON (CX300, CX3-10, CX3-20, CX3-40, CX3-80, CX4-120, CX4-240, CX4-480, CX4-960); IBM (DS6000, DS8000, 2145-4F2, 2145-8F2, 2145-8F4, 2145-8G4, 2145-8A4, 2145-CF8, 2145-CG8, 2076-112, 2076-124, 2076-312, 2076-324, N series, ), HP EVA (4000, 4100, 4400, 6000, 6100, 6400, 8000, 8100 & 8400); HP LeftHand (P4300, P4300 G2, P4500, P4500 G2, P4800, P4800 G2, P4000 VSA, NSM2120, P4300, P6300 & P6500); NetApp (ONTAP 7.2 or higher, E2600, E399x, E4900, E54xx, E69xx, E79xx, IS5000, IS4600, IS4100, IS4000, 6780, 6580, 6180, 6540, 6140); Hitachi (TagmaStore, Virtual Storage, Universal Storage V & VM, SANRISE NSC 55, USP 100, USP 600, USP 1100, Adaptable Modular Storage 2100, 2300 & 2500); FalconStor (CDP Gateway, IPStor Enterprise, NSS Gateway, NSS SA, NSS VS & NSS VA); Fujitsu (ETERNUS4000 300/500, ETERNUS4000 400/600, ETERNUS8000 700/900/1100/2100, ETERNUS8000 800/1200/2200, ETERNUS DX90, ETERNUS DX90 S2, ETERNUS DX410/DX410 S2/DX440/DX440 S2 & ETERNUS DX8100/DX8400/DX8700).

Indicamos los credenciales y la dirección IP del clúster primario, “Next”,

“Finish”,

Ok, realizamos los mismos pasos para el CPD de respaldo, una vez agregadas ambos sistemas de almacenamiento, los tendremos que emparejar, así que en actions pulsamos sobre ‘Enable’.

Una vez emparejadas las cabinas debemos crear un grupo de protección donde seleccionaremos replicación basada en las cabinas y no en vSphere, seleccionaremos los datastores que protegeremos (con el contenido de MVs a proteger), posteriormente crearemos un plan de recuperación con estos grupos de protección con los que realizaremos los tests de planes de recuperación de desastres entre el CPD principal & el secundario. “Create Protection Group”,

Seleccionamos el sitio protegido (origin), seleccionamos en el tipo “Array based replication (SAINT)” y seleccionamos las cabinas recientemente emparejadas, “Next”,

Seleccionamos los datastores a proteger, en la parte inferior podremos observar las máquinas virtuales que se respaldarán ya que están alojadas en ese volumen VMFS, “Next”,

Indicamos un nombre al grupo de protección & “Next”,

Confirmamos que la configuración es correcta & “Finish”!

GOOD, una vez tenemos definido nuestro respaldo, debemos crear un plan de recuperación en el que seleccionaremos nuestros grupos de protección y configuraremos órdenes de arranque/apagado u otras opciones posteriormente, Click on “Create Recovery Plan”,

Indicamos cuál será el sitio de recuperación, “Next”,

Seleccionamos el/los grupos de protección,

Definimos las redes de test que utilizaremos en el datacenter de backup, ya que una vez generado este plan & configurado deberemos testearlo hasta que no obtengamos errores, “Next”. Si no tenemos redes aisladas para realizar los test’s deberemos crearlas para evitar conflictos de IP’s entre el CPD de producción y éste. “Next”,

Indicamos el nombre al plan de recuperación, “Next”,

We confirm that everything is OK & “Finish”,

Cómo vimos en el documento anterior de SRM 5.0, debemos editar los pasos de recuperación indicando nuestras configuraciones a la hora de arrancar/parar las máquinas, priorities… una vez configurado según nuestras necesidades pulsaremos en “Test” para comprobar si la configuración es correcta,

Mark “Replicate recent changes to recovery site” with the intention of transferring the latest changes from our HP Lefthand datastores between Bilbao and Donosti, “Next”,

We confirm that the protected site is correct, as well as the destination, “Start” to start the test!

Perfect, after a few minutes, the last modified blocks will be replicated at the SAN level between the different sites, later it will register the machines, on… once we see that everything starts according to requirements, we perform a cleanup to have it ready in case we need to use the site someday. We carried out a “Cleanup”,

“Next” to start the cleanup assistant after a successful test.

“Start” begin with, It will take a few minutes and we will have the replication between both datacenters ready and protected with VMware SRM 5 It only remains to start it if necessary.

Ok, Since this is a lab, we can simulate the failure of the primary datacenter and perform a recovery in the backup datacenter, To do this, click on “Recovery”,

We mark the check of “I understand that this process will permanently alter the virtual machines and infrastructure of both the protected and recovery datacenters” Indicating that VMware passes on the responsibility for what we are going to perform, And we select the type of recovery that interests us, If it is planned (In case of any error, it will be canceled) Or if the primary datacenter no longer exists (Because it has burned out…) We will perform a disaster recovery.

As always, we confirm that it is correct & “Start”,

And that's it! it will take all the necessary time to replicate our storage arrays (if possible), it will perform an orderly shutdown by inverting our boot options in the protected machines' data center, it will change the source datastore to read-only and migrate the content to the destination Lefthand, then it will modify that store to allow writing and start the machines in the recovery data center.
One of the new features of VMware Site Recovery Manager 5 using SAN replication is the ability to use reprotect or reprotecting, which will allow us to return the primary data center to its initial state once we move everything to the backup data center, So by using this new feature we will restore everything to its original state. Click on “Reprotect”,

We confirm that we will not be able to undo this action, since for that we would have to use a recovery plan… “Next”,

We confirm that the new protection and recovery sites are correct and we would start moving data/machines between both sites just like in test or recovery processes. “Start”!

And that's it, We would wait for it to finish and then we can generate the recovery plans again, back against (again) the backup data center, etc, etc…