Citrix Branch Repeater VPX

Citrix Branch Repeater VPX is the new name for the WANScaler appliance in virtual environments, Supported for Citrix XenServer, VMware vSphere and soon Microsoft Hyper-V. In this last document we already saw how to set up WANScaler (www.bujarra.com/?p=3320) so its operation does not vary too much, the most complicated thing will be to define a good design in our physical and virtual infrastructure since depending on the needs we will have to assign one or two physical NIC's to the virtual network where we host the virtual machine or configure different VLANs if necessary. In this document we will see how to deploy the VM and how we will optimize the traffic of an external client (with the plugin).

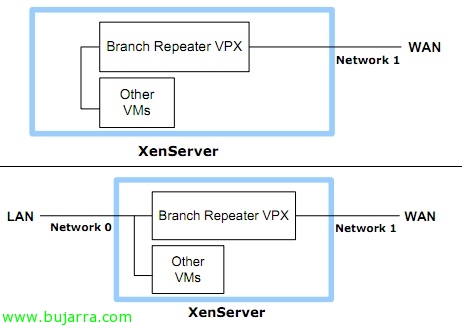
The version of this appliance is the 5.6.1 which has the same functionalities as the 5.5 that physical appliances have (Repeater Series 8500), unlike that we will not be able to enable High-Availability mode or Group Mode. In the image you can see the two ways to mount Branch Repeater VPX, everything will depend on our network and above all on the design to be implemented, since being physical it is easier to implement in large environments. This virtual appliance is geared toward low bandwidth (Up to 10Mbps). Apart from the physical appliance (Citrix Branch Repeater Appliance) And this VPX, we would have Citrix Branch Repeater with Windows which is a Windows 2003 OEM Storage Edition on a physical machine (integrated with ISA + cache).
With HTTPS/SSL/VPN IPSec there would be no traffic compression but flow control allowing us to lower latency.

As usual, The first thing to do is download the 2 components that we will need one the Citrix Branch Repeater VPX of the Citrix official website and the plugin that will be the client that we will install on a Windows computer and will be the computer that connects remotely to our delegation; it will connect to a server of the central and transparently pass all its traffic through the Branch Repeater that will behave like a Bridge. This VPX comes in OVA template format so from VMware we will import it from “File” > “Deploy OVF Template…”

Select the .ova file, “Next”

We confirm that it is Citrix Branch Repeater VPX, “Next”,

We indicate the name for the virtual machine,

We indicate the datastore where we will store it, “Next”,

Select 'Thick provisioned format’ for production environments, “Next”. We will have to take into account that 60Gb of disk is not recommended for production environments, once we have the machine turned off we will expand the vHD to 100Gb, It is enough to simply expand the disk since the next restart of the machine will detect it and expand the partition.

We indicate our virtual switches to which we will assign the vNICs, the LAN-apA-1 network will be connected to our internal virtual network (LAN) and the WAN-apA-2 network on the external network,

We confirm that everything is OK & “Finish”,

…

“Close”,

Now once we have it turned off, we will edit its virtual hardware to meet the requirements of our environment.

We turn it on,

We connect with the default user 'admin’ and 'wanscaler’ password, The only thing we will configure here will be the management network adapter by: 'set adapter apA -IP DIRECCION_IP -netmask MASCARA_DE_RED -gateway PUERTA_DE_ENLACE’ and we restart with 'restart'.

To allow incoming traffic we will have to configure the Branch Repeater virtual networks in promiscuous mode so we will mark 'Accept’ the 'Promiscuous Mode'; This allows it to capture all the traffic that flows through it.

We log in through a browser to the address of the apA adapter with http or https.

The first time we enter it notifies us with alerts, We will have to modify the password of the user 'admin', We will also enable bridging. If we are going to connect only Branch Repeater appliances to each other, we will enable the Hardbust mode that will allow the maximum possible acceleration; on the other hand, if we will need access to clients with the Plugin we should indicate Softbust (this in Bandwidth Management); as well as to configure the real limits that we have in our environment (Send/Receive Limit). If our interest is to use QoS, we would have to define rules with the type of service desired (HTTP, FTP, ica, MAPI, CIFS…) and then policies to speed it up/compress it and assign it to the queues of more or less priority.

In “Configure Settings” > “Date/Time” Important to configure the time service manually or with an NTP server on your network.

The form of licensing will be different depending on the licenses acquired, since NFR licenses, VPX Express and Evaluation are licensed locally (assigning the branch's MAC in MyCitrix); and Retail licenses, CSP, and annual licenses require a Citrix license server on Windows (assigning the license server MAC in MyCitrix). In “System Tools” > “Manage Licenses” we will indicate well 'License Server’ or 'Local Server'.

If we want to allow remote client connections and allow acceleration in their traffic with our network, we must first add the necessary licenses on the license server. Later in En “Configure Settings” > “Repeater Plug-in” > “Signaling Channel Configuration” we will enable it 'State’ a 'Enabled’ and we will enter the IP address for Signaling which will be the address to which customers connect from abroad (Logically, this rule should be added to our firewalls), in addition to indicating the port (Default 443TCP), We indicate transparent mode and optionally we can indicate the value (in milliseconds) for the discovery of a LAN network.

In “Configure Settings” > “Repeater Plug-in” > “Acceleration Rules” We will have to configure acceleration rules depending on what traffic we want to accelerate and from which target networks (and its ports).

Once configured correctly, we confirm that everything is correct.
Installing and Configuring the Citrix Acceleration Plug-In,

This will be the plugin that we will install on the remote computers that are not after the second Branch Repeater, is an MSI and we can edit it with Orca to indicate the Signaling Addresses automatically.

We accept the license & “Next”,

We indicate the installation directory for Citrix Acceleration Plug-In, default %ProgramFiles%Citrix,

“Install” to begin installation,

…

“Finish”,

We must restart the computer, “Yes”,

Once the computer is restarted, we must configure 'Signaling Addresses'’ with the public IP address we set up earlier, we will also have to expand the use of disk (recommended 10Gb). We'll test the connectivity and save the configuration,

We check in this graph on a line of 2mbps the accelerated traffic and the compression rate, as well as bytes sent before and after compression.