Multipath Configuration for RHEL Servers
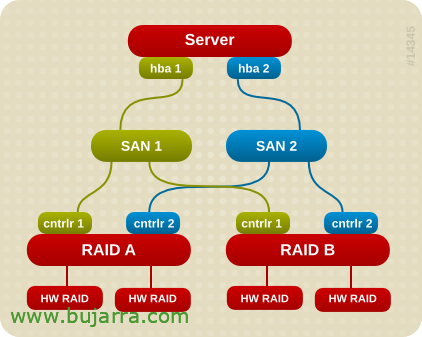
Today I share with you a procedure that my colleague 'Marcos Ortiz' has sent me, where we will see the configuration to be applied to RedHat machines in order to correctly configure the native multipath software when you have a Boot From SAN environment (BFS).
1. Start the OS installation. RHEL with the 'linux mpath option'’ (With all the roads presented).
2. Once we finish the basic installation, After the first reboot, We will find an error (Repair FileSystem), Enter the root password and run the following command:
- Mount -o remount rw /, to put the system in RW
- Edit the /etc/multipath.conf file and put the following lines:
blacklist {
Devnode “^(RAM|Raw|Loop|Fd|Md|Dm-|Mr|Scd|St)[0-9]*”
Devnode “^(Hd|xvd|Vd)[A-Z]*”
# wwid “*”
}
Multipaths {
Multipath {
wwid “36006016063102B006A2BDD66337AE011”
alias mpathROOT
}
}
devices {
device {
Vendor “DGC”
product “.*”
product_blacklist “LUNZ”
getuid_callout “/sbin/scsi_id -g -u -s /block/%n”
prio_callout “/sbin/mpath_prio_emc /dev/%n”
features “1 queue_if_no_path”
hardware_handler “0”
path_grouping_policy “group_by_prio
Immediate failback
rr_weight uniform
no_path_retry 60
rr_min_io 1000
path_checker emc_clariion
}
}
3. Edit the /etc/lvm/lvm.conf file and modify the following lines:
- Comment preferred_names = []
- preferred_names = [ “^/dev/mpath/”, “^/dev/mapper/mpath”, “^/Dev/[Hs]d” ]
- filter = [ “a/dev/mapper/.*/”, “r/dev/sd.*/” ]
4. Once these steps have been carried out, we mount the RH installation CD and restart the server, we boot from CD and in the type of installation, Put “Linux Mpath Rescue”, With this we will enter recovery mode.
- We select language, keyboard.
- We skip network configuration.
- We skip File System scanning.
- Once we have the shell, We execute the following procedure:
mkdir /mnt/sysimage
mkdir /mnt/sysimage/boot
multipath –F
multipath –v0
mulitipath –l
kpartx –a /dev/mapper/mapth0
lvm vgscan –config ‘devices{ filter = [ “a/mapper/”,”r/.*/” ] }’
lvm vgchange –ay –config ‘devices{ filter = [ “a/mapper/”,”r/.*/” ] }’
mount –t ext3 /dev/mapper/rootvg-lv00 /mnt/sysimage
mount –t ext3 /dev/mapper/mpath0p1 /mnt/sysimage/boot
mount –t proc none /mnt/sysimage/proc
mount /dev /mnt/sysimage/dev
mount /sys /mnt/sysimage/sys
chroot /mnt/sysimage
dmsetup mknodes mpath0
dmsetup mknodes mpath0p1
dmsetup mknodes mpath0p2
dmsetup mknodes mpath0p3
Remount the /boot directory
umount /boot
mount /dev/mapper/mpath0p1 /boot
Change the /boot/grub/device.map entry to point to the mpath boot device
# this device map was generated by anaconda
(hd0) /dev/mapper/mpath0
/dev/rootvg/lv00 / ext3 defaults 1 1
/dev/mapper/mpath0p1 /boot ext3 defaults 1 2
tmpfs /dev/shm tmpfs defaults 0 0
devpts /dev/pts devpts gid=5,mode=620 0 0
sysfs /sys sysfs defaults 0 0
proc /proc proc defaults 0 0
/dev/mapper/mpath0p3 swap swap defaults 0 0
/dev/mapper/uservg-lv01 /export/home ext3 defaults 1 2
/dev/mapper/uservg-lv02 /export/appl/pkgs ext3 defaults 1 2
mkinitrd –f /boot/initrd-2.6.18-53.1.6.el5.img 2.6.18-53.1.6.el5
grub-install /dev/mapper/mpath0
5. It is important to remember, that every time the /etc/multipath.conf is modified, We need to generate a new initrd using the mkinitrd command –f /boot/initrd-2.6.18-53.1.6.el5.img $(uname -r).
Thank you Marcos!!!


