
Installing and Configuring 3CX VoIP PBX with Linksys SPA3102 Gateway

In this document I will explain the basic installation and configuration of the 3CX free PBX as well as the configuration of the Linksys SPA3102 Gateway to allow incoming and outgoing calls from a PSTN analog line.
First of all, Get the files to install. You have the free version on the official 3CX website (http://www.3cx.es/).
The PBX can be installed on a WinXP or Server2003 machine. In theory, also about Vista and 2008 but personally, I haven't tried them. We will run the services on a WinXP and test the client with a View. Prior to installation, we must have available in the .Net Framework 2.0.
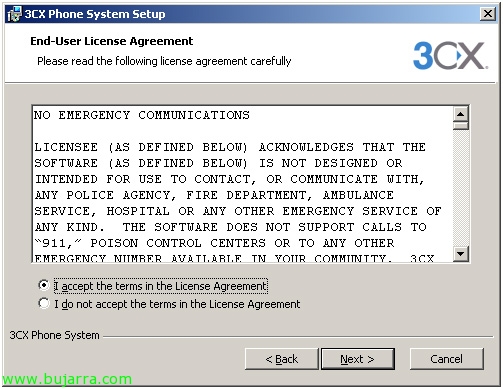
We run the installer.

We accept the terms and select the application group in which we want to install it as well as the path.

The IP/FQDN/SIP Domain is our VoIP ISP, so to speak, the one who is going to give us call service. There are some that are free and allow you a call duration of 1min. This, Can be configured later.

Now we must indicate the number of digits we want the internal extensions to be., In my case I select 3 Digits. (For example: 234)

This window, It shows us the credentials with which we can enter the PBX administration console later.

This window is for integrating the PBX with your mail server. I haven't tried it but hey, in the console there is a wizard to be able to deploy 3CX with Exchange 2007. This is how we would achieve, that if we are not on our phone and they leave us a message, This message is automatically forwarded to our mailbox.

Click on install...

…And we wait for it to end.

Now we are able to manage and configure our own VoIP switchboard in depth. Management is accessible from anywhere on your network, HTTP://IpDelEquipoECU:5481

Basic Configuration: Extensions, Call queues, ISP VoIP, PSTN Lines…

To get started with setting up extensions, you have to go to the Extensions/Manage/add Extension tab.

It's as simple as entering the desired extension number (Remember that in the installation we have put the extension outside of 3 Digits), the name and surname of the person who will use the extension, And to finish, ID and Password (With this data, then we will be able to log in with the Softphone client or IP phone). The rest of the configurations are for the Exchange integration issue, Call forwarding in case of a busy phone, Out of service or unresponsive (We will configure this in the call queues) and name for ISP, in case they want to call us from outside our network with a name through the VoIP ISP.

When setup is complete, We are shown a summary of what we have configured and some links to the tutorials to configure certain phones with this extension.

If we select the Manage tab, We will be able to see the list of the extensions created, with the most relevant information about them. I have created one more to make the call queues now.

About the Advanced tab, we can configure Ring Groups or call queues. Ring groups, They allow you to when a call comes in, start ringing all those extensions you've set up, or for example if you want to call anyone in a department, call a master extension that rings all extensions belonging to that department. On the contrary,, The Call Queue, is to tell you that when a call comes in to some configured extension, if after some time he has not taken or is busy, jump to another extension and so on and so on.

When creating a new one, The first thing we must choose is the extension of the ring group. Not surprisingly, We'll give a name to recognize it, and in my case the ringing strategy is "ring all". Below we have the list of available extensions. They must be added to "Members".

In the event that there is no response, We can send the call to another extension, Ring group, Call Queue, as well as finishing it or leaving it ringing.

We now configure the VoIP line, so you can start making calls abroad. To do this,, we will go to the "Lines" tab "Add VoIP". In this part we have some templates with the most common ISPs for 3CX, in case ours does not fall within those templates, select "Generic VoIP Provider". This configuration will have to be provided to you by the Provider you have chosen.

Now is when we have to configure the PSTN line that we want to add. This line is going to be configured towards the Linksys SPA3102. To do this, we must select Add PSTN Lines.. As with VoIP ISPs, There are hardware templates we recommend. In our case we have it so we will select it and give it a name.

In this window, we must indicate the IP that we have assigned to the Gateway. Default, Mark the port 5060, although I recommend that you put another one, such as the 5062. The rest of the options, we have them "restricted" since we have chosen a template.

Next, we are shown a screen on the virtual extension that is going to be the PSTN line, as well as the ID and Password that we will later use for the configuration of the Linksys SPA3102. In call routing, We can select an extension that the call is going to enter. Can be simple extension, ring group or call queue if we have configured them. You can choose one for the day and one for the night. These schedules can be set in the "Options" of the 3CX PBX.

To conclude, They will give us the possibility to create an output rule. This is telling the switchboard when it has to take this road and not another. For example, for all calls starting with "9" that carry the "Linksys Gateway SPA3102" route, Removing "0" digits.

As on other occasions, when the PSTN setup is complete, a summary is shown that will be very useful when configuring the Gateway. Notice that when you select a port other than the 5060, The summary ignores that option since it continues to mark the damn 5060.
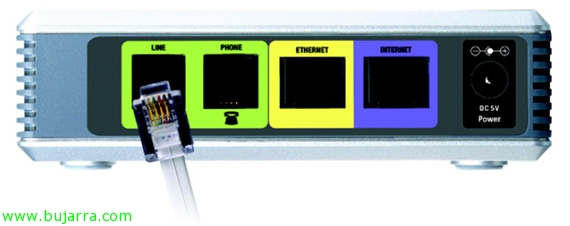
It's time to install and configure the Linksys SPA 3102 And the first thing is to know where to plug in all the cables, we, as we are only going to use it as a gateway between VoIP and PSTN, we must plug the telephone line into LINE and the internal network in ETHERNET. PHONE, It's for the FXO, an incoming phone or a FAX and INTERNET is for the case that we want to configure the Gateway as a router as well.

Once we access the web configuration, The first thing we will do is click on "admin login" and "advanced" so that all the options are shown. (The default ip is 192.168.0.1)

On the WAN tab, We will configure the network parameters, selecting the IP of the Gateway, the gateway, the subnet mask...

LAN Setup, we will leave it as it is except for the option "Enable DHCP Server" that we mark a "NO". Before you switch tabs, always save all changes with "Submit All Changes".

Once we have the network parameters configured, Let's go with the parameters of communication with the switchboard. The image above belongs to the VOICELINE PSTN tab. We must mark the port we have previously selected on the 3CX, the 5062 in my case, In Proxy we will dial the IP of the switchboard and then we have to indicate the credentials. "Display Name" is an identifying name, "User ID" means the indicated ID, "Password" ... Well, you know, we will mark "Use Auth ID" in "YES" and that's it.

The dial plan we have to dial the virtual extension of the PSTN Line on the 3CX PBX with the format (S0<:Virtual Extension>).

Below we will check the option of "PSTN Caller Default DP:" in "8" since the Dial Plan has been written in the 8. All other values are taken by default.
We already have the Gateway ready to make and receive calls. If we go to Line Status on the 3CX PBX, we should see the line in Green.
Gateway configuration may vary depending on the line.
You can find manuals and consultation forums on the official 3CX website.


