Installing and Configuring Microsoft Office ProjectServer 2003

In this document, we'll explain how to properly install Project Server 2003, for this we need a SQL server (A 2000) to store the DB for Project Server projects, on this server we will then put the Analysis Services; and logically then we will connect with the web client or Microsoft Outlook or Microsoft Project Professional 2003.
– Pre-installation – HERE
– Installation – HERE
– Post Installation – HERE
– Outlook Integration – HERE
– Project Professional Setup – HERE
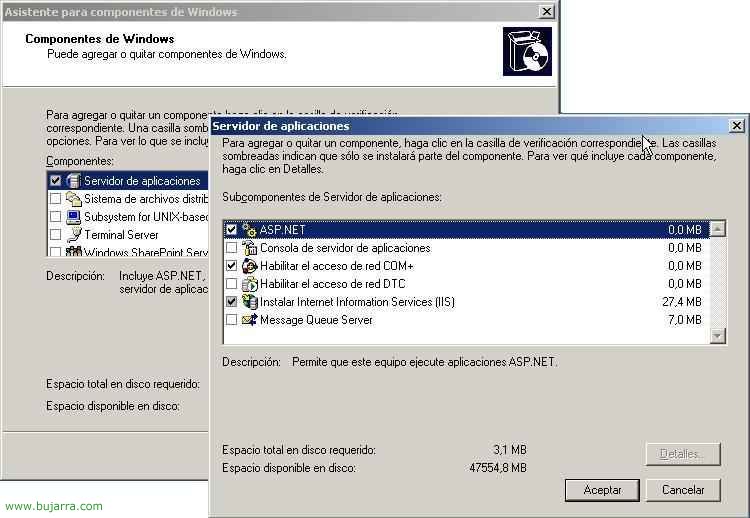
First, on the server that will have Project Server we must install the IIS components + ASP.NET, for this, Let's go to the “Panel de Control” > “Add or remove programs” > “Add or remove Windows components” > Mark “Application Server” in “Details…” Mark “ASP.NET” and the necessary components will be automatically selected. We accept and install…

Now, in the Active Directory (It doesn't have to be on this server, far from it), we create a user that we will then use. So we opened the console of “Active Directory Users and Computers” of the “Administrative Tools” and create a user about the Organizational Unit that interests us, Right-click “New” > “User”.

We give you a name, in my case it will be “ProjServer”, “Following”,

We provide a password to this user, We marked that “User can't change password” and “The contaseña never expires”, “Following”,

“End”.

Now we go to the SQL server, to create a SQL user; in “Safety” > Right click on “Logins” > “New login…”

We provide you with a username, in my case “SQLProjServ”, Mark “SQL Server Authentication” and we provide you with a password.

On the “Server Roles” We marked him “Security Administrators” and “Database Creators”, We accept to create the user.

Now, in SQL Server properties,

On the “Safety”, we verify that the authentication will be of “SQL Server and Windows”, If we want, we can raise the level of auditing to obtain more information in case of possible failures.

GOOD, now we need to install the Analysis Services on the SQL server. To do this,, we insert the SQL CD and select “SQL Server 2000 Components”

Click on “Install Analysis Services”

“Following”,

We accept the license agreement, “Yes”,

We only dial “Decision Support Objects” and “Customer components”; We start the installation by pressing “Following”,

We waited a few minutes…

OK, “End”,

Now what we need to do is install the latest Service Pack available for these Analysis Services. To do this,, on the Microsoft download website (HTTP://www.microsoft.com/downloads) we download the SP corresponding to Analysis Services, in this case it is called: SQL2000. AS-KB884525-SP4-x86-ESN.EXE.

Once Analysis Services is installed, in the Active Directory or if not, on the local users of the SQL server will have created a group called “OLAP Administrators”,

And we put in the user that we created before, if it is a local SQL server group, We'll look for the user in the domain location.

Now, on the Project Server server, let's check that ASP execution is enabled, for this we go to “Manage your server” in the “Administrative tools”,

Click on “Add or remove function”,

“Following”,

And to verify that in “Application Server (IIS, ASP.NET)” is “Configured” a “Yes”, if it wasn't, we would enable it.

Now we are going to install the SharePoint Services that are necessary to improve the performance of writing files so that multiple users can write to the same file at the same time. To install it we can do it, downloading it from the Microsoft download website (http://www.microsoft.com/downloads) or else from “Control Panel” > “Add or remove programs” > “Add or remove Windows components” and it would be by checking the last check of “SharePoint Services”. In this case I have downloaded it from the Microsoft website. We accept the license and continue,

We carry out a “Typical Installation” & “Following”,

“Install”,

…

… Hope…

When this website opens to us, the services will already be installed. Perfect.

GOOD, now on this same server, We open the “Internet Information Services Administrator (IIS)” of the “Administrative Tools”, and we go to the properties of “Websites”.

On the “Service”, Check that it is unchecked “Running the WWW Service in IIS 5.0 Isolated Mode”

GOOD, now we're going to prepare SharePoint Services so that we can use Microsoft Project Server with them, Stop that, we put the Project Server CD in and in the author we mark “Microsoft Windows SharePoint Services”,

Now, “Windows SharePoint Services Configuration Wizard” or “Windows SharePoint Services Configuration Wizard”,

“Following”,

We select the “Default Website” and “Following”,

Select “Sites” and “Following”,

We indicate who is the owner of the site and their email, “Following”,

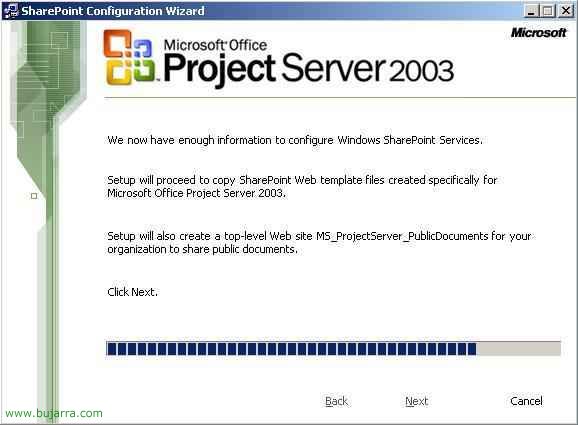
“Following” to configure Windows SharePoint Services,

We wait while you set up…

Click on “Accept” as it will close the setup wizard and wait for you to reopen it to finish the setup…
… continuous…

Ok, Configuration Completed, it already tells us that to manage SharePoint Services we must do it with a browser connecting to the port 7764. Click on “End”.

GOOD, Now we start with the installation of the server, we put the Project Server CD in and click on “Server Installation”,

We indicate Name and Organization, “Following”,

We accept the license, “Following”,

This would be the installation path for Project Server, “Following”

We leave the installation by default, “Following”,

Click on “Create a new database” and we tell you on which SQL server you will do it, Mark “Connect using: SQL Server Authentication” to create the DB with the user we have previously created in SQL, We put the credentials in and continue,

Mark “Connect to the Project Server 2003 Primary Database”, “Following”,

Now it will create two user accounts, “MSProjectServerUser” and “MSProjectUser”, we must indicate passwords, the first account is for connecting Project Server to the ProjectServer database; and the other user account to connect Project Professional to the DB. “Following”,

We enter the data now, we indicate who the Analysis services server is, it's usually SQL, but it doesn't have to. And now an account to connect us to it, which will be the user we have previously created and put into the group “OLAP Administrators”, “Following”

It asks us on which website you will create the site for Project Server, Select “Default website” & “Following”,

When we send an email to users and hyperlinks come to them, we must refer to which server Project Server is installed, We indicate the name of the server. “Following”,

For email notifications, If we are going to use it we can now configure who the mail server is, the SMTP port and from which account the emails will arrive. “Following”,

It doesn't matter, We can enter the information later, “Following”,

Select “Enterprise” Because if not, we will not be able to use all the benefits of Poject Server, “Following”,

Now it will create the ProjectServer administrator account, but we must indicate a password, this will then be the one with which we access through Web Access. “Following”,

The installation begins by clicking on “Install”,

… lasts a few minutes…

OK, Finally, Click on “End”

Now let's upgrade Project Server 2003 to the latest Service Pack, but for this, first you have to update the Project DB, “ProjectServer”, we have to go to the SQL server. The SP that I am going to apply is the 3, the last one to date of the document, we go to the Microsoft download website and there we look for it (HTTP://www.microsoft.com/downloads), we download the first patch called ProjectServer2003SP3-KB923645-SqlFile-ESN.exe and unzip it into the SQL BINN directory, which by default is: “C:Program FilesMicrosoft SQL Server80ToolsBinn”.

We go x MSDOS commands to the directory and update the DB with the command: “upgdb113.cmd SERVIDOR_SQL BASE_DE_DATOS”. (Before you update, Logically we would make a backup).

The DB updates us for a while, In my case it doesn't take long since I don't have content, Press a key to continue.

Then we need to apply the ProjectServer SP3, we look for it again on the Microsoft download website (HTTP://www.microsoft.com/downloads), would be to download and run the file: ProjectServer2003SP3-KB923645-FullFile-ESN.exe.

After ProjectServer SP3 is installed, we must update the Project Server templates, for this there is another update on the same website of the Project Server SP, we look for it on the Microsoft download website (HTTP://www.microsoft.com/downloads), We look for the ProjectServer2003-KB923645-WSSFILE-ESN.EXE file, We download and install it.

Now, so as not to have problems, we have to put the Project Server server from where we are going to open Project Server Web Access or Project Professional 2003 as trusted sites…

Now we're going to create a user group where the users we put in here will have access to use Project. To do this,, we go to the Active Directory or the server administration console, if it is not a domain controller and then we create a new group.

We will create a group “Global” and of type “Safety”, We give the group a name, For example “ProjectUsers”.

And we must include as members the users we want in it so that they use Project.

On the Project Server server, We open the “Internet Information Services Administrator (IIS)” in the “Administrative Tools”, to access Project Web Access, Changing certain permissions, envelope “Websites”, on your properties.

On the “Directory Security”, in the part of “Authentication and access control” Click on “Modify…”.

We must mark the checks of “Built-in Windows authentication” and “Basic Authentication” and we will look for the domains, We accept all screens after.

We tried opening the Project Web Access address with a browser, To do this, we put: HTTP://SERVIDOR_PROJECT/ProjectServer/ and log in to the administrator account we created earlier during the Project Server installation wizard.

If this is the first time we are open, We will need to accept the license “I accept the terms in the License Agreement” & “Next”

Also if it is the first time we open it from this team, it will install a Project Server ActiveX, Click on “Install”,

Click on the “Administration”

Click on “Server Configuration”,

In “Active Directory Group to Synchronize” we write the group we have created before where we will put the users who are going to use Project Server, “UsersProject” in my case, and click on “Upgrade Now”.

To check that this sync works, We're going to “Manage users and groups” and in the combo when you deploy it, the users we have added should appear.

To install certain components in our Outlook and work with it directly, log in to the Project Web Access console and click on the “Working with Outlook”,

Click on “Download Now”, and we install the,

Click on “Install” to install the…

…

OK, It would already be installed now is to test it.

When you open Outlook, you'll see several new buttons.
Configuring Project Professional to work with Project Server,

To allow Project Professional users to work with common projects and work with multiple projects at once, We must set it up, Click on “Tools” > “Enterprise Options” > “Microsoft Office Project Server accounts…”

We must create a new account, Click on “Add…”

We give it any name, descriptive; in “Dirección URL de Project Server” We put the address of the Project Server server: HTTP://SERVIDOR_PROJECT/ProjectServer. Mark “Use a Windows user account” and “Set as default account”. And we tested the account from “Test Connection”

Accept.
Now, we close Project Professional and reopen it so that it connects us with this new account, We will go against the server. Now it's creating projects and working 🙂
www.bujarra.com – Héctor Herrero – Nh*****@*****ra.com – v 1.0