RIS Installation and Configuration – Remote Installation Service – Remote Installation Service

RIS is a utility that MS Windows brings 2003 and serves to distribute operating systems over the LAN, so you don't have to travel with the S.O's CDs. Over there, if we buy a new PC for the office, if you put it to boot by network card it would start to install for example MS Windows XP with SP2, This is the example I will make. Of course,, The installation is clean and without any other software, That's why we have active directory policies for distributing software – HERE. And if what we want is to distribute it with applications and so on, we should go to commercial products like Symantec Ghost. More RIS configurations are explained below. – HERE; and how to use RIS with unattended installation files (Unattended Setup Answer File) – HERE. And if you don't know what unattended installation files are, Take a look at this procedure before – HERE.
Prerequisites: On the server that we are going to install it it has to have at least 2 Partitions, where the images of the CD's are copied cannot be in the same system. It has to be an NTFS partition. Domain/Active Directory must exist. And logically, Space for disk images. Running a DHCP on the network – HERE.
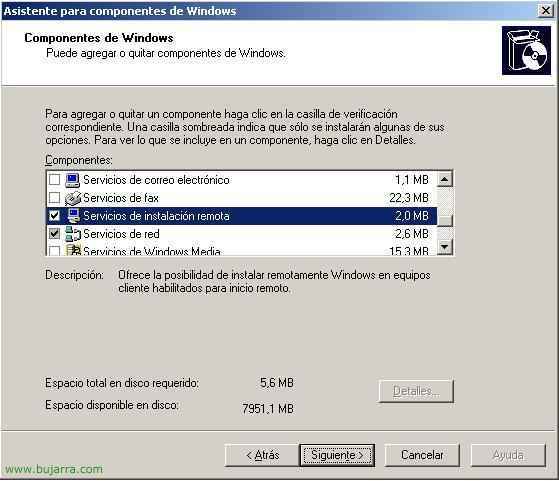
Started, to install the 'RIS server', We are going to “Beginning” > “Panel de Control” > “Add or remove programs” > “Add or remove Windows components” and we marked the check of “Remote Installation Services”; we put the MS Windows CD on the server 2003 and we give “Following”.

We wait while you copy…

End.

And… There is no choice but to restart the server, We restart it to continue.

It will create a new console called “Remote Installation Services Setup”, We open it.

Following,

It is the directory where all our S.O images will be stored. clients, it has to be a different partition than the System and NTFS, in my case E:

We mark the first check and click on Next, it is simply in case a PC requires the RIS, Well, let him accept the connection.

Vale, Now for example, to make an image of the MS Windows XP SP2 CD in Spanish, we put the CD in and indicate the letter of the drive where it is, in my case “D:”, We give Next,

We give a name to the folder where you will save it and Next.

A description…

And now, pressing Finish will start copying the CD to the hard drive.

We wait while you copy file and perform all the tasks…

Ok, All without problems. The server part is now finished, now it would be left to boot the client PCs.

If the PC's customers, have a compatible network card and PXE, it's just setting it in the BIOS to boot through it…

And if the same thing happens to you as it did to me, I don't have a compatible network card, Well, we created a very light PXE boot disk as follows, from the RIS server, “Home” > “Execute” > “C:windowssystem32reminstrbfg.exe” and Accept. The rbfg is the RIS client.

We insert a floppy on the server and click on “Create Disk”

We waited a second…

And the disk would already be created to install the first MS Windows XP over the network!

Vale, we assemble the new PC to install, We put the floppy disk in the floppy drive, in the BIOS we tell you that your first boot is through the floppy drive. When you start, all that will come out, press F12 when you ask…

We wait for the environment to load…

Pressed “Enter”

Ok, to continue with the installation of an OS. We must authenticate with a user with permissions, for example the domain administrator, We fill in the username and password and give “Enter”

EYE, that the PC disk will be formatted (How is it logical) to continue, Press “Enter”

Vale, “Enter” To start.

It will restart, and a normal MS Windows XP installation is already started, as my image was with the SP2 already and in Spanish, Well, perfect.
From now on if we want to modify anything in the RIS, the Admin console is in: “Active Directory Users and Computers”. To modify any image, Add new, Modify permissions…

Open the console “ADUC” (Active Directory Users & Computers) in “Administrative Tools”, we search for the RIS server, About Him, Right-click and properties.
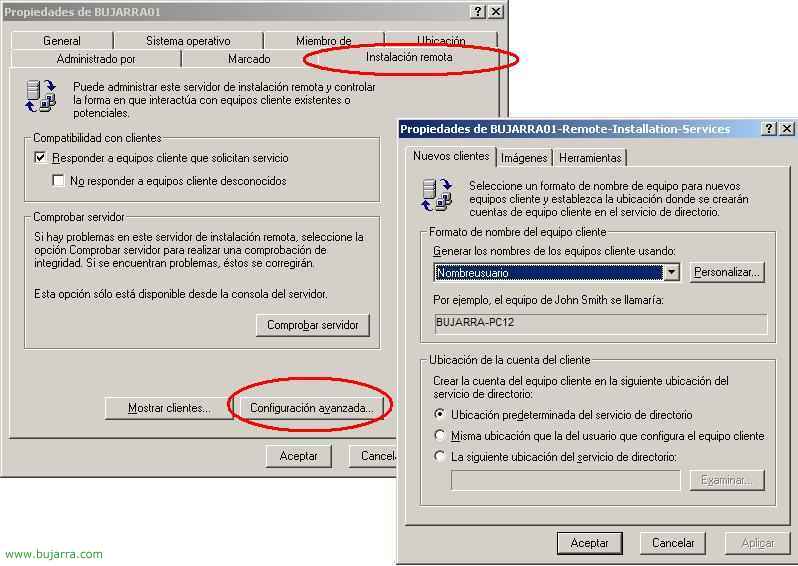
We notice that he has created a new tab called “Remote Installation”, we can see how many PCs have been installed through this RIS server, or check the status if everything is OK… I hit “Advanced Settings…” to see several interesting options.
RIS & Unattended installation files,

We have three tabs, “New customers” “Imagery” and “Tools”. In the first one we can generate the names of PC's for the installations with RIS and where to store these account names in the Active Directory, by default is in “Computers”. In the Plague “Imagery” We can create new images of S.O. or add for example response files, so that customers' facilities, are fully automated and we have nothing to do. Click on “Add…”

We select the first option “Associate a new response file with an existing image”. and next,

Now we'll tell you where we have our “Unattended installation response”, Select “An alternative location” and press Next

For which image which Operating System it will be and Next,

And here we look for the *.sif file which is the one that has all the answers for the installation of MS Windows XP and we click Next.
If you don't know how to generate the response file, Read this procedure: Automated/unattended installation of Windows using response files – HERE

We name the image of the S.O.. And I add 'unattended’ to indicate that it will be when you want to do it quickly and automatically. We give the following,

And Finish for the generation of this new image of S.O. with response file included.