Installing Nextcloud 13

I love the series we're about to start, Let's try to get the most out of Nextcloud, Let's see what you think! In several posts we will see really interesting options for any type of business, from a simple installation that allows us to access, share or synchronize files with our users or suppliers, to other amazing features that will allow them to use video conferencing, chat, Online Office Automation Edition…
![]()
More than very briefly, To remember What is Nextcloud for those of you who have no idea 😛, It is a service that will run on a machine that we have in our datacenter (physical, Virtual or Cloud), that is, controlled by us, that will allow users to access files and folders, as well as having them synchronized on your computer or mobile devices. Go, not to advertise but to get to the point, is an open source alternative to Dropbox, in reality it is much better 😉 since we can install add-ons to integrate it to our needs.
What we will see in future documents? We'll start by integrating it with the Active Directory, so that our users already have their own account, later we will see how to add External Drives to connect to the file server and allow external access to the data either with the web client or via WebDAV, also how we will not customize the appearance and put a Corporate Theme To the fullest, It will be cool! And now we start with the good stuff… Install OnlyOffice and we'll integrate it with Nextcloud, to enable users to Edit Online Any type of office automation document, It's a real blast! And we will continue to install Talk to allow users to put WhatsApp aside and use a corporate app to chat, Make video calls, do Video conferencing Group, make meetings and share a Desktop, PowerPoint… and users will use an app or a website, whatever you want! They will be able to invite external users such as suppliers, clients… On a private level, I also use the issue of videoconferences for the family, Super simple, A webcam with microphone on the TV… But I'll tell you about that another day!!
Wow, today it's time to talk about the start, Let's install Nextcloud 13, in this post we will base ourselves on the fact that we have an Ubuntu 16.04 LTS already installed, updated and has its hostname correctly as well as a static IP address. If everything is correct, We start installing the requirements:
[SourceCode]apt-get install apache2 mariadb-server libapache2-mod-php7.0 -y
apt-get install php7.0-gd php7.0-json php7.0-mysql php7.0-curl php7.0-mbstring -y
apt-get install php7.0-intl php7.0-mcrypt php-imagick php7.0-xml php7.0-zip -y[/SourceCode]
The installation will ask to assign password to MySQL root user, We wrote it down.
Now we can download the Nextcloud installation file, We downloaded it from https://nextcloud.com/install and click on “Get Nextcloud Server”. We unzip it and copy it to the web service directory:
[SourceCode]Unzip nextcloud-13.0.5.zip
cp -r nextcloud /var/www[/SourceCode]
We create our Nextcloud configuration file and save it in '/etc/apache2/sites-available/nextcloud.conf’ with:
[SourceCode]Alias /nextcloud "/var/www/nextcloud/"
<Directory /var/www/nextcloud/>
Options +FollowSymlinks
AllowOverride All
<IfModule mod_dav.c>
Dav off
</IfModule>
SetEnv HOME /var/www/nextcloud
SetEnv HTTP_HOME /var/www/nextcloud
Satisfy Any
</Directory>[/SourceCode]
We create a link to the configuration, We enable the necessary modules for Apache and restart Apache:
[SourceCode]ln -s /etc/apache2/sites-available/nextcloud.conf /etc/apache2/sites-enabled/nextcloud.conf
a2enmod rewrite
A2Enmod Headers
a2enmod env
a2enmod dir
a2enmod mime
Service Apache2 Restart[/SourceCode]
By the way, if we want to enable SSL to allow secure connections we can enable it, although we will see it in a post later:
[SourceCode]a2enmod ssl
a2ensite default-ssl
Service Apache2 Reload[/SourceCode]
We replace permits:
[SourceCode]chown -R www-data:www-data /var/www/nextcloud/[/SourceCode]
And to conclude, we need to create a user for the Nextcloud MySQL DB that we are going to create, we can do it with the following command, replacing the username and password:
[SourceCode]Sudo Mysql –user=root mysql
CREATE USER 'user'@'%’ IDENTIFIED BY 'password';
GRANT ALL PRIVILEGES ON *.* TO 'user'@'%’ WITH GRANT OPTION;
FLUSH PRIVILEGES;[/SourceCode]
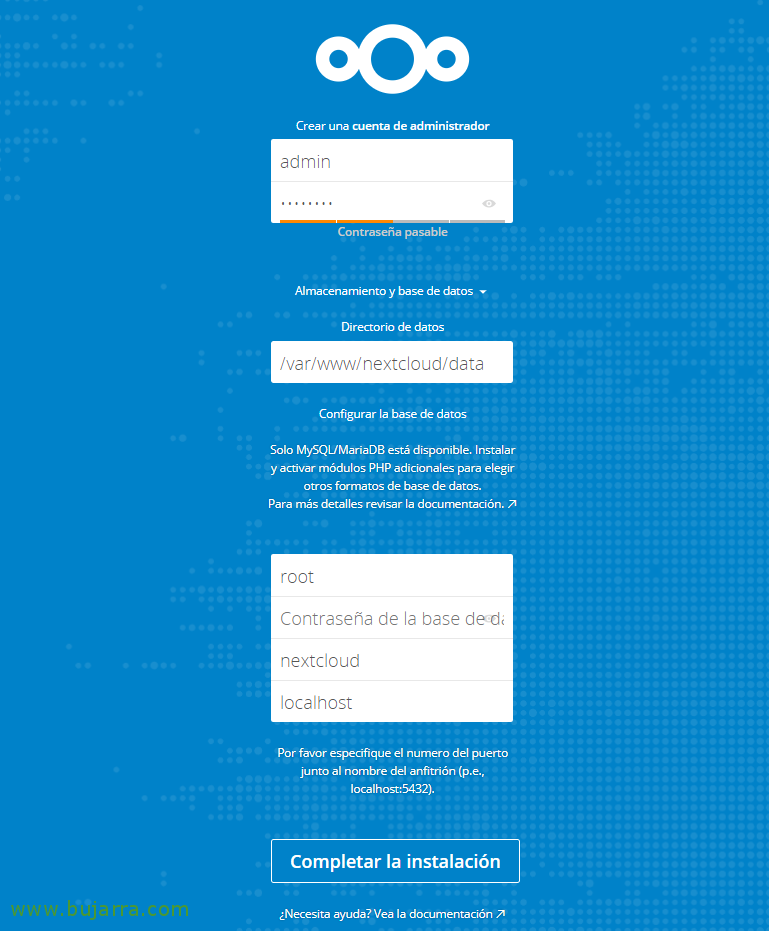
Now we will be able to access the Nextcloud access URL, What will be HTTP://DIRECCION_IP_NEXTCLOUD/nextcloud/, If everything went well, when opening the website from a browser, It will ask us to create an administrator account for the site, we will also set the directory from where we will store the data by default and the database where we will store the configuration, we indicate our MySQL username and password, name of the database to be created and click “Complete the installation”

And that's it! It will automatically open the portal where we will see the files we have in our new private cloud! We will be able to upload files, Share… we will discover everything, although you can do it too!!! 😛