Citrix ShareFile integration with Active Directory

We will be able to integrate Citrix ShareFile Enterprise accounts with our Active Directory users to allow Single Sign-on and validate the login of users with their DA credentials, so obviously our dear users will not have to remember two different passwords!
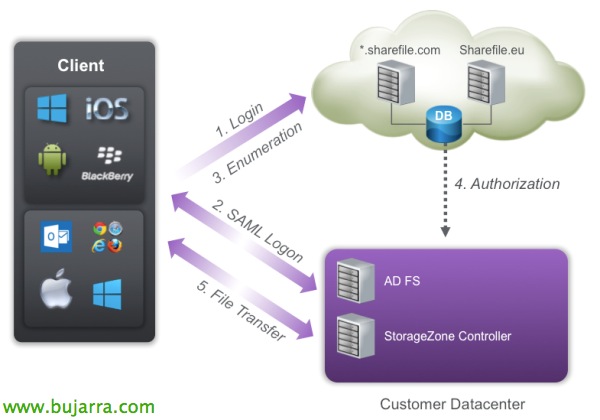
In this image we can see how the process of connecting a client to the ShareFile environment is, where the logon is requested on Citrix servers and redirected to our datacenter, after authentication, we will be able to transfer files against Citrix servers or those of our datacenter if you have deployed previously a StorageZone Controller.
Since ShareFile uses SAML (Security Assertion Markup Language) for the SSO, we will configure ShareFile to communicate with our Microsoft Active Directory Federation Services (ADFS) that provide this single sign-on access. And users when they are validated in the ShareFile portal, user login requests will be securely redirected to AD.
User accounts in ShareFile require a name ID in email format, we must have a correct email address configured as the UPN (User Principal Name) of the user or alternatively the 'Email address' attribute’ of the user.
We will need to create an A record in our public domain (adfs.domain.eso) which we will redirect to this ADFS server (we can use a proxy in the DMZ to further secure accesses). We will also need a certificate already installed on the server for the site, we may have problems with Wilcards if the subdomain does not appear in the certificate.

We'll start by deploying a Federation Services server on our network, is added using the 'Add Roles and Features Wizard'’ > 'AD FS’ > 'Federation Service'.

Once installed, open the AD FS console and select “Configure the AD FS Federation Server Wizard”,

As the first federation server is the first one we will select “Create a new federation service”,

We will be able to create an independent server or a federation server farm that will allow us to have high availability in this critical service.

Select the name of the federation service and the SSL certificate that we will use to encrypt the traffic,

We will select the service account that we will use with ADFS,

Click on “Following” to apply the settings on this first server,

… we wait while the settings are applied…

List, Once the settings have been applied, “Close”.

We will need to create a rule for user trust in the AD FS system, since “Relationships of trust” > “Trusted user truthfulness” > “Add trusted user truthfulness…”

A configuration wizard will open, “Initiate”,

Select “Manually enter data about the relying party”,

In the name to be displayed, we will identify the ShareFile site as a reference, for example, “Following”,

Select “AD FS Profile” as it uses the SAML protocol 2.0, “Following”,

We do not select any certificates for token encryption, “Following”,

In the ShareFile admin panel, in “Configure Single Sign-On” we will have to copy the URL of Assertion Consumer Service (ACS), then we will return to this management console to enable SSO / SAML.

Continuing with the Truthfulness Wizard, we must mark “Enable SAML Protocol Support 2.0 Web SSO” and the SAML SSO Service URL 2.0 of the relying party we will paste the URL copied in the previous step.

We filter for the relying party to come only from the ShareFile portal by adding the ID string with the Sharefile site, with the format: 'dominio.sharefile.com’ & “Add” & “Following”,

Mark “Allow all users to have access to this trusted user” & “Following”,

We check that everything is correct in this summary & “Following” To apply the settings.

Click on “Open the Edit Notification Rules dialog box for this relying party veracity when the wizard is closed”

We must indicate to the AD FS what type of growths we will present, Click on “Add Rule…”

We select the template “Send LDAP attributes as notifications” & “Following”,

We give the notification rule a name, select the Attribute Store as 'Active Directory', select the LDAP 'E-Mail-Addresses' Attribute’ and under Notification type we will indicate 'Email address'. “End”

Added an additional rule to transform the claim, Click again on “Add Rule…”

We select as a template “Transform an incoming notification” & “Following”,

We give the notification rule a name, we select as Incoming Notification Type 'Email Address', as Outgoing Claim Type 'Id. by name’ and as id format. outgoing name 'Email'. “End”,

“Accept”,

GOOD, in the AD FS console we must enter the properties of the newly created Trusted User Veracity.

We will mark as Secure Hashing Algorithm 'SHA-1’ & “Accept”,

We navigate in the console to “Service” > “Certificates” and on the Token Signing certificate click “View certificate…” to copy it and then import it into the ShareFile admin portal.

Click on “Details” > “Copy to file…”

We will export the certificate in X.509 coded base 64 (.CER)

Open the file with a Notepad and copy the certificate,

We log in to the ShareFile instance as an administrator, Select the “Admin”, Select the left menu “Configure Single Sign-On” and enable SAML by checking 'Enable SAML'.
In 'ShareFile Issuer' / Entity ID’ we will enter our domain registered in ShareFile in the format 'dominio.sharefile.com’
In 'Your IDP Issuer / Entity ID’ We'll enter 'https://dominio.sharefile.com/saml/info'In X.509 Certificate click on “Change” and…

… We will paste the previously copied certificate! & “Save”,

We finalize the configuration, with:
Login URL 'https://adfs.dominio.com/adfs/ls/’
Logout URL 'https://adfs.dominio.com/adfs/ls/?wa=wsignout1.0’
We verify that in SP-Initiated SSO certificate we have 'HTTP Redirect with no signature’ and that SP-Initiated Auth Context is a 'Integrated Windows Authentication'’
And we keep with “Save”!!!
User Management,
We will need the ShareFile User Management Tool to synchronize our AD users with our ShareFile users.

We will download the installer from the MyCitrix, We start the wizard & “Next”,

“Next”,

… Wait a few seconds…

“Close”.

We open the User Management Tool console, we connect to our site with our Admin credentials & “Log on”,

In Domain we will have to enter the local domain and administrator credentials to be able to manage the users, “Connect”,

Let's go to the tab “Users”, and we explore the organizational unit where we have the users we want to add and select them. Then click on “Add Rute”,

We mark the first two checks in addition to indicating that the authentication method is 'AD-Integrated’ and the 'Storage Zone'’ is the site of our data center where our data resides.
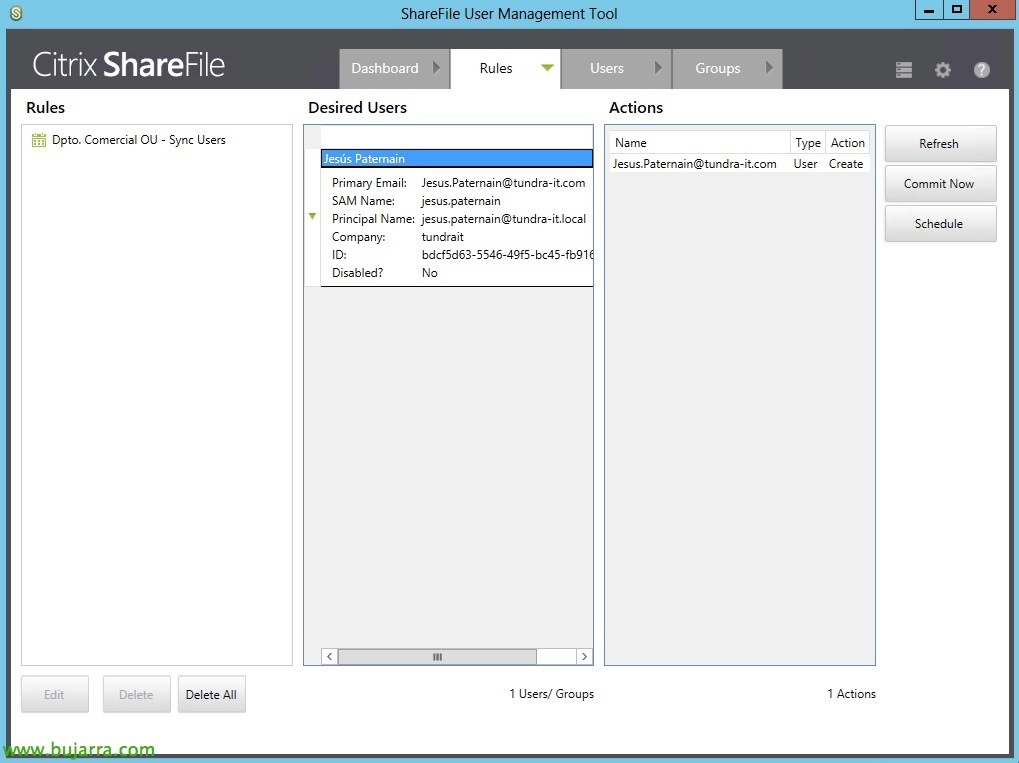
We confirm that we have the users we want and click on “Commit Now”,

“Accept”, already tells us that it synchronized the users of our Active Directory to ShareFile in order to allow them to use the Logon!!
With this, users could now log in to ShareFile with their user accounts, but when opening the ShareFile URL, users will be opened a window asking for the username and password (They will open 'https://dominio.sharefile.com’ and will be redirected to 'https://dominio.sharefile.com/saml/login'). The truth is that it does not have a portal that tells the user that they are in ShareFile, Maybe I'll confuse them! And also it will not allow us to have users stored in Citrix since it will always validate us against the Active Directory.
Configuring SAML to work with all browsers,
We would have access problems with Google Chrome for example :'( so it is convenient to solve it.

In the IIS Management Console, We will select the default website > 'ADFS’ > 'ls', select Don't require SSL and Bypass client certificates.

In the same virtual directory, select in the Authentication options, in the advanced settings of 'Windows Authentication', We'll turn off Extended Protection.
Setting up a custom portal for SAML,
If we want to make a ShareFile portal with custom Single Sign On, or at least let us know that we are in ShareFile, We must first, Contact the Citrix Support, Follow the steps below and instruct them to activate the portal.

We must download the template from the portal of this link, Unzip and modify it. We will edit 'login.htm’ to replace the correct SAML URL, Change:
'https://subdomain.sharefile.com/saml/login’ with 'https://dominio.sharefile.com/saml/login’
'https://subdomain.sharefile.com/resetpasswordrequest.aspx’ with 'https://mysubdomain.sharefile.com/resetpasswordrequest.aspx’
Obviously we can edit the file as we want, or the images, Logos…

In “Shared Folders” we will have to create a new shared folder called 'Customizations', Click on “Create Shared Folder”,

In Folder Name we put 'Customizations', and in 'Add Users’ we will indicate 'Add Manually’ & “Create Folder”,

We must enter in 'Email Address’ The support email address ‘his*****@*******le.com‘ to share configuration files with you, We enter the other information and give download permissions. “Add User”,

We must upload to this directory all the content that we had unzipped from the 'CustomLogin file Template.zip’

And we will be able to check how by accessing 'https://dominio.sharefile.com/customlogin.aspx’ we already have the double ShareFile access portal configured to our liking; Active Directory users will be able to access from the left in SAML Login and Citrix users will be able to access from Email Login with their email addresses.
More info in the official documentation on configuration of Single Sign-On with ShareFile and the customization of the portal.