Integrating a Sonoff Touch into Home Assistant

As you already know, Sonoff has a marvel of devices, with which we can control everything we can think of, in this post we will see how to use the Sonoff Touch, a Wifi switch that we can put in our homes, replacing traditional switches. Apart from having an aesthetic that I personally love, we can change the firmware to integrate it with our Home Assistant installation and be able to control any light in the house / office.

Unlike most Sonoff modules, The Sonoff Touch is based on ESP8285 rather than ESP8266. The first thing we will have to do is change the firmware, personally, as you know, I usually use Tasmota, unwelded and in 2 minutes we will have it ready. Later we will configure Tasmota, where we will enable MQTT against our Broker and thus we can turn on the switches from Home Assistant.
Putting Tasmota firmware into Sonoff Touch

Although it may seem bulky, it is not that big of a deal, We must open the switch and we will see its beautiful plate, We will locate the connectors where we are going to connect 4 Jumpers cables. To flash it and put the firmware we want we can do it in many ways, Here we saw How to do it with a Raspberry Pi; but another simple way can be if we have a Windows or Linux computer, with ESP Easy Flasher and a USB to TTL device. We will connect the connectors as indicated in the image to our USB to Serial converter, we will locate the GND, TXD, RXD and VCC to 3.3v. When we connect the USB to the PC, the Sonoff Touch will turn on, at that time we have to have the R19 connector connected to the GND, This will be just the first 10 Seconds, then it will have entered the mode that will allow us to flash it.
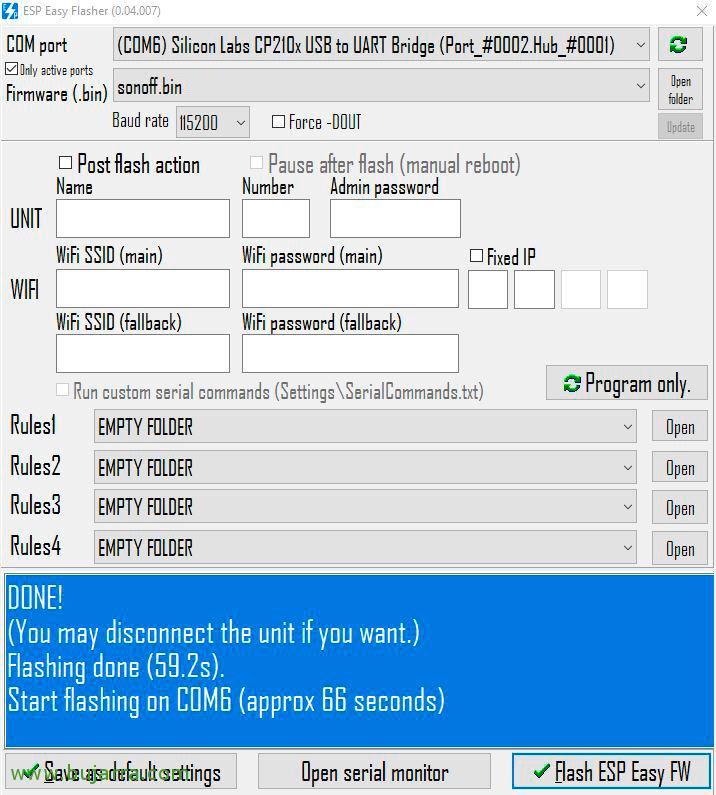
In our team, We will have downloaded the last stable image of the firmware we want, in this case using Tasmota, You have all the firmware you are interested in This link for download, select the COM port of your USB device, Pressed “Flash ESP Easy DW” and after about a minute we will have the Sonoff Touch tastled! We disconnect the USB from the computer…
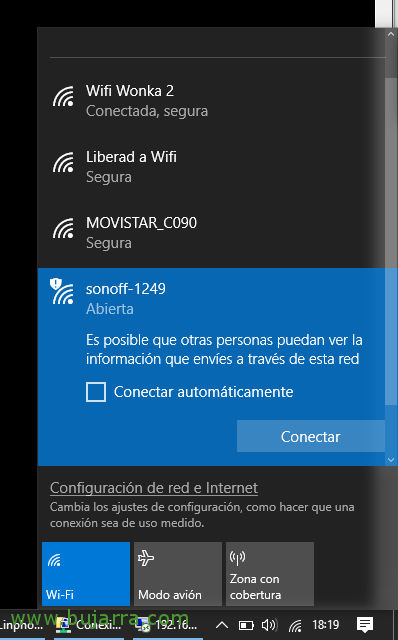
Now we can reconnect the USB to the computer to start the Sonoff Touch, but this time without going into maintenance mode, if not letting it start normally, it will have created an access point for us, when we connect to their Wi-Fi they will open the browser directly against the IP address of the device, that I think I remember by default is the 192.168.4.1

In the Tasmota interface we must indicate the network parameters, the name of our home or office Wi-Fi network and your password. Remember that it must be 2.4GHz WiFi and not 5GHz which is not supported. We record and that's it! We will be able to restart the SonOff device again and verify that it connects perfectly to our Wifi network.

Once we know which IP address our Sonoff Touch has taken, that we will see on the DHCP server. We must continue, since “Configuration” > “Configure Module” We will indicate the type of module, in this case I have a Sonoff Touch T1 from 2 canals, Click on “Save”,
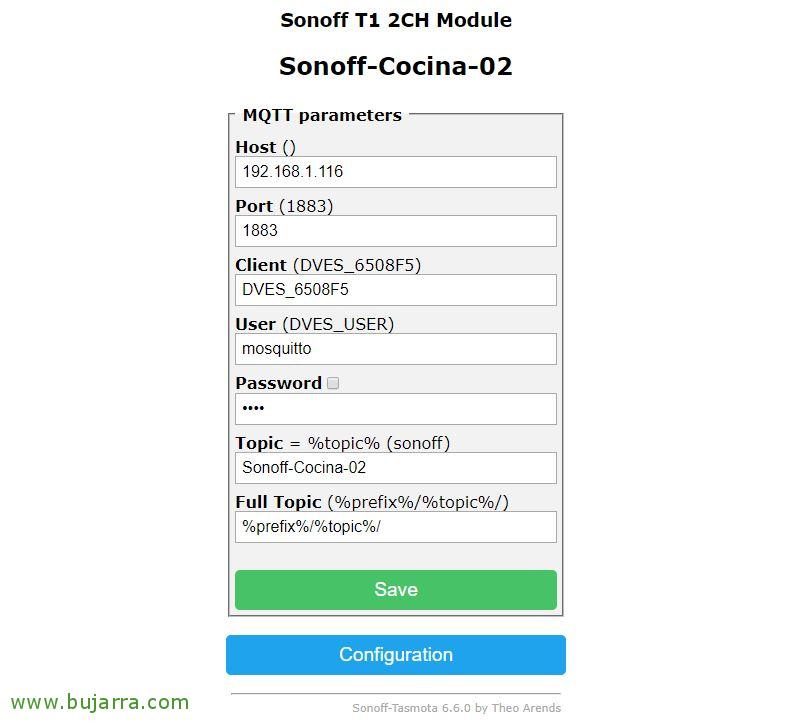
In “Set” > “Configure MQTT” we will enter the IP address of our Home Assistant, since there we will already have the MQTT Broker module installed, We will indicate the port and credecial, as well as the topic to refer to this device. Click on “Save”,

And nothing, ready, We can now test if everything goes OK to finish by mounting the switch and placing it on the socket of the wall switch, replacing the traditional previous switch. The truth is that it is not that complicated to replace old switches, I have done it in my house and I am still here…
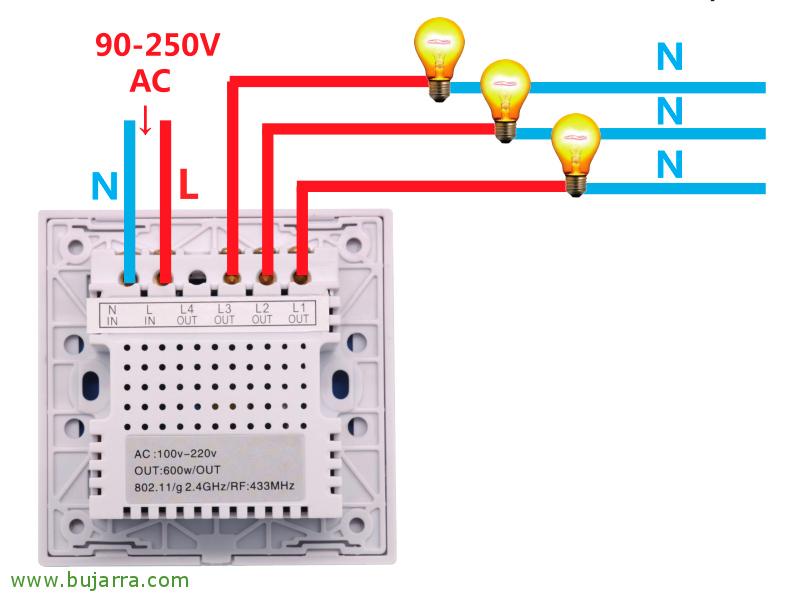
What we will have to take into account is that we have to lower a neutral wire from the register boxes (The blue) that we need to connect to the back of the Sonoff Touch, without it I wouldn't start, I would not have power. The rest is like any switch, We connect the input line cable (IN) and on the outings (OUT) We will connect the wire that goes to each bulb or lamp. I understand that we will have some commuted, Personally, I've forgotten about it, since with automations you can skip this topic, so certain wiring we will omit making it even simpler, and at some point we will have to place a Sonoff Touch simply powered and without connection to the bulb; by pressing on the inerbreaker through MQTT we will turn on the other Sonoff that does have the bulb connected.
Add Sonoff Touch in Home Assistant
Well, what we have left now is to add all the Sonoff devices that we have in our Home Assistant or Hassio, for this we will do it as always, By tapping on the configuration file “configuration.yaml”, We will add in the 'light' section’ Each device, we will have to indicate the name and topic of each Sonoff, The easiest thing to do is to copy the following code and modify it to your need. I leave you a couple of options, a first Sonoff Touch with dual switch (Kitchen and dining room), as well as another one-button Sonoff Touch (Downstairs Bathroom):
[SourceCode]…
Light:
– Platform: MQTT
Name: "Luz Comedor – Int1"
state_topic: "stat/Sonoff-Cocina-02/RESULT"
value_template: ‘{{ value_json["POWER1"] }}’
command_topic: "cmnd/Sonoff-Cocina-02/POWER1"
availability_topic: "tele/Sonoff-Cocina-02/LWT"
Qos: 1
payload_on: "ON"
payload_off: "OFF"
payload_available: "Online"
payload_not_available: "Offline"
retain: False
– Platform: MQTT
Name: "Luz Cocina – Int2"
state_topic: "stat/Sonoff-Cocina-02/RESULT"
value_template: ‘{{ value_json["POWER2"] }}’
command_topic: "cmnd/Sonoff-Cocina-02/POWER2"
availability_topic: "tele/Sonoff-Cocina-02/LWT"
Qos: 1
payload_on: "ON"
payload_off: "OFF"
payload_available: "Online"
payload_not_available: "Offline"
retain: False
– Platform: MQTT
Name: "Luz Baño Abajo"
state_topic: "stat/Sonoff-Bano-Abajo/RESULT"
value_template: ‘{{ value_json["POWER"] }}’
command_topic: "cmnd/Sonoff-Bano-Abajo/POWER"
availability_topic: "tele/Sonoff-Bano-Abajo/LWT"
Qos: 1
payload_on: "ON"
payload_off: "OFF"
payload_available: "Online"
payload_not_available: "Offline"
retain: False
…[/SourceCode]

As usual, after restarting Home Assistant we can add cards with our Sonoff Touch light switches easily in Hassio. And we can control them manually to turn them off / Turn on lights, as well as if they have a dimmer function or if we want to play with automations and do cool things… When no one is at home let all the lights go out, that when a movement is detected with a PIR sensor, then that a certain light is given… I hope it has been of interest to you,