
Monitoring Nutanix from Centreon

If we have a Nutanix in our environment… Why don't we centralize all the information you give us in our Centreon monitoring system?? Not only to better manage alerts, but to store all its metrics and be able to work on them as we see fit, this is a post with full detail on how to fully monitor Nutanix!
What I said, This document is somewhat extensive, since we can get a lot of interesting metrics from both the Nutanix cluster and the CVMs, So we're going to separate it into different phases, first we'll look at how to enable SNMP on Nutanix and then all the options we can look at, I will give you the Command and Service that we will need for each item to be monitored. So everyone adds what is interesting, And then below I leave you how it would look!
Enabling SNMP on Nutanix,
We start! The first thing will be to enable SNMP in our Nutanix cluster to be able to obtain its metrics from our machine with Centreon,
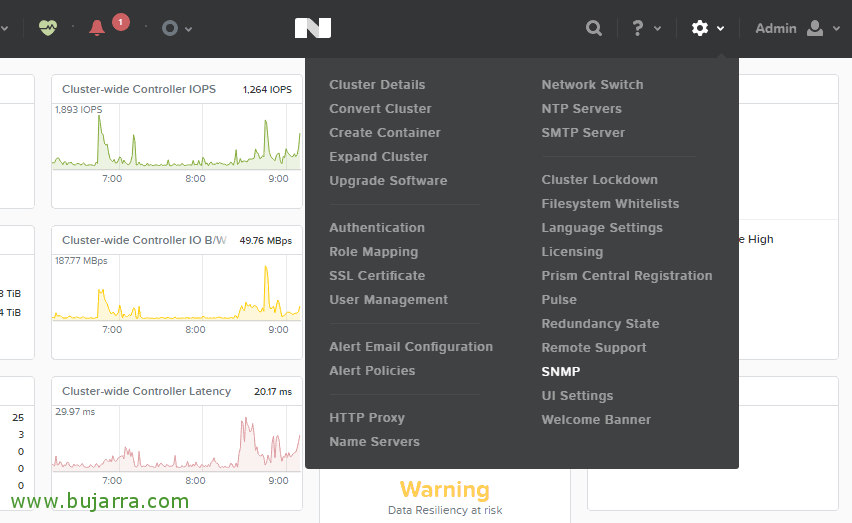
After logging into the Nutanix administration website, We're going to “Settings” > “SNMP”,

We marked the tick of “Enable SNMP”, and in “New Transport”,
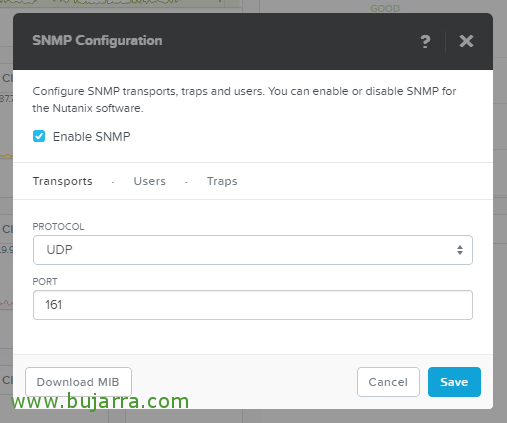
On the “Transports” we will enable the UDP protocol and port by default 161,

On the “Users” Click on “New User”,

And we assign a name to this user and the types of authentications in addition to the required passwords, As we see, Nutanix uses SNMP version 3 🙂 In this post I will use a generic user called centeron and with passwords centeron using AES and SHA, Why I'm telling you this? Why the Commands we will use will carry those credentials by default 😉
We also click on “Download MIB”, the file with the Nutanix MIBs will be required later, We keep it lying around,
Installing the requirements in Centreon,
Once we have Nutanix ready, we'll proceed to install the requirements in Centreon so that we can use a couple of scripts, to obtain certain metrics and with it we can make some of the queries that we will need, We'll download the scripts check_nutanix.pl and check_ssh_nutanix_cluster.pl, we upload the file with the newly downloaded MIBs by SCP and we are ready to install the requis:
[SourceCode]Cpan Date::Parse
cpan Net::OpenSSH
With IO::Pty
CP NUTANIX-MIB.txt /usr/share/snmp/mibs/[/SourceCode]
Eye, A note, in the script check_nutanix.pl, In the line 97, in the end, A comma is missing! And we will save it in the path of the Centreon Plugins, in /usr/lib/centreon/plugins/.
Monitoring CPU, Memory, Charging and Disk
And then, We will see what we can monitor, I'll leave you briefly, the name of the Service that I usually use, followed by the Arguments. And then at the end, the command I used. For now via SNMP,
Services:
- CPU: CPU 80 90
- RAM: memory 80 90
- Load: load 80 90
- Disk: storage 80 90
Command:
- Name: OS-Linux-SNMP-Basico-v3
- Command Line:
[SourceCode]$CENTREONPLUGINS$/centreon_linux_snmp.pl –plugin=os::Linux::snmp::Plugin –mode=$ARG 1$ –hostname=$HOSTADDRESS$ –snmp-version=3 –snmp-username=centreon –authprotocol=SHA –authpassphrase=centreon –privprotocol=AES –privpassphrase=centreon –warning=$ARG 2$ –critical=$ARG 3$[/SourceCode]
- Argument 1: Way (CPU, memory, load…)
- Argument 2: Warning
- Argument 3: Critical
Monitoring Uptime,
To know the Uptime, it will be enough to create a Service and a Command:
Service:
- Uptime: Uptime
Command:
- Name: OS-Linux-SNMP-Basico-v3-sin-wc
- Command Line:
[SourceCode]$CENTREONPLUGINS$/centreon_linux_snmp.pl –plugin=os::Linux::snmp::Plugin –mode=$ARG 1$ –hostname=$HOSTADDRESS$ –snmp-version=3 –snmp-username=centreon –authprotocol=SHA –authpassphrase=centreon –privprotocol=AES –privpassphrase=centreon[/SourceCode]
- Argument 1: Way (CPU, memory, load…)
Monitoring Total Capacity, Used, State, IOPS and Latency.
The Services that we will create with your arguments:
- Cluster Nutanix – Total Capacity .1.3.6.1.4.1.41263.504.0
- Cluster Nutanix – Capacity Used .1.3.6.1.4.1.41263.505.0
- Cluster Nutanix – State .1.3.6.1.4.1.41263.503.0 “Cluster status”
- Cluster Nutanix – IOPS .1.3.6.1.4.1.41263.506.0 “IOPS”
- Cluster Nutanix – Latency .1.3.6.1.4.1.41263.507.0 “Latency”
Command:
- Name: check_snmp_v3
- Command Line:
[SourceCode]/usr/lib/nagios/plugins/check_snmp -H $HOSTADDRESS$ -o $ARG 1$ -P3 -L authPriv -U $ARG 2$ -a $ARG 3$ -A $ARG 4$ -x $ARG 5$ -X $ARG 6$ -l $ARG 7$[/SourceCode]
- Argument 1: UUID
- Argument 2: User
- Argument 3: SHA
- Argument 4: SHA Password
- Argument 5: AES
- Argument 6: AES Password
- Argument 7: Text
Monitoring cluster I/O bandwidth,
Service with their arguments:
- Cluster Nutanix – IO bandwidth .1.3.6.1.4.1.41263.508.0 “IO bandwidth” 300000 350000
Command necessary:
- Name: check_snmp_v3_wc
- Command Line:
[SourceCode]/usr/lib/nagios/plugins/check_snmp -H $HOSTADDRESS$ -o $ARG 1$ -P3 -L authPriv -U $ARG 2$ -a $ARG 3$ -A $ARG 4$ -x $ARG 5$ -X $ARG 6$ -l $ARG 7$ -w $ARG 8$ -c $ARG 9$[/SourceCode]
Monitoring CVM alerts,
To check the alerts we will use the script that uses SSH access,
Service:
- Alerts: USERNAME PASSWORD alerts
Command:
- Name: check_ssh_nutanix_cluster.pl
Command Line:[SourceCode]$CENTREONPLUGINS$/check_ssh_nutanix_cluster.pl -H $HOSTADDRESS$ -u $ARG 1$ -p $ARG 2$ -T $ARG 3$[/SourceCode]
- Argument 1: User
- Argument 1: Password
- Argument 3: Guy
Monitoring cluster services,
And here come all the services of the cluster, If we are interested in knowing the state, These are all the Services that you will have to create:
- Cluster Nutanix – InsightsDataTransfer > Status InsightsDataTransfer
- Cluster Nutanix – ABAC Service > Status “ABAC”
- Cluster Nutanix – Acropolis Service > Status “Acropolis”
- Cluster Nutanix – AlertManager Service > Status “AlertManager”
- Cluster Nutanix – APLOS Service > Status “APLOS”
- Cluster Nutanix – APLOSEngine Service > Status “APLOSEngine”
- Cluster Nutanix – Arithmos Service > Status “Arithmos”
- Cluster Nutanix – Brain Service > Status “Brain”
- Cluster Nutanix – Chronos Service > Status “Chronos”
- Cluster Nutanix – CIM Service
- Cluster Nutanix – ClusterConfig Service
- Cluster Nutanix – ClusterHealth Service
- Cluster Nutanix – Curator Service
- Cluster Nutanix – DynamicRingChanger Service
- Cluster Nutanix – Ergon Service
- Cluster Nutanix – Hera Service
- Cluster Nutanix – InsightsDB Service
- Cluster Nutanix – Janus Service
- Cluster Nutanix – Lazan Service
- Cluster Nutanix – Medusa Service
- Cluster Nutanix – MinervaCVM Service
- Cluster Nutanix – NutanixGuestTools Service
- Cluster Nutanix – Orion Service
- Cluster Nutanix – Pithos Service
- Cluster Nutanix – Prism Service
- Cluster Nutanix – Scavenger Service
- Cluster Nutanix – SecureFileSync Service
- Cluster Nutanix – SSLTerminator Service
- Cluster Nutanix – Stargate Service
- Cluster Nutanix – SysStatCollector Service
- Cluster Nutanix – Tunnel Service
- Cluster Nutanix – Uhura Service
- Cluster Nutanix – Uhura Service
Command:
- Name: check_ssh_nutanix_cluster.pl_r
- Command Line:
[SourceCode]$CENTREONPLUGINS$/check_ssh_nutanix_cluster.pl -H $HOSTADDRESS$ -u $ARG 1$ -p $ARG 2$ -T $ARG 3$ -r $ARG 4$[/SourceCode]
- Argument 1: User
- Argument 2: Password
- Argument 3: Guy
- Argument 4: Item
Monitoring various statuses,
These are the Services that will have to be created, next to the Type and Subtype arguments:
- Cluster Nutanix – Controllers – State > Controllers cstControllerVMStatus
- Cluster Nutanix – Controllers – Core Services > Controllers cstDataServiceStatus
- Cluster Nutanix – Controllers – Metadata Services > Controllers cstMetadataServiceStatus
- Cluster Nutanix – Disks – State > Disks dstState
- Cluster Nutanix – Disks- Latency > Disks dstAverageLatency
- Cluster Nutanix – Hypervisors – Drop Received > Hypervisor HypervisorsRxDropCount
- Cluster Nutanix – Hypervisors – Drop Streamed Hypervisors HypervisorsTxDropCount
Command:
- Name: check_nutanix.pl
- Command Line:
[SourceCode]$CENTREONPLUGINS$/check_nutanix.pl -H $HOSTADDRESS$ -a $ARG 1$ -u $ARG 2$ -A $ARG 3$ -x $ARG 4$ -X $ARG 5$ -t $ARG 6$ -s $ARG 7$[/SourceCode]
- Argument 1: authProtocol (SHA)
- Argument 2: User (centreon)
- Argument 3: authPassword (centreon)
- Argument 4: privProtocol (AES)
- Argument 5: privPassword (centreon)
- Argument 6: Guy
- Argument 7: Subtype
Monitoring the Cutter's IOs,
And finally we finish :), These are the Services that will have to be created followed by the Arguments
- Cluster Nutanix – Disks – IOs bandwidth > Disks dstIOBandwidth 200000 250000
- Cluster Nutanix – Disks – IOs x second > Disks dstNumberIops 2500 3000
- Cluster Nutanix – Hypervisors – IOs writing x second > Hypervisors hypervisorsWriteIOPerSecond 1200 1500
- Cluster Nutanix – Pools – spitIOPerSecond > Pools spitIOPerSecond 10000 12000
Command:
- Name: check_nutanix.pl_wc
- Command Line:
[SourceCode]$CENTREONPLUGINS$/check_nutanix.pl -H $HOSTADDRESS$ -a $ARG 1$ -u $ARG 2$ -A $ARG 3$ -x $ARG 4$ -X $ARG 5$ -t $ARG 6$ -s $ARG 7$ -w $ARG 7$=$ARG 8$ -c $ARG 7$=$ARG 9$[/SourceCode]
- Argument 1: authProtocol (SHA)
- Argument 2: User (centreon)
- Argument 3: authPassword (centreon)
- Argument 4: privProtocol (AES)
- Argument 5: privPassword (centreon)
- Argument 6: Guy
- Argument 7: Subtype
- Argument 8: Warning Subtype
- Argument 9: Critical subtype
Example of a Command,

And nothing, After all the txapa, how I have organized the Services and Commands to be created, well, I leave you an example of what a Command would look like for those who have doubts. We will have indicated the Name, the Command Line and Arguments.
Example of a Service,

And the same for each Service to be created, we will indicate the Name, we will select your Command and fill in all the Arguments you ask for.
What would it look like?

GOOD, What's interesting! This would be a snapshot of a fully controlled and monitored Nutanix environment! To the CVMs, Remember that you can add Virtual Environment Metrics and get more data on mega interesting returns! I hope you have found it useful!