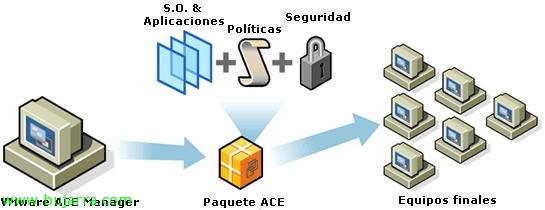
Installing VMware Workstation ACE, creating VMs for use with the VMware ACE environment and viewing the policies

Well, once we have the VMware ACE server installed, We can take advantage of it, even if it is not entirely mandatory to have an ACE server, since we can have our virtual machines (Packages/Instances) generated but without a server control. In this document, We show how simple it is, VMware Workstation ACE Edition installation to create these virtual machines, we generate a VM and then we see the directives other possibilities we have about them. Once everything is ok, we could generate the virtual machine packages to install or distribute them, but that is in the following document:http://www.bujarra.com/?p=1908.

First of all, we need to download VMware Workstation ACE Edition from their official website http://www.vmware.com/products/ace/, Once downloaded, we proceed to install them to be able to create VMs and later the packages. “Next”, again the MyWife assistant,

We perform a typical installation, “Typical” & “Next”,

Select the installation path, Default “C:Program FilesVMwareVMware Workstation” & “Next”,

Where we want shortcut icons,

Click on “Install” to begin installation of the VMware Workstation ACE Edition product,

…

After a few minutes of installation, It will ask us for generic information plus a valid serial number, in my case it's one of DEMO, So whoever wants, You can copy it 😉 “Enter”,

“Finish” to exit the installation wizard,

And it will ask us to restart the computer with VMware Workstation ACE to be able to use it, So we restart when we can.

Once rebooted, We open the VMware Workstation, We accept the license agreement “Yes, I accept the terms in the license agreement” & “OK”,

The first thing to start with is to create a virtual machine, if we don't already have it created since “New Virtual Machine”; if we already have a valid virtual VM, We can add it whenever we have things in mind, such as upgrading the version of your virtual hardware. In the practical case we will do, I will create a virtual machine with Windows XP and install the applications I think are necessary, An example: The application that my company sells to give this virtual machine to all my salespeople so that they can make demos of the application, I know that I will not have problems with it being cracked since I will cover it with the directives, I'll even decide on an expiration date.

Well, We create a new virtual machine using the typical wizard, “Next”,

I select the ISO image or a CD where the operating system that I will install on it is located, “Next”,

I enter the serial number of my operating system installation, All this is to perform an unattended installation of it and save me the whole installation process, now 😉 we also enter the name of a user and its password. “Next”,

Enter the name of the virtual machine and the path where I will store it, “Next”,

We give you the necessary hard drive, the one we need. We have a utility called “Pocket ACE size calculator” which will help us if one of our interests is to create virtual machines to distribute using PenDrives or 'small' storage units, since VMware ACE will always use more space than the VM takes up, We see it:

It shows us all the space that the package will need (If we will use it at all) by Pocket ACE, since we can insert the VMware Player for both Windows and Linux into it, or “Fast synchronize cache” whether we will distribute it on slow disk drives such as flash memory. “OK”,

Well, Click on “Finish” so that the virtual machine is created and the OS is installed.

… we check how the VM is not automatically installed by means of the “Easy Install” VMware…

Ok, after a few minutes and already have our virtual machine installed (and with VMware Tools installed) We can customize it to our liking, both install the applications that interest us or tune it as we want, since from here we will take the packages that we will later distribute.

Once we have it created and perfectly prepared, we can already enable VMware ACE features on it, Stop that, Click on “Enable ACE features”.

And we will get all the possibilities that we can generate in it, But before we go on with this, what I'm going to do is connect this virtual machine with my VMware ACE server, so we edit your properties from “Edit virtual machine settings”,

On the “Options” We're going to “ACE” and we enable it by dialing “Enable ACE features” & “Use server”, we enter the IP address or name of it and the port (443TCP by default). “OK”,

When applying the changes, it asks for the password of the VMware ACE server administrator, We introduce it & “OK”,

Once that's, We will edit the possible configurations we have on the distribution of the package. Anything we modify from now on will only affect the packages that we are going to generate from this moment on.

In “Encryption” We will be able to select the level of protection of the package (The Virtual Machine) and of the (what is the configuration and the policy files): “Package protection” Protects package files, of being copied or altered; “Instance protection” protects the ACE instance from being copied or altered. We may not encrypt “None”, or everything except the virtual machine file but the configuration “Tamper resistant” or all “Encrypted”.

In “Package Lifetime” We can configure the installation period of the package, We can specify until what date this package can be installed, and NOT the lifetime of the virtual machine.

In “Instance Customization” We will be able to configure the instances of the virtual machines, or what has been the same 😉 as its personalization, If we enable it by dialing “Enable Instance customization”, we can enter from here the serial number of the virtual machine's Operating System.

In “System Options” we can configure the Name and Organization, as well as the name of the team we want it to have. We can use unattended installation parameters that Sysprep uses to indicate the name, the organization or team name, using style variables: %logon_user% or %logon_user(n)%, %host_name% or %host_name(n)%, %random_alpha_digit(n)%, %random_alpha(n)%, %random_digit(n)%… (n) shall be a numerical value to indicate the maximum length of the characters or numbers.
In addition, we must generate a new “Security ID” o Team SID. And optionally we can synchronize the time of the virtual machine with the time of the host where it runs “Sync the guest time zone with the host time zone”.

In “Initialization Scripts” We have the commands that can be executed once the virtual machine starts, if necessary.

In “Workgroup or Domain” We can automatically introduce the virtual machine into a domain or workgroup, in the case of the domain we will be able to indicate in which OU (Ou) We may introduce you…

In “Windows Login” We create a local virtual machine administrator account,

In “Custom EULA” we may enable a license in TXT format so that the user has to accept with the conditions and terms that we indicate (End User License Agreement).

And finally in “Deployment Platform” We will be able to select the platform on which we will generate these packages, whether only on Windows or Linux systems or both. “OK”.

Now we'll configure ACE policies or policies, for this we mark “Edit policies”, These directives are about packages that are already installed or that we are going to install,

In the VMware ACE policies we can configure the “Access Control”, having policies at the level of “Ativation” (who can access an ACE package and convert it to an instance) and “Authentication” (Who can turn on an instance). We can set up unprotected activation “None”, or by a simple password “Password” or directly with an activation key (being able to create several activation keys). In addition to being able to limit a maximum number of activations in “Activation limit”. Policies at the authentication level we see who could power on the instances/VMs, being able to limit it by means of a password “User-specified password” or nothing “None” or we can create a custom script to figure out who can or cannot initialize the instance.

In “Host-Guest Data Script” we can generate a script to run and pass information from the host to the virtual machine.

In “Expiration” We will be able to indicate when these instances will expire, This is, when we will be able to use the virtual machines that we generate from it. Setting a time period, o X days since the activation was. In addition to being able to customize the warning message.

In “Copy Protection” we can allow copies of the virtual machine/instance to be made or not. Depending on whether we are interested or not, they can copy/move it, since all ACEs have the CPID (Copy protection identifier) that contains the instance's path and checks it at boot.

In “Resource Signing” We can specify if we want it to check whether or not the files in the package have been modified, This is, the files where the VM was located, if any have been modified/deleted.

In “Network Access” we will be able to define which networks this instance can connect to, or if we want it to have no network, or yes and unlimited, or the network ranges that you could connect to.

In “Removable Devices” we will be able to indicate whether or not you can, Use removable devices.

As well as USB devices in “USB Devices” we will be able to indicate what type of USB devices they could use, or block your storage devices (for example so that they do not get information through USB's from the VM) or indicate a specific USB device that could, a specific license key/backpack…

In “Virtual Printer”, We will indicate whether or not we want you to be able to print virtual machine jobs through the host printer, without the need to install drivers if the OS. are compatible (x e.g.),

In “Runtime Preferences” We can configure a series of configurations such as, that always runs in full-screen mode, that hides the bar when in full screen, Appliance Mode Use, Use the VMware Virtual Keyboard…

We can also allow snapshots of the machine to be taken or not from “Snapshots”,

Or block full access to the virtual machine by creating administrator mode or “Administrator Mode” to be able to modify the instance, or to take snapshots or revert to previous states, as well as being able to use the command line tool 'VMware-acetool'.

In “Kiosk Mode” We can enable kiosk mode if we are interested or require a password to be able to exit it and thus not allow access to the host computer where it runs,

And finally in “Policy Update Frequency” we can configure the period of time with which it will try to connect to the VMware ACE server to check whether or not the policies have been modified. And in the event that there is no connectivity with it, we can set up a “Offline usage” indicating grace periods.

To upload these policy changes, if we have modified any previous instance we can upload the changes to the ACE server by clicking “Publish policies to server” and thus be applied to the rest of the packages/VMs generated from this instance,

“OK”