Nagios – Monitoring our Business Service (2/3)

Part 2! We're going to keep shaping this… Once you more or less have documented on paper or Excel (or however you prefer) this hierarchy of Services that we saw in Part 1 of our Business Service Monitoring, We will therefore proceed with the following, which will be the installation of the Plugin in Nagios, followed by its configuration already in Centreon to be able to use it!
Nagios BP
This will be the plugin that we will use to monitor our business processes, called Nagios BP or Nagios Business Process; combines the individual results of the Nagios checks into a larger grouping, called Business Processes.
And apart from what you're already imagining, we will use another Add On called 'Business Impact Analysis’ which will allow us to analyse and assess certain risks and what impact they would have on our business. Responding to… What if…? What happens if I turn off this router? What happens if I let go of this cable? What happens if I mark a certificate as invalid?? What does all this affect?? Printer, but we will see it later, Let's go in order!
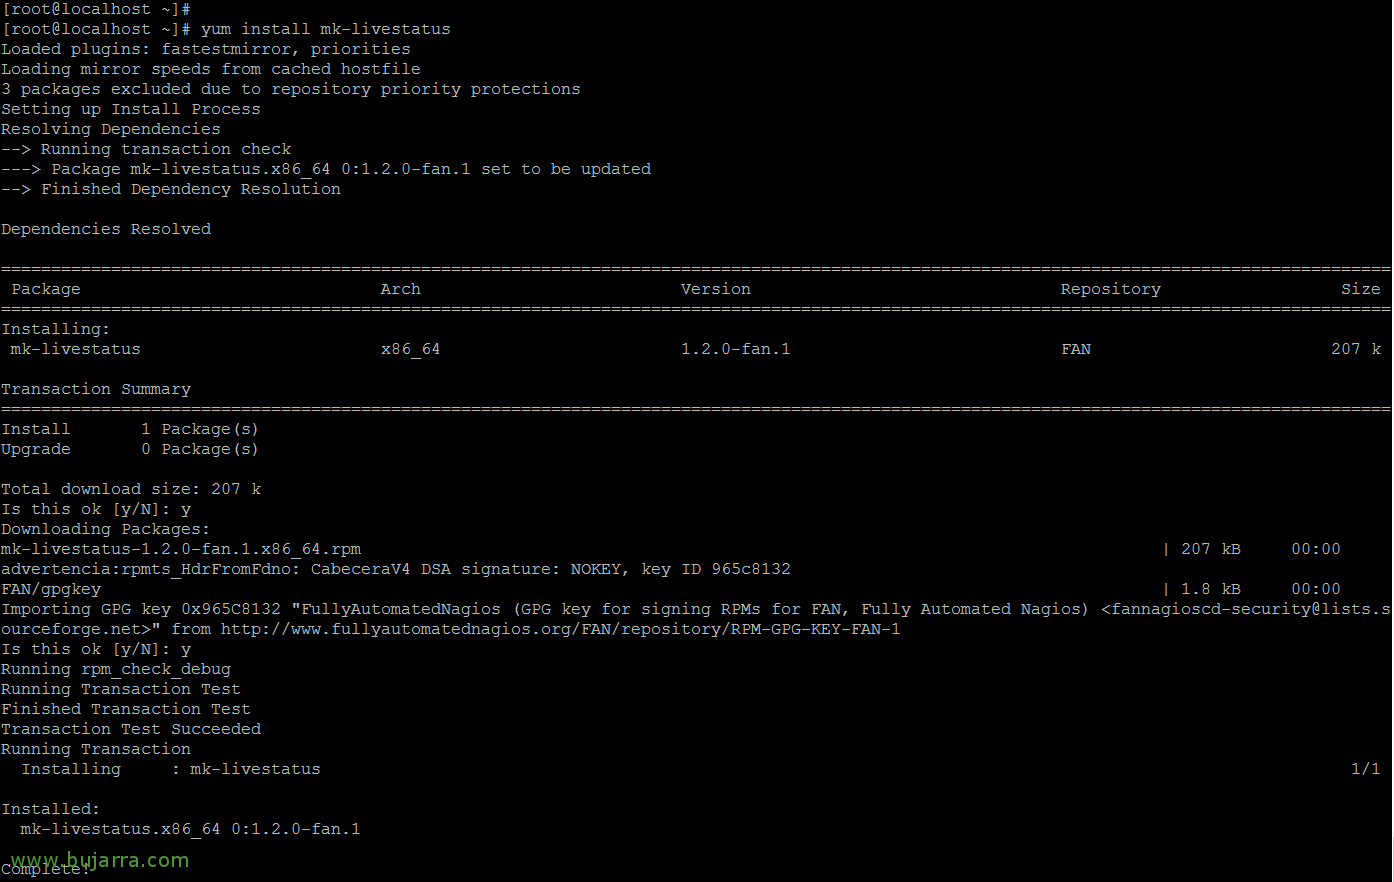
Before installing Nagios Business Process add-ons, We will need to comply with the installation requirements, We will base ourselves on the fact that we have a FAN version 2.4 (the requirement is to arrange the version 2.2 minimal); After fulfilling that, we must then install the MK Livestatus if we do not already have it!

Eye, we may have outdated Repos on our Centos, In my case I have an old version, one 5.9, we will need to correct the repositories in the configuration file at '/etc/yum.repos.d/CentOS-Base.repo'. We'll modify URLs that we see wrong, removing the '/centreon part’ of URLs. Example: HTTP://vault.centos.org/centreon/5.11/… –> HTTP://vault.centos.org/5.11/… and care! That we will need the Epel repository in our installed Centreon to install certain packages, we do it with:
[SourceCode]WGET HTTP://archives.fedoraproject.org/pub/archive/epel/5/x86_64/epel-release-5-4.noarch.rpm
rpm -ivh epel-release-5-4.noarch.rpm
Yum Repolist[/SourceCode]
And by the way! This document is based on a FAN (Fully Automated Nagios), Yes, on the counter, you have an ESC 3.4 (Centreon Enterprise Server) and installed NagVis following previous documents, you will already have MK Livestatus installed! If you don't have it installed, You can follow on This document The Steps ‘Install MK Livestatus‘ and ‘Config en Centreon‘. Therefore, the steps that you will see below will not be necessary for you!
And after that, we can start the installation of MK Livestatus with:
[SourceCode]Yum Install MK-LiveStatus[/SourceCode]

We added a new module in the broker for this, We must go to “Configuration” > “Monitoring Engines” > “main.cfg” > “Nagios CFG 1” > “Date” > “Add a new broker module” and indicate one of the following modules:
[SourceCode]For the x86_64 version –> /usr/lib64/mk-livestatus/livestatus.o /var/log/nagios/rw/live
For i386 version –> /usr/lib/mk-livestatus/livestatus.o /var/log/nagios/rw/live[/SourceCode]
What I said, if instead of Nagios with Centreon in a FAN we have Centreon CES directly 3.4, it will be enough to verify that we have and if it is not, we add:
[SourceCode]/usr/lib64/centreon-engine/bin/livestatus.or /var/lib/centreon-engine/rw/live[/SourceCode]
Without forgetting that we have to record & export the configuration and restart the Nagios service as we already know!
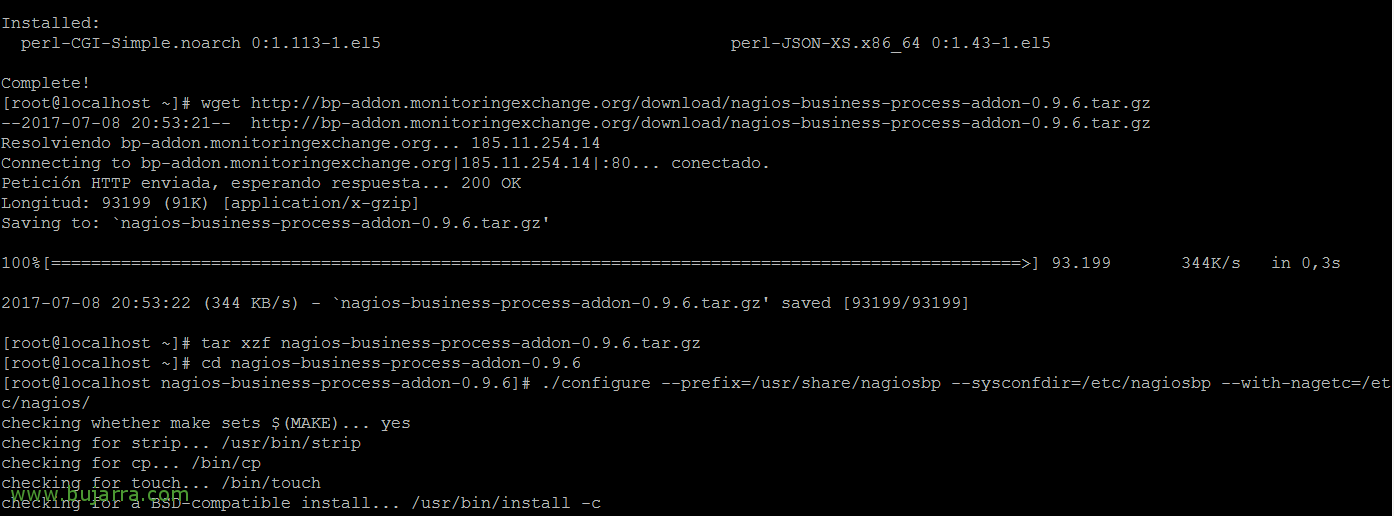
We start with the installation, we downloaded perl-JSON and perl-CGI-Simple from the Repo Epel we installed before, download below the Nagios BP fonts, We complicate it and install it as follows:
[SourceCode]Yum Install –enablerepo=epel perl-JSON-XS perl-CGI-Simple
WGET HTTP://bp-addon.monitoringexchange.org/download/nagios-business-process-addon-0.9.6.tar.gz
tar xzf nagios-business-process-addon-0.9.6.tar.gz
cd nagios-business-process-addon-0.9.6
./Set –prefix=/usr/share/nagiosbp –sysconfdir=/etc/nagiosbp –with-nagetc=/etc/nagios/
make install[/SourceCode]
We continue to restart Apache and create a configuration file with:
[SourceCode]/etc/init.d/httpd restart
cd /etc/nagiosbp/
cp ndo.cfg-sample ndo.cfg[/SourceCode]
We edit the newly created file '/etc/nagiosbp/ndo.cfg’ and modify the following lines:
[SourceCode]ndo=mk_livestatus
ndo_livestatus_socket=/var/log/nagios/rw/live[/SourceCode]
And if we have CES, Parameter ndo_livestatus_socket would be different path, being:
[SourceCode]ndo_livestatus_socket=/var/lib/centreon-engine/rw/live[/SourceCode]

We already test the backend if it works correctly with:
[SourceCode]/usr/share/nagiosbp/bin/nagios-bp-check-ndo-connection.pl[/SourceCode]
It will show us the status of the backend and everything it is getting from NDO, we must see all the items that we have already monitored on our Nagios or Centreon platform, as well as their Status and complementary information.
Since we already have everything running perfectly, There's nothing left! hehe, just move 'everything’ What we have previously defined on a paper or excel here!
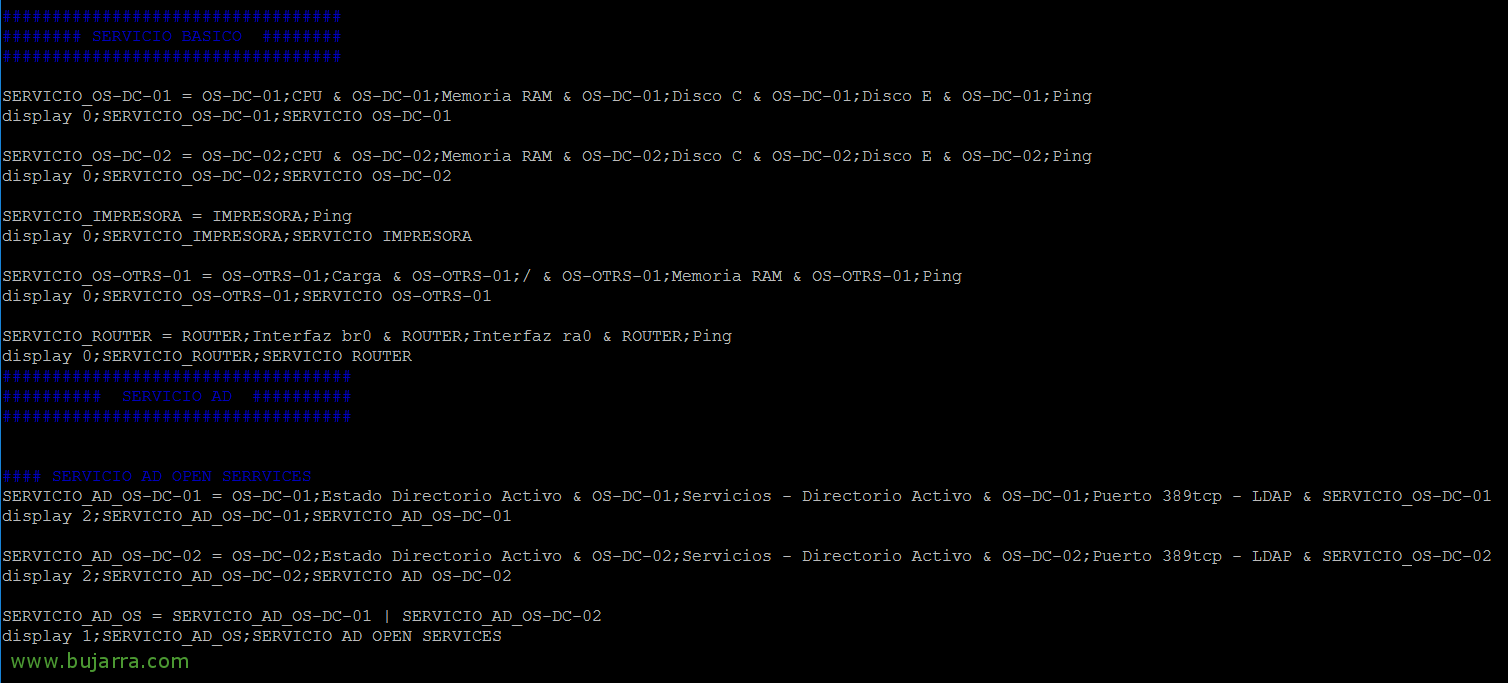
Within the /etc/nagiosbp/nagios-bp.conf file all Business Services will be defined, Operational Services and Infrastructure Services!
We must be careful and define them with the required format, If we look closely, for each Service are 2 lines with their conditioning factors (AND u OR):
[SourceCode]ALIAS_SERVICIO = SERVER;Monitored service 1 & SERVER;Monitored service 2
display PRIORITY;ALIAS_SERVICIO;HOW WE SEE IT[/SourceCode]
We will start by writing from top to bottom in the document, we will start first by defining our HOSTS and their services and then scale up to Infrastructure Services, to the Operational and finally to the Business. It's going to take us a while to do it, We must try to document it as visually as possible in the ESE file since later the reading will be more comprehensive for us.
Continuing with the theme of this document, I put a minimum part of what we have seen in terms of configuration in this file, but that will help you understand the syntax to use. I will define 1 Nagocio Service, a small part of it as an example, which will be the CUSTOMER SERVICE, which, as we have seen, had several Operational Services, I will only define the MAIL SERVICE that served the company's mail, Yes? And of all its Infrastructure Services I will only define the ACTIVE DIRECTORY SERVICE & DNS SERVICE, yes indeed, these whole and with their dependencies. Just as I set up these Services, all the others would have to be configured, that depends on the size of our company will require a lot of time to think about and make corrections. To the point, My configuration file '/etc/nagiosbp/nagios-bp.conf' would look like this.:
[SourceCode]
##########################################################
######### BASIC SERVICES – DEFINITION OF HOSTS #########
##########################################################
# HERE ARE ALL THE HOSTS WE'LL NEED LATER
SERVICIO_SRVDC01 = SRVDC01;CPU & SRVDC01;RAM & SRVDC01;Disc C & SRVDC01;Ping
display 0;SERVICIO_SRVDC01;SRVDC01 SERVICE
SERVICIO_SRVDC02 = SRVDC02;CPU & SRVDC02;RAM & SRVDC02;Disc C & SRVDC02;Ping
display 0;SERVICIO_SRVDC02;SRVDC02 SERVICE
# …etc, etc… We define here all the hosts that we will need later…
##########################################################
############ INFRASTRUCTURE SERVICES ###############
##########################################################
########################################
###### ACTIVE DIRECTORY SERVICE ######
########################################
SERVICIO_AD_SRVDC01 = SERVICIO_SRVDC01 & SRVDC01;Active Directory Status & SRVDC01;Services – Active Directory & SRVDC01;Port 389tcp – LDAP
display 4;SERVICIO_AD_SRVDC01;AD SRVDC01 SERVICE
SERVICIO_AD_SRVDC02 = SERVICIO_SRVDC02 & SRVDC02;Active Directory Status & SRVDC02;Services – Active Directory & SRVDC02;Port 389tcp – LDAP
display 4;SERVICIO_AD_SRVDC02;AD SRVDC02 SERVICE
SERVICIO_DIRECTORIO_ACTIVO = SERVICIO_AD_SRVDC01 | SERVICIO_AD_SRVDC02
display 3;SERVICIO_DIRECTORIO_ACTIVO;ACTIVE DIRECTORY SERVICE
######################################
########## DNS SERVICE ##############
######################################
SERVICIO_DNS_SRVDC01 = SERVICIO_SRVDC01 & SRVDC01;DNS Checkup & SRVDC01;DNS Services
display 4;SERVICIO_DNS_SRVDC01;DNS SRVDC01 SERVICE
SERVICIO_DNS_SRVDC02 = SERVICIO_SRVDC02 & SRVDC02;DNS Checkup & SRVDC02;DNS Services
display 4;SERVICIO_DNS_SRVDC02;DNS SERVICE SRVDC02
SERVICIO_DNS = SERVICIO_DNS_SRVDC01 | SERVICIO_DNS_SRVDC02
display 3;SERVICIO_DNS;DNS SERVICE
# …etc, etc… we define here all the Infrastructure Services that we will need later…
##########################################################
############## OPERATIONAL SERVICES ###################
##########################################################
SERVICIO_CORREO = SERVICIO_DIRECTORIO_ACTIVO & SERVICIO_DNS & SERVICIO_VIRTUALIZACION & SERVICIO_ECXCHANGE & SERVICIO_COMUNICACIONES_INTERNAS
display 2;SERVICIO_CORREO;MAIL SERVICE
# …etc, etc… we define here all the Operational Services that we will need later…
##########################################################
################ BUSINESS SERVICES ####################
##########################################################
SERVICIO_ATENCION_AL_CLIENTE = SERVICIO_CORREO & SERVICIO_ERP & SERVICIO_CRM & SERVICIO_TELEFONIA & SERVICIO_INTERNET
display 1;SERVICIO_ATENCION_AL_CLIENTE;CUSTOMER SERVICE[/SourceCode]
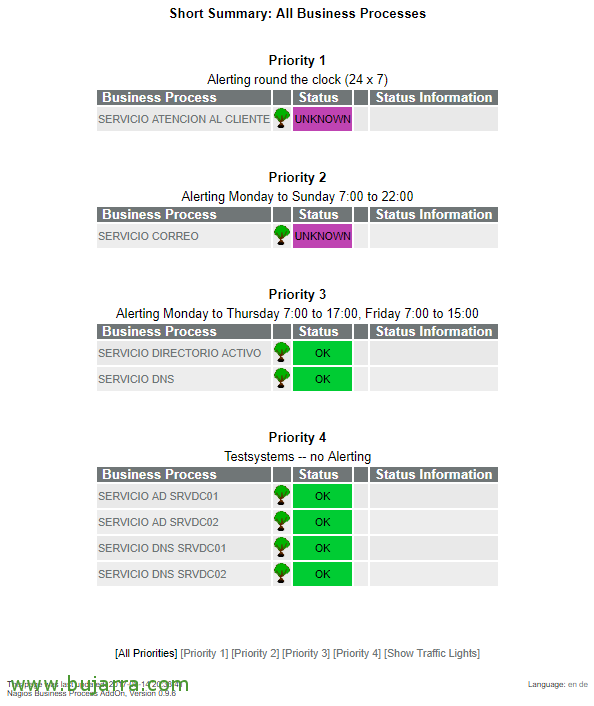
And if everything has gone well and we have been careful when creating the file with all the definitions, Let's test if what we have 'chopped' is correct. We open a browser against http://IP_SERVIDOR_NAGIOS/nagiosbp or http://IP_SERVIDOR_NAGIOS/nagiosbp/cgi-bin/nagios-bp.cgi
We will see what we have been configuring visually, Something ugly that we will improve, already… If you look at the settings I've put in, I order Services by Priority, This is optional, eh, but in Priority 1 I set up Business Services, Priority 2 For Operational Services, Priority 3 for Infrastructure Services and then it is optional to put more or good, each one as they want.
If we are navigating by clicking on the TREE icon, we will be able to travel through our configuration, going down the branches discovering the dependencies as we have configured them, Good for now, No? 🙂 The idea is to finish the configuration file so that this does not fail with UNKNOWN, after completing everything we should have everything perfectly related.

What do you think of this screenshot?? It would be the example we have worked on, we see all the dependencies we have and their relationship!!!
A little thing, if you want to change the language in the Business Process interface to Spanish, You can download the language pack in Spanish and copy it to the language path, it will automatically pick up the language to use from your browser, And if we want to force it, We crush the i18n_en.txt and i18n_de.txt that come by default. Well, the steps would be:
[SourceCode]WGET HTTP://bp-addon.monitoringexchange.org/download/language_pack_es_0.9.6.tar.gz
tar zxfv language_pack_es_0.9.6.tar.gz
CP ES/i18n_es.txt /USR/Share/Nagiosbp/Share/lang/[/SourceCode]
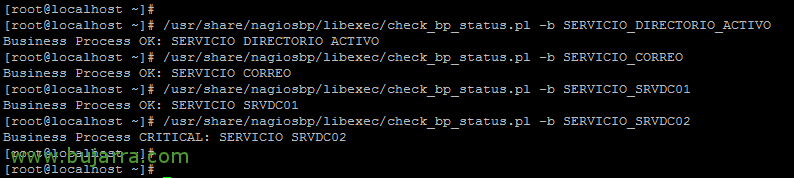
GOOD, how we monitor this with Nagios and Centreon? Very easy! There is almost nothing left for you to have your business fully monitored! If we go to the shell, we will see that we have a new plugin that will allow us to check the status of a Service that we have just created, that's how simple we could verify that Nagios will be able to monitor it:
[SourceCode]/usr/share/nagiosbp/libexec/check_bp_status.pl -b NOMBRE_DEL_SERVICIO[/SourceCode]
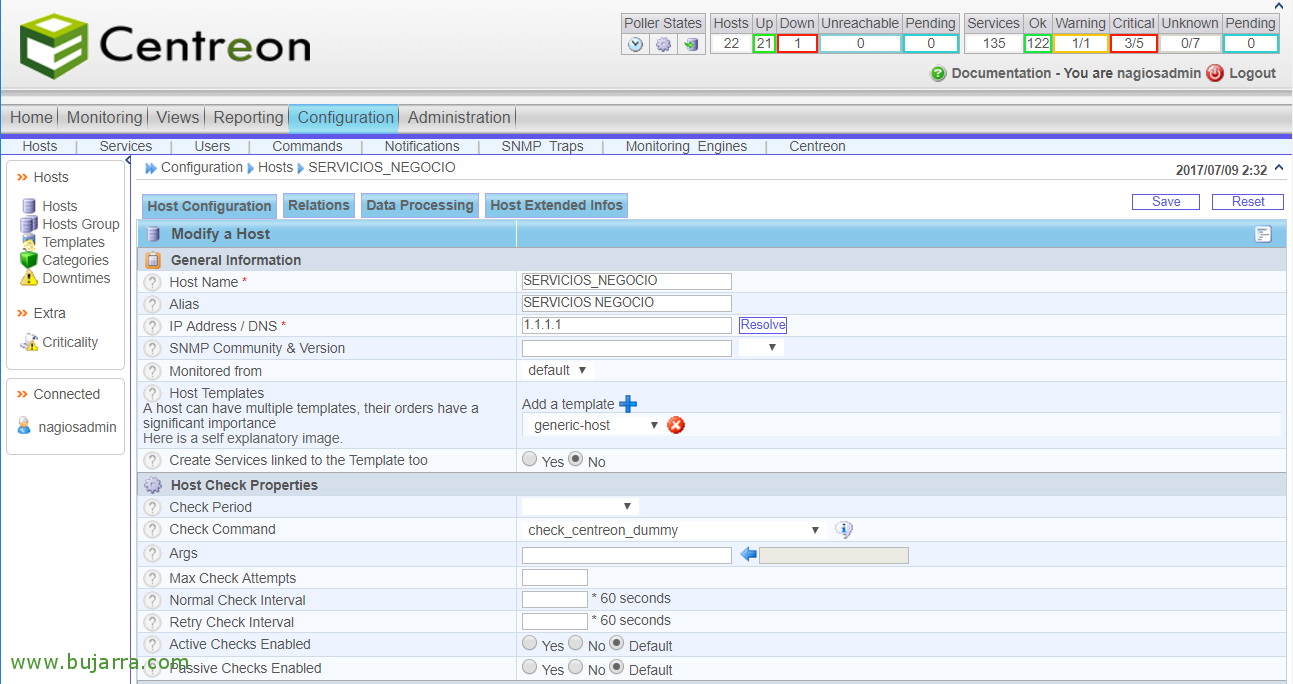
Now let's take this to Centreon, we are going to create the monitoring of Business Services. First of all, we need to create a Host to which we will associate all these services. We're going to “Configuration” > “Hosts” > “Add…” and we create one that is called, for example, SERVICIOS_DE_NEGOCIO inventing its IP address and associating it as always with the generic template we want; We will take into account in “Check Command” Indicate that you use “check_centreon_dummy” so that this imaginary Host that will serve us to organize ourselves does not fail. “Save”,

The next thing will be to create the Command that we will execute when we go to check a Service, since “Configuration” > “Commands” > “Add…” and we indicate the following:
- Command Name: We indicate as usual, the same name of the script that will run, with something like 'check_bp_status.pl’ we will better associate you when we create the Services.
- Command Type: Select 'Check'.
- Command Line: If we rely on what we have run in the shell, We will create your execution with the same format, we will only pass Argument 1 to you when we create the Service. Something like:
/usr/share/nagiosbp/libexec/check_bp_status.pl -b $ARG 1$
- Argument Description: It will be where we indicate what ARG1 is, and it will therefore be the ALIAS of the Business or Operational or Infrastructure Service that we have defined in the configuration file '/etc/nagiosbp/nagios-bp.conf'.
We record with “Save”,
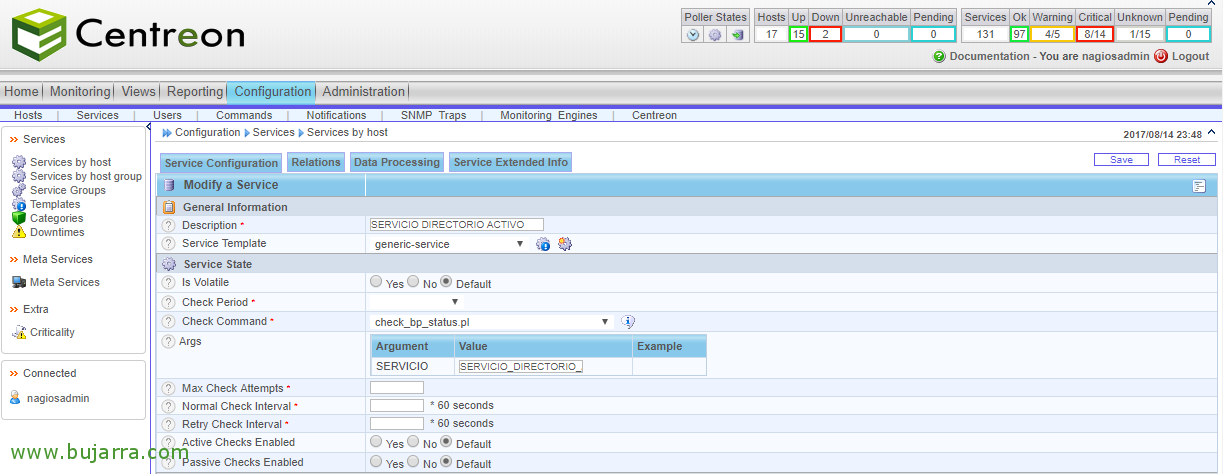
And nothing! Now we only have to register with Centreon all the Business Services / Operational or Infrastructure that we have! We're going to “Configuration” > “Services” > “Add”, in this example we see how to create the Active Directory Service. Indicate:
- Description: We indicate the name of the Service being monitored, For continuing without mixing, We call it the same, in this case ACTIVE DIRECTORY SERVICE.
- Service Template: As usual, this depends on each Nagios site, We may have a parent template with preset notification-type settings…
- Check Command: We indicate the Command that we have just created 'check_bp_status.pl'.
- Args: Will it be what I said, the ALIASES that we have defined in the configuration file and against which we will validate this Service.
Let's not forget in “Relations” associate it with the Host we just created SERVICIO_DE_NEGOCIO, or perhaps, as we know, it is faster to clone Services than to add them one by one by setting the parameters.
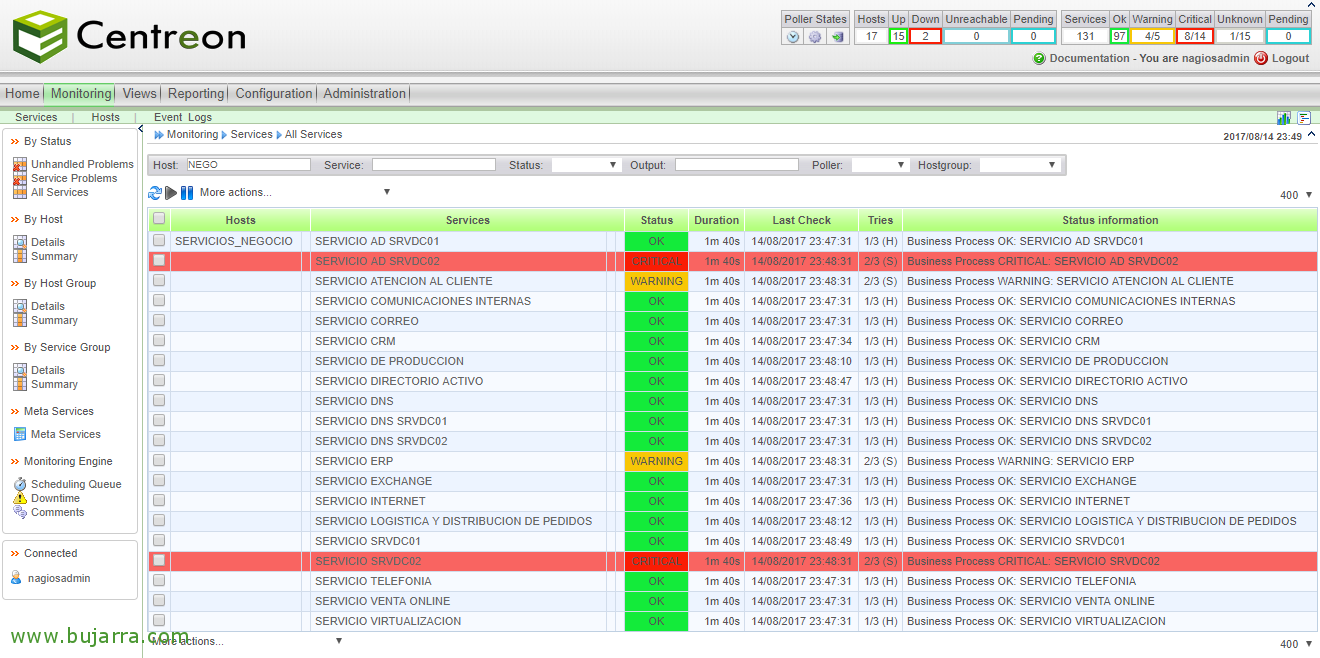
And bam,!!! we have already monitored with our beloved Nagios and Centreon what have been all the Services on which our business depends!!! In a final document we will get more out of it and show you what else we can obtain, The magic has just begun, You'll see!!!