Using Ettercap

Sniffing techniques are becoming more popular every day, Arp-Spoof, dns-spoof, man in the middle, etc, But there are many who believe that they are reserved for the gurus of the network, and until recently it was like that, but in this as in everything, over time, The Internet has made it possible to rapidly develop tools that make what was previously very complex, Now it's a child's thing (I'm not sure if that's good or bad).
In this text I will try to explain (above) How to use the program “Ettercap“.
I have chosen the “Ettercap” apart from the fact that I consider it to be one of the best tools you can find to intercept connections, because I think that after FOOL did 3 Great manuals on the subject (Networks and sniffers, Arp-spoof, Rationale and practice, Manual on the technique “Man In The Middle” ), About what “Moebius” write an article about the “Dsniff” (for Linux), Published in the magazine “hackxcrack” Nº11, and that “Vic_Thor” explain how to use the “Cain” (Windows) To intercept network traffic using ARP poisoning (HTTP://www.freewebs.com/victhor/hxc/FAQ/faq2.pdf ) I think it's the turn of the “Ettercap” and since it's been a long time since I've done a text of this type… It's my turn 🙂
I know that many of you are afraid of linux, But you know that sooner or later you'll have to dare, And what better time than this?, Why ettercap works under Linux, although if you prefer to keep thinking about it, you can also install it on Windows, With the help of the Cygwin, but we will talk about this later.
These topics can be very technical, But as always, And for everyone to understand, I am not going to go into deep explanations about the ARP, Sniff, network topologies, etc.… I'm just trying to show how easy a theoretically advanced attack could be, but that today anyone can do, I mean, anyone can pose a danger to our safety.
INTRODUCTION:
Before we get into the ettercap, Let's introduce some small concepts that may help you understand what this is all about.
Hub/Switch
There are many types of networks, Including, those that connect the equipment through a hub and those that do so through a switch. Suppose we have a mininet (LAN) with 3 Equipment, like that of many individuals, Small Businesses, etc, all three connected to a hub, If the team 1 wants to open a folder (or share) of the team 2, The request to enter that folder leaves the computer 1, She goes to the hub and it sends her to the team 2 and 3, but since the request was for the team 2, the 3 when he receives it he will simply ignore it, and the 2 will receive it and respond, And with the answer the same thing will happen again.
In this situation, a person located on the team 3 You can use a sniffer, and leave it to listen, This way you can see all the information that the equipment is exchanged 1 and 2, because you'll see in the sniffer all those packages that weren't meant for the, but for the team 2.
If our mininet had a switch and not a hub, the operation would be different, in the same situation as before, The team's request 1 I would go out to the switch, but he would only send her to the team 2, since it is addressed to him (This is the difference with the hub) , and the 3 He wouldn't know anything. Now the sniffer of the team 3 It's no longer good for anything.
IP/Mac
Each computer connected to a network/internet, Has (at least) an IP address and each connecting device has a MAC address. The IP address is of the type of X.X.X.X and is used to distinguish one computer from another when they are connected (An isolated team, I mean, without any connection, it also has IP, It is the 127.0.0.1). The MAC address goes “Recorded” on each connecting device (Network Cards, Routers, modems…) and in theory there should be no 2 Equal in the world, Until recently it was assumed that they could not be changed and since not long ago there have been techniques to change them (not always).
To make it clearer, let's look at some cases: An independent team, that connects to the Internet through a modem will have the IP assigned to it by its ISP and the MAC that the modem comes with from the factory. If there are several computers connected to the Internet with a modem-router (in multi-position) Internet equipment will be identified by the IP assigned by your ISP to the modem-router, the MAC will be that of the modem-router, but among them they will identify each other (and with the modem-router) using the IP assigned to you by the network administrator and the MAC of your network cards in the case of computers, since the modem-router has its own MAC.
For the example of our mininet, Let's assume that the IP of the computer 1 is 1.1.1.1 that of the team 2 is 2.2.2.2 and that of the 3 is 3.3.3.3, and that the MAC addresses of your network cards are MAC1, MAC2 and MAC3 respectively, This will help us to understand the following paragraph.
Arp spoofing
This is where the ARP comes in (address resolution protocol). The ARP works by sending packets that make the following query: “If your IP is X.X.X.X send me your MAC address”, When a computer receives this query, checks that the IP specified is yours and if so responds by sending your MAC address, and the team that formulated the consultation, it will cache the response with the IP and MAC (IP/MAC).
The important thing is that these packets are sent to all computers on the network, regardless of whether the network is connected via a switch or a hub.
Arp-spoofing works by sending specially created arp queries and responses.
Back in our mini-network, If the team 3 ARP Replies to the Team 1 with manipulated IP/MAC information, can deceive you and get that if any information comes out from 1 towards 2, it actually goes towards 3, and therefore we found the team again 3 can intercept all communication between 1 and 2 even if the network has a switch.
We have said a little above “Specially Crafted ARP Responses”, What would these answers contain?? simply, The Team 3 would construct a response in which the IP/MAC content was 2.2.2.2/MAC3 (Of course in reality this is more complicated, but I think the operation is clear), and send it to the team 1, For example, in this way this response is saved in the cache of 1, And he will believe that the IP 2.2.2.2 it corresponds to MAC3 instead of MAC2 ( this is called ARP poisoning).
ETTERCAP
¿What is it?
According to its authors:
“Ettercap is a sniffer/interceptor/logger for LAN networks with switches, that supports active and passive dissection of many protocols (even encrypted) and includes many features for network and host analysis (host).
Among its functions, The most outstanding are the following:
*Injection of characters into an established connection by emulating commands or responses while the connection is active.
*SSH1 support: It can intercept users and passwords even in connections “Safe” with SSH.
*HTTPS support: Intercept connections using http SSL (supposedly safe) even if they are set through a proxy.
*Intercept remote traffic using a GRE tunnel: If the connection is established through a GRE tunnel with a Cisco router, can intercept it and create an attack “Man in the Middle”.
*”Man in the Middle” Against PPTP tunnels (Point-to-Point Tunneling Protocol).
Plug-in Support.
List of plugins:
Password Collector in : TELNET, FTP, POP, RLOGIN, SSH1, ICQ, SMB, MySQL, HTTP, NNTP, X11, NAPSTER, IRC, RIP, BGP, SOCKS 5, IMAP 4, VNC, LDAP, NFS, SNMP, HALF LIFE, QUAKE 3, MSN, YMSG.
Packet filtering and replacement.
OS fingerprint: I mean, Remote OS Detection.
Kill connections.
LAN Scanner: Hosts, Open Ports, services…
Look for other poisonings on the same network.
Port Stealing (Port Theft): It is a new method for sniff in switch networks, no ARP poisoning”.
This info is taken from the official Ettercap website and gives us an idea of how powerful this tool is.
Linux installation:
Installation is very simple, The version I'm going to talk about from now on is 0.6.b, First we download the file from the official website
http://ettercap.sourceforge.net/index.php?s=download
(There are also rpm, But I don't recommend them, Because they don't come with all the plugins that come with the tar file, At least what I've tried)
Once downloaded, We decompress it:
tar -zxvf ettercap-0.6.b.tar.gz
Let's go to the folder where it has been unzipped:
cooldown ettercap-0.6.b
and we begin:
./Set
If all goes well, we have several make options, I recommend that you install everything, for this put:
Make complete_install
and it is already installed.
If you are going to use the SSH1 or HTTPS options, the OpenSSL libraries are required ( HTTP://www.openssl.org ) If you don't already have them installed
Installing on Windows:
Like most programs designed for Linux, it is possible to run them on Windows thanks to the cygwin (HTTP://cygwin.com/setup.exe).
But there is also a specific distribution for Windows, You can download it from:
http://sourceforge.net/projects/ettercap/
If you prefer to install the Linux package on Windows, you're in luck, the package contains a file called README. WIN32 in which it explains in detail the steps you need to follow.
Using the Ettercap:
Before starting with the Ettercap we have to configure our system to accept all the packages it detects, for this, We open a terminal and write:
ECHO 1 > /proc/sys/net/ipv4/ip_forward
to check if the ip_forward is in 1 Or 0 (On or off) We can use this command:
cat /proc/sys/net/ipv4/ip_forward
and the answer should be a 1.
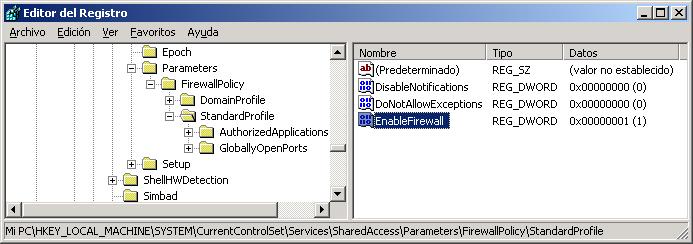
To do the same in Windows we must go to the registry, to the chain:
HKLMSYSTEMCurrentControlSetServicesTcpipParameters
and in the IPEnableRouter value we put a 1 instead of a 0.
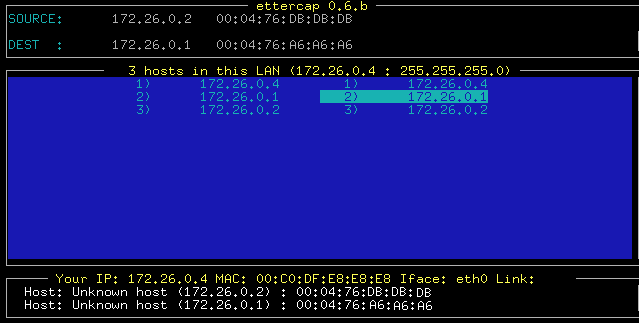
Now with the ip_forward activated and the Ettercap installed, we run it in a terminal (with dimensions greater than 80×25) and we see that the first thing it does is search for all the equipment in our network, When it ends, a screen appears in which two columns appear with the IPs in contradas in our network, in the left column select (Moving the cursors and pressing Enter) The Team “origin” What do you want to spy on?, and on the right, the team “destiny”, So that we understand each other, Let's assume that on the network I'm on there's a switch that connects the gateway (172.26.0.1) with the rest of the teams, at the time of the captures there are 2 Equipments Switched On 172.26.0.2 and the 172.26.0.4.
My team is the 172.26.0.4 and I'm going to try to intercept all the information that the team exchanges 172.26.0.2 with internet, I mean, the one that sends and receives from the 172.26.0.1 via switch, So I select in the first column the team 172.26.0.2 and in the second the 172.26.0.1, Here's what we'll see:

If we press F1 we will see the help menu (All menus have their own help, and you can always access by pressing F1):

We see that there are 3 Sniffing Modes:
ARP Poisoning -> by pressing 'a’ or 'A’
Sniffing IPs -> Pressing 's’ o'S’
MAC Sniffing -> Pressing 'm’ o 'M’
In our case we will press 'a', But there's more interesting stuff, To access the plugins you have to press 'p’ or 'P’ , To find out the operating system of the computers on the network we will press 'f’ or 'F', We can also edit the headers of the packages by pressing 'X'’ or 'X', etc… anyway, that's up to you.
Let's activate the plugins we want to use, To do this, press 'Q’ (Quit) to exit the help and now press the 'p', This is the menu we see:

If we go down with the cursor we see that we have 34 Installed Plugins (We have them because during installation we put 'make complete_install’ and this includes plugins), I'm not going to explain them one by one, because each one has a sufficiently descriptive definition, and because many more will undoubtedly emerge.
The choice of plugins to use depends on the needs of each case, but be careful because some are DOS attacks and can be dangerous, for LAN network integrity.
With the cursor you move through the list and to select the one you want to activate you press 'enter', the plugin will be marked with an 'A'.
Some are marked with an 'E', These are independently executed, I mean, are not selected, They run when you press 'enter'.
If you have doubts, To test, select the ones that put '…password…’ 😉
In this example I activate the following: H13_giant2, H20_dwarf, H30_thief (It's more than I need to intercept passwords and emails)
To see from the command line which plugins you have installed, type in a terminal: 'ettercap -Np list’ and to run a specific one 'ettercap -Np nombre_del_pluging host'.
There's a lot more to know about plugins, to do this, read the file 'README. PLUGINS', and if you have any questions about using any plugins, Each one is located in a folder with its name inside the 'plugins' folder, and some together with their corresponding HOWTO.
I exit the plugins menu (By pressing 'Q') and I start capturing, in this case due to the switch pressing 'a’ (ARP poisoning), And this is what you see:

We see that the state of each established communication is detailed (ACTIVE, CLOSED, KILLED…) and the type or protocol (HTTP, domain…)
At the top we see that information about the session that we have configured, In this case, the filters are disabled (Filter: OFF) and the capture of passwords (Active Dissector: ON) and the type of sniff is ARP.
We can open up help (F1) to see everything we can do.
Pressing 'enter'’ On any line we can sniff the selected connection, if it is active (ACTIVE) We will see how in the box on the left appears what was sent by the target team and in the box on the right what was sent from the remote computer to the target team.
This is the screenshot:

And do I have to find the passwords there? No, The Ettercap is very clever, and makes work easier, revealing the username and password it finds, at the bottom of the window, when we select the connection they are on.
For example, This is the capture of the Hotmail password when someone connects to your email via the web:

As you can see below, the user is visible, the pass and the URL where they were used. Note that the connection is https (theoretically safe).
Although not everything is so beautiful, this is the capture of an MSN login:

As you can see, it does not give us the password in plain text (Logically), but… And the theft of sessions? Mmmmm, I don't know, I don't know, Well, that's a long topic, Stop again 🙂
Anyway, When you get tired, You press 'l’ o 'L’ and all captured passwords are saved in a log.
Well, I think that as an example it is enough, There are many things left to see, for example POP captures, FTP, TELNET, IRC … , manual editing of the headers of sent packages, Filters (that allow you to capture and edit strings “on the wing”, etc… But that's up to you.
As you can see, All this text, More than a manual, is a presentation, Contact, Or call it what you want, I hope that at least it has served to expand a little the knowledge of some of them about these techniques that are currently being used.