Installation, Citrix Provisioning Server Configuration and Management

This document will cover these two Citrix Provisioning Server for DataCenters releases (for server provisioning) and Citrix Provisioning Server for Desktops (for desktop provisioning).
Installation and configuration of Citrix Provisioning Server – HERE
Installation and use of the Citrix Provisioning Server agent or Citrix Target Device – HERE
Using Citrix Provisioning Server – HERE
Distributing an operating system over the network and managing it with Provisioning Server – HERE
Since Citrix acquired another company, in this case Ardence has grown even more, now with this product Citrix will be able to distribute servers or devices over the network. It will be called equipment provisioning, 'On-Demand’ or on demand, in real-time for desktops and server images. This real-time provisioning capability promises greater agility for the IT organization and offers new options for how companies deliver applications and desktops over the network to users.
For those who do not know exactly what it is capable of, you can watch this YouTube video – HERE
In that video we see how we can get 150 New equipment on the fly, We will distribute them over the network and we will be able to start light equipment, thinclients, fat clients or directly integrate it with XenDesktop and provide machines immediately. These computers don't have to have a hard drive, a CD drive… they just need to have a network card and boot with PXE from the BIOS.
Installation and configuration of Citrix Provisioning Server,
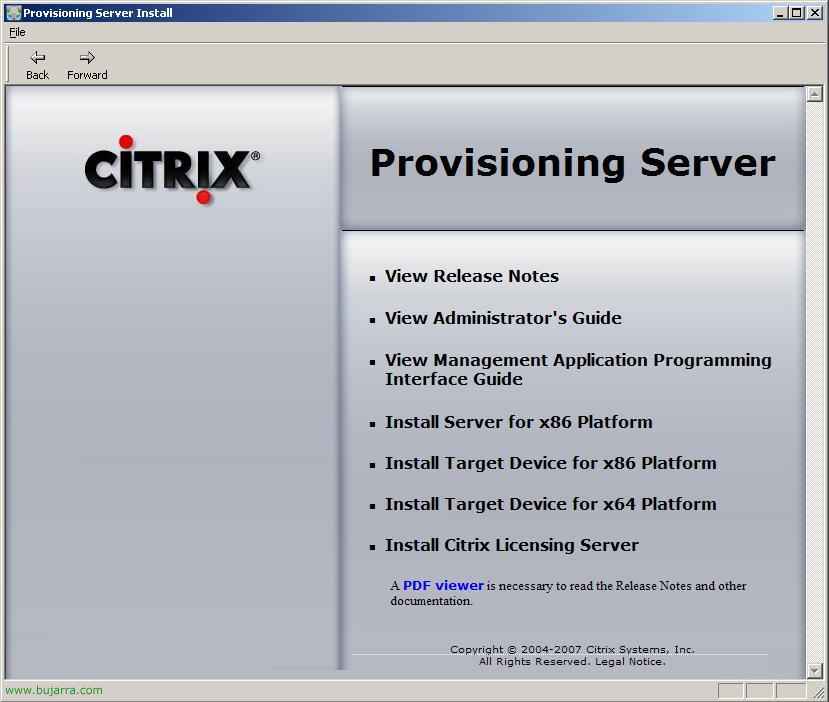
Well, the first thing is to get the Citrix Provisioning Server CD and install it on a server, in my case it will be a Windows server 2003.

To install it, from the autorun we select “Install Server for x86 Platform”,

An installation assistant appears,, to start it we click on “Next”,

We accept the license agreement, “I accept the terms in the license agreement” & “Next”,

We indicate the name and organization, We, “Next”,

We select the installation path for Provisioning Server, by default will be “%Program files%CitrixProvisioning Server”, “Next”,

We select the type of installation that interests us, full or custom. In my case, I will select “Custom” since I already have a DHCP server on my network and this will install one, and I prefer to configure Microsoft DHCP, “Next”,

We uncheck the components we don't need and continue, in my case, I am not interested in the Tellurian DHCP server or the Documentation, “Next”, but we could leave the Tellurian DHCP if we don’t have one on our network, and we would configure the IP range to give to the clients.

Click on “Install” to start the installation of “Provisioning Server”,

… We wait while it is installed…

GOOD, successful installation, “Finish”,

The configuration assistant will automatically appear., we must complete it, “Following”,

We select the DHCP server that we have on our network, in my case, being the Microsoft one, I select the first one “Microsoft DHCP” and we check on the machine that is either this one or a remote one. “Following”,

We need to indicate with which service we will provide the PXE boot data, it indicates that we need to configure the options on the DHCP server 66 and 67, “Next”,

Well, before continuing with the setup wizard, we will have to configure our DHCP server with the following information, we will configure the option 66 “Serv hostname. Starting” with the IP address of the Provisioning Server and the option 67 “Startup File Name” with the value ARDBP32.BIN.

Well, we continue with the Provisioning Server setup wizard, we select where we will locate the database, by default in “%Program Files%CitrixProvisioning ServerVLD.MDB”, “Following”,

We need to complete the licensing information, who the license server is and its port, which by default will be 27000tcp, “Following”,

We select the network interface of the server to enable streaming on it and select the ports for administration, by default it is the range from 6905tcp to 6909tcp. “Following”,

If we have a TFTP server on the network we can use it with the ARDBP32 image. BIN, otherwise, we install the TFTP server that comes with Provisioning Server by checking the box for “Use the Provisioning Server TFTP Service”, “Following”,

We leave the IP address of our Streaming server, If we have more servers we will put them here, “Following”,

We check a summary of the configuration, if everything is correct we click on “End” and leave the box checked for “Automatically Start Services” to start the services now,

… we wait while Provisioning Server configures and starts the services…

GOOD, Click on “Donate” to exit the configuration wizard.
Installation and use of the Citrix Provisioning Server agent or Citrix Target Device
Once we have Provisioning Server configured, before configuring anything, lo que nos interesa es crear una imagen de un sistema operativo para poderlo distribuirlo por la red. Así que pensamos qué es lo que queremos distribuir, en mi caso distribuiré un Windows XP y el cliente ICA para que mis usuarios puedan trabajar con un equipo ya listo con un S.O. y usen las aplicaciones vía Citrix Presentation Server, aunque podría dejarle las aplicaciones instaladas, un Office o las que usen. Así que tengo por ahí un PC con un Windows XP limpio y las aplicaciones que nos interese, para poder hacer una imagen de este equipo, primero tenemos que instalarle el “Target Device”, después crearemos una imagen de este XP a un segundo disco duro. Then we will create a disk in the Provisioning server console and transfer this data to the newly created disk.. In this example, we see that I will distribute an XP., a desktop OS., but it can also be equally logical to distribute server OS., with the services configured.… Then we can make this hard disk that we are creating 'Private',’ or 'Standard'., This is, The first is a virtual hard disk that we will assign to only one remote machine and it CANNOT be shared., All changes made will be saved.; And the second can be used to distribute the same image of a virtual HD to different machines at the same time., And thus send an XP with its applications across the entire network., For example..

So the first thing is to install the “Target Device for x86 Platform” or “Target Device for x86 Platform”, según sea nuesto sistema.

We start the installation wizard, “Next” Getting Started,

We accept the license agreement, “I accept the terms in the license agreement” & “Next”,

Indicamos un nombre y una organización, “Next”,

Select the installation path, dejamos ese, “Next”,

And click on “Install” for installation to begin,

… esperamos mientras nos instala Provisioning Server Target Device…

Durante el proceso de instalación nos creará un dispositivo de un disco duro virtual llamado “Citrix Virtual Disk”,

GOOD, Click on “Finish” para acabar esta instalación.

Debemos reiniciar el equipo cuando podamos para seguir con todo esto, So we click on “Yes”,

Una vez reiniciado nuestra máquina pulsamos en “Provisioning Server Image Builder” para crear una imagen de este equipo.

Seleccionamos la partición de sistema, donde tenemos nuestro Windows instalado en “Source Drive”, and in “Destionation Drive” tenemos que meter la unidad de un segundo disco duro que tengamos, que será donde nos copiará todos los archivos de C: para luego llevarlos al servidor de Provisioning Server. Eye, this destination hard drive will have all the data erased! Click on “Build” to create the image,

We confirm that it will delete all the data from the destination hard drive, “Yes”,

… and we wait a few minutes while it copies all the information from the system hard drive to the destination HD…

GOOD, once all the data is copied, Click on “Accept” and we go to the Provisioning Server. We will need to be able to transfer these data that we just copied to a hard drive to the Provisioning Server, either over the network or by taking the hard drive to it.
Using Citrix Provisioning Server ,
Now what we will explain is, how we can create a virtual hard drive on the Provisioning Server with the data we just generated from our XP machine (in my case). After creating that virtual disk, We will see how we can use this disk and boot machines almost without hardware with that OS!! as many machines as we are interested in!!

We open the administration console of Citrix Provisioning Server, the “Provisioning Server Console”

It shows us the Provisioning Server servers and below in “Target Devices” the devices that we have configured to boot with our virtual hard disks.

Well, the first thing is to create a blank virtual hard disk and fill it with the information we generated in the previous step. So to create the new virtual disk, we right-click on the Provisioning Server server “New Virtual Disk…”

We select the first option & “OK”,

Select “Create a new disk”, we select the directory where we will save the image of this virtual hard disk in “Directory”, in “Disk name” le indicaremos un nombre para saber de qué disco se trata, en mi caso como le meteré los datos del puesto ese con Windows XP le pongo un nombre lógico 😉 ‘DiscoXP’; le indicamos la cantidad de disco en MB, en mi caso se que me sobrará con 3Gb, pero cuidado al establecer el tamaño. “OK”,

… esperamos mientas nos crea el disco…

Una vez nos haya creado el disco, tenemos que mapearnoslo en el servidor de Provisioning Server y meterle los datos que hemos generado con anterioridad, así que sobre el disco duro virtual, Right-click “Map disk as local drive”,

Vemos que el icono del disco se cambia, eso significa que está bloqueado por algún dispositivo o que está mapeado, Not bad,

Vemos que en “My PC” nos sale una unidad de disco nueva, es este disco duro virtual mapeado, primero como no tiene formato, se lo tenemos que dar, así que botón derecho en él y “Formatear…”,

Le indicamos un sistema de archivos NTFS y le marcamos la opción de “Formato rápido”, Click on “Initiate” para que lo formateé,

Accept,

GOOD, ya tenemos el disco virtual formateado! Accept,

Y lo que tenemos que hacer ahora, es coger los datos que hemos creado anteriormente con el “Device Image Builder” of the “Target Device” y copiarlos al disco recién formateado.

Una vez que hemos copiado todo el sistema el disco virtual, lo tenemos que desmapear, así que sobre el disco virtual con botón derecho > “Unmap disk”,

List. Ahora tenemos dos opciones, crear dispositivos de destino o ‘Target Devices’ de forma manual introduciendo la dirección MAC de cada uno, to assign the disks we want it to have or directly let the machines boot via PXE without disks and ask for data to associate with a virtual disk.
Distributing an operating system over the network and managing it with Provisioning Server,
In this example, we will demonstrate how a thin client would boot without a hard drive and only via the network.

We boot a device via the network, which should have its network adapter set as first in the boot order. We will see something like this, booting from network, it will be assigned a dynamic IP address by the DHCP server and will receive the image to boot from the Provisioning Server. We will need to fill in the necessary information to be able to boot the virtual HD.

We enter a name in “Device Name”, a description in “Device Description”, we select the Provisioning Server, seleccionamos con que disco duro queremos arrancar la máquina, si con el disco virtual o con el local (si es que lo tiene), And we restarted,

Ya vemos una máquina arrancada con un Windows XP que es el del disco virtual y es una máquina sin disco duro, si vemos es una que me he montado en un VMware y que de hardware no tiene ni unidad de CD/DVD ni unidad de disco duro! sólo un adaptador de red!!! además vemos que en arrancar está máquina ha tardado 34 Seconds!!

Si vemos en la consola de Provisioning Server el disco virtual sale como bloqueado y automáticamente me salen mis dispositivos y qué discos virtuales tienen asignados! Pero si este disco virtual está bloqueado quiere decir que sólo se puede usar desde una máquina a la vez, así que si nos interesa que más dispositivos puedan usar este disco, tenemos que cambiarle en sus propiedades de ‘Privado’ a ‘Standard’,

Estás son las opciones que tenemos desde un dispositivo…

And what I said, para cambiar las propiedades en el disco, con botón derecho entramos en “Properties”,

On the “Disk Mode” sería cambiarle el modo de acceso a Standard.

Y así vemos que diferentes dispositivos tiran del mismo disco duro virtual! así que aunque tengamos un parque de 1000 equipos y cada equipo usa el mismo HD, tendríamos 3Gb sólo de disco para todos ellos y no 3Gb x Equipo = 3000Gb o 3 Teras!!!!!!
www.bujarra.com – Héctor Herrero – Nh*****@*****ra.com – v 1.0