How to clone a Citrix Presentation Server or XenApp server

This procedure explains in detail how to clone a Citrix Presentation Server 4.0 or Citrix Presentation Server 4.5. The idea is if we already have a server in the farm installed and with the applications installed, to avoid this, having to reinstall them all and Citrix PS back on it. It will depend on whether the DB is Access or SQL, but to do so we would modify the script that we will discuss below, It works for both databases. Let's start with the explanation.

We need to already have a server with Citrix Presentation Server installed and the applications, We do a cloning of it, with any application, Symantec Ghost or Symantec LiveState Recovery. And after cloning him or before, it depends on what we are interested in, whether to have an image already prepared or to prepare, whatever. We must create a new SID, rename the server, your IP, licences… for this we will use Sysprep. On the Windows CD 2000 or 2003, we have a directory called SUPPORT, within it one called TOOLS and inside a CAB file called DEPLOY.CAB, we must unzip the contents of that directory into a folder called SYSPREP on the system drive, be C: o M:… If we want, we can leave it ready with an already generated response file so that the process is fully automated (Generate response file – HERE), in case it is a process that we perform frequently.

Well, now, We must “Detain” and put in the service status how “Manual” Citrix Services:
Citrix MFCOM Service
Citrix SMA Service
Independent Management Architecture de Citrix
Citrix WMI Service
To do this, we enter the “Services” from the “Administrative Tools”, on each right-click service and “Properties”.

In “Startup Type” Select “Manual” and click on the “Detain”, We accept and realize this with all four services.

Now we will indicate that when it restarts automatically a script will be executed, this step can be avoided and done manually, but nicer if everything is fully automated. The first thing is to download the script FixUpCTX.cmd of HERE, unzip it and save it in the directory where we saved the SYSPREP before.
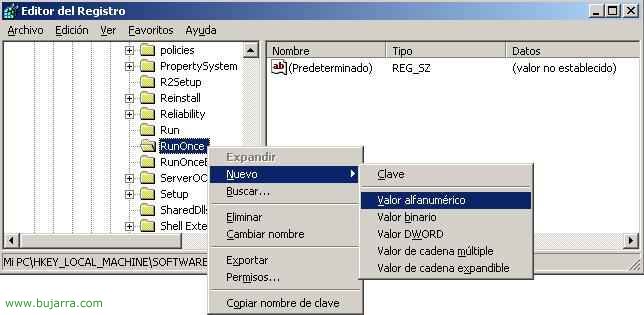
And from the registration we will call you, Enter the Windows Registry (“Beginning” > “Execute” > “regedit” and “Accept”), We enter to the entrance:
“HKEY_LOCAL_MACHINESOFTWAREMicrosoftWindowsCurrentVersionRunOnce”, We create a new “Alphanumeric Value”, We put it in “Value Name” something that tells us that this script will be executed, in my case ScriptPS.
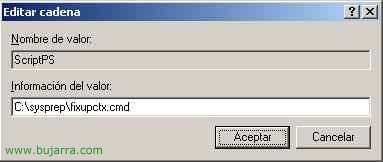
And in “Value Information” We put the exact route to the script, Accept,
Script content to make it understandable:
@echo off
rem Citrix Presentation 4.x Clone File
rem for SQL and Access (see at the end the necessary modifications)
echo Configuring Registration for Citrix Customization…
rem Create Temporary Directory Log File
set CTXREG=”%TEMP%fixreg.reg”
ECHO.
Rem ****** Header of the log file ******
echo Windows Registry Editor Version 5.00 > %CTXREG%
ECHO. >> %CTXREG%
rem SERVER SPECIFICATION
Rem ****** Citrix IMA Server Host ******
ECHO [HKEY_LOCAL_MACHINESOFTWARECitrixIMA] >> %CTXREG%
ECHO “ServerHost”=”%COMPUTERNAME%” >> %CTXREG%
ECHO. >> %CTXREG%
Rem ****** SMA User account ******
ECHO [HKEY_CLASSES_ROOTAppID{BBBF5400-E091-11D8-AD76-005056C00008}] >> %CTXREG%
ECHO “Runes”=”%COMPUTERNAME%Ctx_SmaUser” >> %CTXREG%
ECHO. >> %CTXREG%
rem CONFIGURE AUTO-START SERVICES
Rem ****** Configure Service “Independent Management Architecture de Citrix” for automatic start ******
ECHO [HKEY_LOCAL_MACHINESYSTEMCurrentControlSetServicesIMAService] >> %CTXREG%
ECHO “Start”=dword:00000002 >> %CTXREG%
ECHO. >> %CTXREG%
Rem ****** Configure Service “Citrix SMA Service” for automatic start ******
ECHO [HKEY_LOCAL_MACHINESYSTEMCurrentControlSetServicesCitrix SMA Service] >> %CTXREG%
ECHO “Start”=dword:00000002 >> %CTXREG%
ECHO. >> %CTXREG%
Rem ****** Configure Service “Citrix MFCOM Service” for automatic start ******
ECHO [HKEY_LOCAL_MACHINESYSTEMCurrentControlSetServicesMFCOM] >> %CTXREG%
ECHO “Start”=dword:00000002 >> %CTXREG%
ECHO. >> %CTXREG%
Rem ****** Configure Service “Citrix WMI Service” for automatic start ******
ECHO [HKEY_LOCAL_MACHINESYSTEMCurrentControlSetServicesCitrixWMIService] >> %CTXREG%
ECHO “Start”=dword:00000002 >> %CTXREG%
ECHO. >> %CTXREG%
Rem ****** Modify CtxSta.config file ******
echo Modify the UID value in CtxSta.config, put any value different from the existing one.
notepad %ProgramFiles%citrixsystem32ctxsta.config
Pause
Rem ****** Modify .dsn file in case of ODBC against SQL, if it's Access Skip******
echo ONLY SQL: *** Modify the WSID value with the current server name in MF20.dsn **
echo ONLY SQL: *** or the corresponding .dsn file **
notepad %ProgramFiles%citrixIndependent Management Architecturemf20.dsn
Pause
Rem ****** Import the file into the registry and delete it ******
regedit /s %CTXREG%
of the %TEMP%fixreg.reg
set CTXREG=
echo Restarting the server…
echo To cancel restart run: shutdown -a
shutdown /r /t 40

Well, Continue, what we have to execute now is the Sysprep to generate all the necessary information, we can run it by double-clicking on the sysprep.exe or from the MSDOS console, We have to seal it again.

We wait for it to end… And when it does, it will turn it off, will restart or do nothing (depending on the option we have chosen).

Well, now we restart what will be the future new PS server…

As we have previously executed the SYSPREP will begin to prepare the new Windows…

It starts with an assistant that we must fill in with the information that interests us, of the new server. I'm not going to put all the screens, only some…

We will indicate the “Name” + “Organization”…

The Windows product key for this new server…

The new name we want the Citrix server to have, in my case this will be the third PS server, and is a copy of the second PS. In addition to the local administrator password.

The IP configuration of this new server…

And if it belongs to any domain, We will join him now… We continue with the wizard until it finishes and starts our server for the first time.

As it is the first time we run it, the script that we have indicated above begins, if it doesn't or we haven't put it, we must execute it manually. With a Notepad, the CtxSta.config file that is in %ProgramFiles%citrixsystem32ctxsta.config will open with a Notepad, we must edit the line where UID comes, which is the unique identifier that each PS server has, we modify the value, We change any number or letter, we save it and close it.

And now, if our database is SQL, we have to modify the connection to the DB, it will automatically open the file that is usually the one that comes by default: %ProgramFiles%citrixIndependent Management Architecturemf20.dsn, If it weren't for this one, It should be taken into account that we must modify the existing .dsn. We will modify the line where the WSID server name comes from, We will indicate the name of the current server. If our DB is an access, this step should be omitted.

And now a mandatory server restart will begin, could be canceled with the command “shutdown -a” From the command line.

Once rebooted, If we open the Admin console, We will have to configure the discovery so that the new server takes us, and we will see from the console the servers we have. And finally we will have to drag the applications that we have published to this new server so that users can connect to them.
www.bujarra.com – Héctor Herrero – Nh*****@*****ra.com – v 1.0