Using vSphere 5 Image Builder

VMware vSphere Image Builder will allow us to create a hypervisor with the drivers, Extensions… that we need on our hosts when installing or upgrading them, Customized therefore our installer for ESXi 5, is also a necessary component for Auto Deploy.

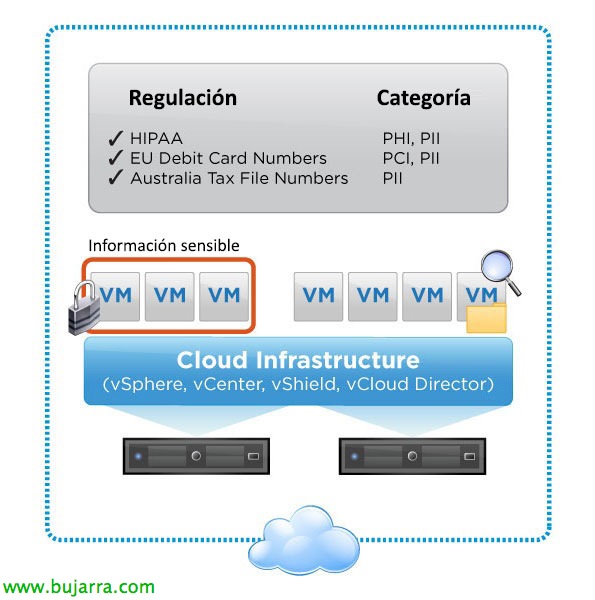
Sometimes it is necessary to create a custom ESXi image for our hosts, since depending on our environment we may need to add components that the 'standard image'’ He doesn't bring, Normally drivers, although we can also add: CIM Suppliers, plugins and the base ESXi hypervisor! A new VMware term is CIM (VMware Cloud Infrastructure and Management), It basically includes all the elements to build a cloud (ESXi, vCenter, vShield and vCloud Director) in one package.
Components,
– VIB: (VMware Infrastructure Bundle) son Software Packages for use on ESXi used by: ESXi Base Image, Drivers, CIM Suppliers & Plugins; dependencies or conflicts may be created between them.
– Image Builder: They are a series of PowerCLI commands and utilities for generating/managing image profiles and generating ESXi images (either in ISO or ZIP). This is what we will see in this document, the creation of these image profiles that we can later apply to our hosts, either manual or automated with Auto Deploy or PXE.
– Depot: It is a warehouse that contains VIBs and image profiles, it may be saved in a ZIP file or in a folder on a web server.

When generating an ESXi profile, we can clone it from an existing profile (Preloaded from a Depot) or we will create it from scratch.

The first thing is to have VMware vSphere PowerCLI installed on a computer, We open a shell by activating the snap-in; later we must have a 'depot’ that we will be able to download from the VMware website (ESXi 5.0 Offline Bundle), We load it with: “Add-EsxSoftwareDepot -DeportUrl ‘PATHVMware ESXi depot 5.0.0-XXXXXX.zip'”, it could also be loaded from a URL.

With “Get-EsxImageProfile” we will see the image profiles we have, with the depot of the image that we downloaded from the VMware website we have 'ESXi-5.0.0-XXXXXX-standard’ and 'ESXi-5.0.0-XXXXXX-no-tools’ that the latter does not have VMware Tools and will be faster to deploy in PXE environments, for example for VMware AutoDeploy 🙂
We create a profile to use ourselves to which we will add and remove some drivers with the intention of generating an ESXi image for our hosts, We duplicate the profile that interests us the most to start, with: 'New-EsxImageProfile -CloneProfile “ESXi-5.0.0-XXXXXX-standard” -Name “NOMBRE_PERFIL”‘ and we checked again,

GOOD, with “Get-EsxSoftwarePackage” We'll see the contents of the depot we've uploaded before; we can delete all the drivers that we are not going to use in order to make a lighter image with “Remove-EsxSoftwarePackage -ImageProfile “NOMBRE_PERFIL” -SoftwarePackage “NOMBRE_PAQUETE_SOFTWARE”.
To add a custom driver we need, in this case I will add the one of a QLogic card 10 Gigabit Ethernet Adapter, previously we will have downloaded the driver for VMware ESXi from the manufacturer's website 5.0, Run “Add-EsxSoftwareDepot -DeportUrl ‘PATHDRIVER.ZIP'”, We check again with “Get-EsxSoftwarePackage” and we see the driver loaded; Now we add it to our profile with: “Add-EsxSoftwarePackage -ImageProfile “NOMBRE_PERFIL” -SoftwarePackage “NOMBRE_PAQUETE_SOFTWARE”.

GOOD, we already have our ESXi image ready, to generate it we must export the profile and generate a ZIP or ISO file that we will use later for the installation of ESXi 5.0 on our hosts! Run: “Export-EsxImageProfile -ImageProfile “NOMBRE_PERFIL” -ExportToBundle -FilePath “PATHHIPERVISOR.ZIP” or “Export-EsxImageProfile -ImageProfile “NOMBRE_PERFIL” -ExportToIso -FilePath “PATHHYPERVISOR. ISO”,

And we will be able to start the installation of our hosts with this fully customized image of ESXi 5.