Basic configuration on a fiber switch (Zoning)
This document shows how to perform a very basic configuration on a fiber switch, based on how to configure zoning and access permissions between HBAs (Host Bus Adapter) of servers and HBAs in a storage array. This example is based on a configuration executed for a VMware ESX environment, we will have four servers with two HBAs each against a booth that also has two cards. All this will be joined by two switches, each HBA from each server to a switch (logically).
In this drawing you can see more or less the environment to be configured, it is essential to have the Node Name or World Wide Node Name (WWNN) and the Port Numbers o World Wide Port Number (WWPN) or of each adapter, since it is absolutely necessary to distinguish who is who 😉
What I said, we target the WWPN and WWNN of each server and booth, To configure zoning on the fiber switch, With this we will be able to secure our environment, restrict interference and simpler and more understandable administration in the future. Not to be confused with cockpit-level mappings on a LUN, that is similar or for the same function, but combining both configurations will obtain the best configuration for a SAN environment. Well, How in this scheme I have two switches, All the configurations that are on one switch I will have to do on the other, but with different data (WWPN, WWNN, Names, alias…)
Connect to the switch with a browser, We will have previously configured an IP address per console or directly in the manufacturer's manual it will tell us what its default IP is
Enter the login username and password, by default on my switch USERID and PASSWORD. “OK”,
This would be the configuration console, Where we'll see the switch, Ports Used, its status and other settings. Click on “Switch Admin” to perform a couple of basic configurations,
What is it like to change the name of the switch or change the IP address, update the firmware and have all switches with the same version, enter more licenses or change the password of the USERID user or create more users for its management. We'll do all this in the tabs “Switch”, “Network”, “Firmware Download”, “License” or “User”. We make the changes that interest us and click “Apply”,
Any changes we make will notify us and we have to record it, for this we confirm it,
We see that it already has the right name (x example),
If we are going to “Port Admin” We will be able to manage the ports of the switch individually,
For example, There are certain ports that we still need, which by default are disabled, In this case it is a switch of a BladeCenter and the external ports are disabled, so we enable the ones that interest us, Right-click “Persistent Enable”. In this case, you don't see any servers that are connected to any ports (nor to the inmates) that is because the HBA drivers or an OS are not directly loaded. to lift the connection, or it is not wired at all! XD
We say yes to enable the port we are interested in, Which will be in this case where I'll connect my cabin,
When I enable it, it already recognizes that the port is 'Online', which is of the Fabric Port type… Close.
And the main setting is on “Zone Admin”, where we will configure the switch zones, that is, which devices can see which devices.
On the “Alias” We have all the devices connected to our switch, in my case there are four servers with their Qlogic HBAs, the other four Qlogic HBAs will logically be on the other switch; and another storage cabin. Here we will have to configure that, the aliases of the HBA's, to make it easier to understand the zones to be configured.
So the first thing we click on “New Alias”,
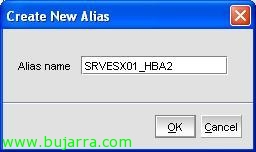
We indicate the name/alias that will help us understand which HBA we are talking about, in my case by having an IBM N3300, with two controllers (for me UP and DOWN) With controller called 0A, Well, my alias will be N3300_DOWN_0a (For example) We give “OK”,
We select said HBA, We give “Add Member >>”
List, We already have that alias with that member.
And now we will have to perform the same task with as many HBA's as we have, “New Alias”,
Alias Name… “OK”,
Same as before, we select the HBA in question & “Add Member >>”
And that, so with all…
Once we have the aliases configured, We will create the zones, that is, The connections we'll allow between aliases, Click on the “Zone” and we create a new zone “New Zone”,
We indicate a zone name, in this case I will call him ZONA_ESX01, and I will allow traffic between the HBA of the ESX01 server and the one of the storage array. “OK”,
So in the aliases, I select the ESX01 server alias and the storage array alias & “Add Member >>”,
After setting up this zone, We will have to configure the rest of the areas that interest us, This is, all the flows that we are interested in having, in this environment there will logically only be traffic/access between each ESX server with the array., but not between ESX servers. So we continue to set up the zones, “New Zone”,
The name of the area, “OK”,
We add your members…
List, and we continue with the rest…
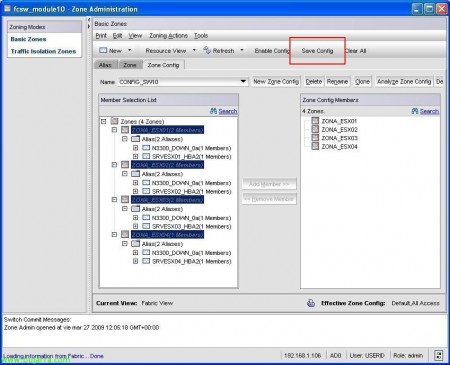
Once the zones have been created, we create a global configuration of all of them, We save and enable such settings. To do this,, Let's go to the tab “Zone config”,
We indicate a global configuration name, In my case the name of the switch “CONFIG_SW10” (or whichever you think is most appropriate), “OK”,
We select the zones we have created and add them as members of this configuration, “Add Member >>”,
We save all settings from “Save Config”,
“Yes” to confirm that we recorded the zone settings,
And now we enable it to take effect. If we look at the default, all traffic is allowed and therefore not optimized, We don't know that “Effective Zone Config” is “Default, All Access”.
We select the configuration that we just created and “OK”,
“Yes” to confirm and enable such config,
And ale, we would already have our switch well configured to control access.
If we are going to “Port Admin” We will see the state of the ports,
And now that I have all the equipment up, you can see if they are connected or not and other useful information.


