Two-factor authentication in Citrix with PINsafe and NetScaler

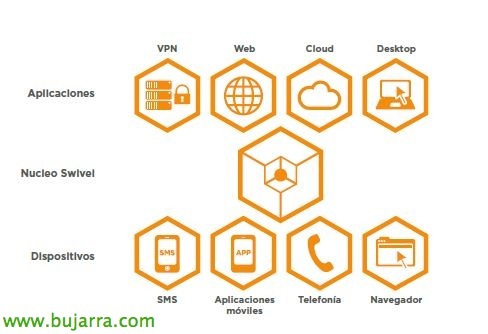
In this document we will look at the deployment of Swivel Secure's great PINsafe product, where we will force users who work against our Citrix platform to have a double authentication and validate themselves with their Active Directory authentication in addition to entering an OTC code based on their PIN so that they cannot access our platform before a keylogger and try to secure the accesses more!!

Prior to this deployment, we will have to have the PINsafe appliance already configured in our environment, We can base ourselves on these previous documents where we deployed the appliance Or we rode Our own facility (eye, that we are a fan of Microsoft, we can also mount it on Windows! we installed Apache Tomcat first, Download PINsafe and we put the file 'pinsafe.war’ in the 'webapps' directory); apart from initially configuring it in a basic way. We will now continue by configuring a RADIUS server on the appliance, we will allow access to the NS so that it can be validated and we will perform all other configurations on the NetScaler!

Access the PINsafe appliance, We're going to “RADIUS” > “Server”, and we will mark “Server enabled” a “YES” to enable the RADIUS server.
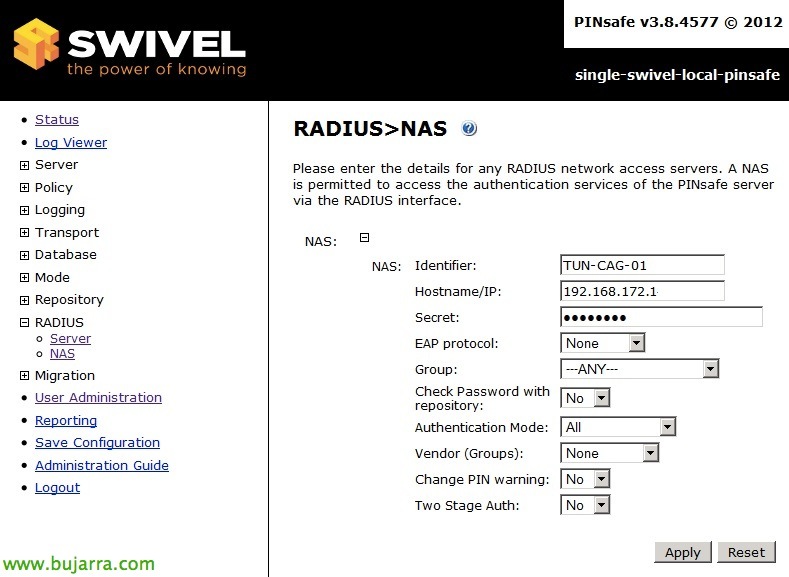
Subsequently, in “RADIUS” > “NAS” we will have to create a new NAS to allow access to the NetScaler, add a name or identifier, we will also add the IP of the PIN (Netscaler IP) and finally we will indicate a secret to use it later between both devices, “Apply”,

GOOD, within our NetScaler we will have to create a server and a RADIUS authentication policy that we will later associate with our Access Gateway Enterprise. To do this,, inside “Access Gateway” > “Policies” > “Authentication” > “RADIUS” > “Servers” > “Add…”

We will create the RADIUS server against which we will validate this second authentication, we indicate a name and specify the IP of the PINsafe appliance in addition to the secret that we registered when generating the NAS inside the appliance. “Create”,

We define the policy to apply it from “Policies” > “Add…”,
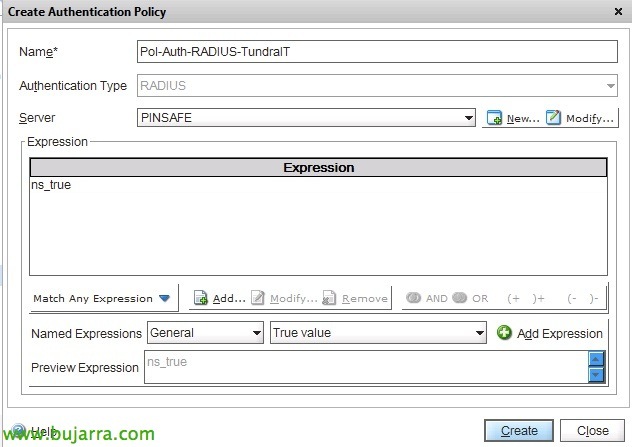
We give a name to the policy, we added the RADIUS server we just created, and we add the expression 'ns_true’ to 'True value'.

We edit our Access Gateway Virtual Server and we will need to add the newly created policy as a secondary, for this, in “Authentication” > “Second…” and we will add the policy for it to attack the PINsafe RADIUS. “OK”.

Now we will continue, first we will download the files to edit the interface of our CAG and be able to introduce the changes, to see the button to view the image. We will take into account that we will need access from outside the organization to the PINsafe server, basically when we use Single Channel Images, such as the TURing image the PINpad, we can always test by accessing the following URL: 'https://URL_PINSAFE_SERVER:8080/pinsafe/SCImage?username=testy'.
Well, we download the template files, we will select the ones we need depending on the version of our CAGEE:- For CAGEE 8.x to 9.1 – HERE.
– For CAGEE 9.2 – HERE.
– For CAGEE 9.3 – HERE.
– For CAGEE 10.x – HERE.
We edit the file “pinsafe.js” and modify the 'sURL' parameter’ to the correct and public URL of our PINsafe appliance.

We will previously make a backup of the files of our NetScaler, We access by putty or local to your 'shell’ and:
cd /netscaler/ns_gui/vpn
cp index.html index.html.bak
cd /netscaler/ns_gui/vpn/resources
mkdir bak
cp *.xml bak

The following, will be to modify in our language template the code that we want it to put to users, instead of 'Password' 2:’ we could put 'OTC:’ or 'PIN':’ to make the entry to our users more intuitive, We access '/netscaler/ns_gui/vpn/resources', We will edit our language file, It's enough for me to edit 'es.xml'.

We look for the following entries and put the text that interests us:
<String id="Password">AD Password</String>
<String id="Password2">OTC:</String>

We copy the newly downloaded files (index.html and pinsafe.js) A'/NetScaler/ns_gui/VPN/’

To make the changes permanent in the NetScaler so that when it restarts the changes are not lost, We must first, copy the modified files (index.html, pinsafe.js and in my case the es.xml) to a non-volatile appliance volume, for example to /var; And then we'll edit '/nsconfig/rc.netscaler’ adding the necessary commands for it to copy after its restart!

We confirm and see how we access the Access Gateway portal and we have the second field to enter the OTC code that we generate each time based on our PIN! As you can imagine, this is the beginning of improving any solution, of course we could send the code by SMS, mail, PINsafe mobile app… I remind you that it is a product that has the first 5 Free licenses, to try it out or demo environments, and later with adding licenses, more users will enter through PINsafe and double authentication!!!
If we need more information, Here are some official documents:- Swivel Secure PINsafe with CAGEE 10.x
– Swivel Secure PINsafe with CAGEE 9.x
– Swivel Secure PINsafe with CAGEE 8.x