Installing and Configuring iFolder with Active Directory & CIFS
After a long time looking for Open Source solutions that allow organizations to set up their own DropBox, we find ourselves with 3 Great solutions: iFolder, ownCloud and SparkleShare. We stay (For now) with the first since today it is the most complete, Clients for the most common operating systems available (Linux, Mac OS X & Windows.) apart from having clients for mobile devices (Android or iOS), allows you to synchronize folders securely or share them with the users you are interested in. Ideal for remote users or information shared across companies,
In this document we will see the installation of the version 3.8.0.3 on an Ubuntu Server 10.04 x64
The first thing will be to have an Ubuntu Server 10.04 newly installed where we will assemble the version 3.8.0.3 from iFolder. So first we upgraded the equipment:
apt-get update
apt-get upgrade
And we install apache with: apt-get install apache2
We enable SSL in Apache with:
a2enmod ssl
a2ensite default-ssl
We install the necessary dependencies for iFolder with:
apt-get install build-essential automake autoconf mono-complete liblog4net1.2-cil uuid-dev libxml2-dev mono-apache-server mono-apache-server2 gsoap libapache2-mod-mono libncurses-dev libtool g++-4.3 gcc-4.3 alien
apt-get remove liblog4net1.2-cil
We downgraded the x64 or x86 versions depending on our architecture with:
or
http://download.opensuse.org/distribution/11.3/repo/oss/suse/noarch/log4net-1.2.10-58.1.noarch.rpm
We convert RPM packages to DEB, We install them and restart Apache with:
Alien –*.rpm scripts
dpkg -i *.deb
/etc/init.d/apache2 restart
How do we want LDAP authentication?, we will need to enable the secure LDAPS protocol on our domain controllers, so LDAP queries won't go through the 389 if not for the 636. We will be able to continue This document to enable it if we don't already have it configured.
Well, once ready we will have to import the certificate of our CA into our iFolder machine so that it trusts the LDAPS connection certificate, with:
certmgr -add -c -m Trust /path/certCA.cer (base64)
We started the installation of Simias with:
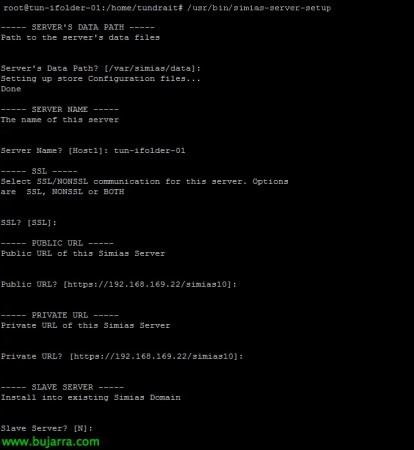
/usr/bin/simias-server-setup
Select the data directory, Default /var/simias/data
We provide a server name.
We will indicate the public URL, Default: https://DIRECCIÓN_IP_LOCAL/apes10
We will indicate the private URL, Default: https://DIRECCIÓN_IP_LOCAL/apes10
This first server will not be a slave server.
If there is configuration before due to incomplete/corrupt installation, We will need to remove the content before: /var/simias/data/simias/
We specify the name of the server as users will see it.
A description of the system.
We'll use key recovery agent.
Default path /var/simias/data
We will use LDAP
We indicate the name of the DC server to which we will connect.
We will indicate that LDAP will be secure.
We specify the DN for the LDAP manager & Your password: cn=administrator,cn=Users,dc=tundra-it,dc=com
We specify the DN for the Simias administrator & Your password: cn=SimiasAdmin,cn=Users,dc=tundra-it,dc=com
We specify the DN for the LDAP Proxy Manager & Your password: cn=MonkeyProxy,cn=Users,dc=tundra-it,dc=com
And the users' search base: ou=Users,ou=Tundra IT,dc=tundra-it,dc=com
We indicate the name attribute: sAMAccountName
We'll set up Apache
We enable LDAP Group plugins
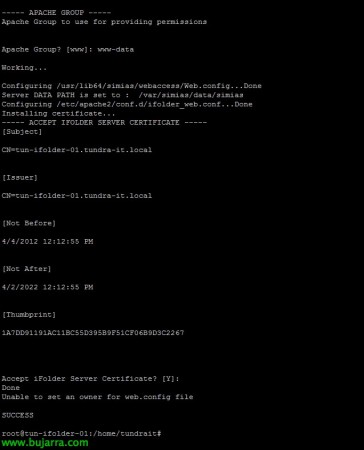
We indicate the apache user: www-data
We indicate the Apache group: www-data
We will accept LDAP certificate
And with this we will already have the server part configured!
Fixed the monkey path, and other paths with:
sed -i 's/apache2/mod_mono.conf/apache2/mods-enabled/mod_mono.conf/g’ /etc/apache2/conf.d/simias.conf
LN -S /usr/bin/gmcs2 /usr/bin/gmcs
mkdir -p /var/www/.config/.mono/
chown -R www-data:www-data /var/www/.config/
/etc/init.d/apache2 restart
If we want to install administrative management via the web on this computer, We'll set it up with:
/usr/bin/ifolder-admin-setup
We will specify the access path.
We will require SSL connection between browsers and iFolder Web Admin.
We will require SSL connection between the iFolder and iFolder Web Admin servers.
We specify the iFolder URL
And if we have redirection for iChain or AccessGateway

We indicate the apache user: www-data
We indicate the Apache group: www-data
We accept server certificate
And that's it!
We run /usr/bin/ifolder-web-setup if we want to configure Web Access on this computer:
We will specify the access path.
We will require SSL connection between browsers and iFolder Web Admin.
We specify the iFolder URL
And if we have redirection for iChain or AccessGateway
The Apache user: www-data
We indicate the Apache group: www-data
We accept server certificate
And that's it!
We fixed the monkey path again and restarted Apache:
sed -i 's/apache2/mod_mono.conf/apache2/mods-enabled/mod_mono.conf/g’ /etc/apache2/conf.d/ifolder_admin.conf
sed -i 's/apache2/mod_mono.conf/apache2/mods-enabled/mod_mono.conf/g’ /etc/apache2/conf.d/ifolder_web.conf
a2enmod rewrite
/etc/init.d/apache2 restart
We will now be able to access to manage our iFolder server from any browser in: https://DIRECCIÓN_IP_iFOLDER/admin, We will log in with the administrator we generated previously.
On the “Users” we will see all the users of the LDAP container that we specified above if we have indicated LDAP; if they were locals, from here we could generate them. The first thing is to allow users who are interested in access to iFolder, We will mark each user and click on “Provision”.
Select the server to assign it and click on “New provision”,
Users will be able to access it from any browser: https://DIRECCIÓN_IP_iFOLDER/ifolder and authenticate.
This would be the view of the Web Access or web client, in this case the content is still empty, From here, users will be able to upload/download documents securely.
If we install the iFolder client, We can download it from here:
HTTP://sourceforge.net/projects/ifolder/files/iFolder Clients/3.8.0.3/
And we will download the client version that we need so much for Windows, Linux or Mac OS.
Once installed, we will have to configure it using the iFolder Account Creation Wizard,
We specify the internal or public URL of the iFolder server,
And our user account,
Click on “Connect”,
We will get a warning from the certificate if we do not trust it or did not put the name of the server associated with the certificate “Yes”,
We'll create our first folder (If we are interested) empty for iFolder.
“End”,
Now a user on any right-clicked folder will be able to convert it to an iFolder, Right Button > “Convert to an iFodler folder”.
We indicate the iFolder server & Accept.
Each iFolder folder that we have synchronized with the server will give us a different icon with which we will quickly identify that the content is on the iFolder server.
We can share any iFolder folder with other users, we can force a synchronization to have it available everywhere with any device or we can easily delete it and therefore turn it into a 'normal'.
This would be the iFolder client if we need to have access, where we will be able to see in more detail the status of the synchronizations, uses, quotas…
Well, in the administrative management part, from the iFolder Administration web console, on the “iFolders” We will be able to see all the folders of all our users. As well as orphaned folders that are no longer in use.
On the “System” We may change certain settings as well as configure per-user limit policies (by number of folders, Disk quota or maximum file size), We may exclude certain files/extensions, The synchronized interval, Encryption and sharing. These configurations could also be made on a per-user basis.
On the “Servers” all the iFolder servers we have will come out, Click on the only available,
And we will see that we can also make a series of basic modifications such as URLs, View Server Logs, LDAP or Datastore Locations.
If we are interested, on the “Reports” we will be able to configure a scheduled generation of a detailed report with all the registration and content of our iFolder servers.
Using a CIFS repository
A good idea is to store the data content of our iFolder server externally to a network server, in this case it will be a Windows with a shared folder on a LUN with deduplication.
We install the requirements:
apt-get install smbfs
update-rc.d -f umountnfs.sh remove
update-rc.d umountnfs.sh stop 15 0 6 .
We confirm the UID of the user 'www-data’ with: 'grep www-data /etc/passwd | Cut -D: -F3′, We will need this to set up the automount in /etc/fstab, in our case it will be '33'.
We create the file '/home/USER/.smbcredentials’ in which we will indicate the user with whom you will connect to said Windows share, Be aware that the password will be visible, Of course, only by root users’ :'( Your Content:
username=TundraIT/UserCIFS
password=PASSWORD
We correct permissions:
chown root .smbcredentials
sudo chmod 600 .smbcredentials
We set up automatic self-assembly, Adding to the end of /etc/fstab:
//DIRECCIÓN_IP_WINDOWS/CARPETA_COMPARTIDA /mnt/CARPETA_COMPARTIDA cifs iocharset=utf8,credentials=/home/USER/.smbcredentials,uid=33 0 0
We force immediate assembly with: mount -a
In the Simias Admin Console, on the “Servers” > SERVER > Data storage > “Add…”
Name: ParaSimias
Full track: /mnt/ParaSimias
We select and enable it! With this we will have a complete deployment of iFolder, Perfect for sharing files between users who are remote and are not always close to the office or share certain information common to different companies.
Things to keep in mind:
If we want to raise the level of LOG, modify from INFO to DEBUG on clients, in:
C:Program FilesiFolderetcsimiasSimias.log4net
C:Users%username%AppDataLocalsimiasSimias.log4net
To display the customer's LOG, We will go to:
%appdata%simias
%appdata%ifolder
If we want to raise the level of LOG, we modify from INFO to DEBUG on the servers, in:
/etc/simias/simias.log4net
To view the server log, We will go to:
cat /var/simias/data/simias/log/Simias.log
cat /var/simias/data/simias/log/Simias.access.log


