TCOS Project

TCOS is one of the best Open Source solutions that generates boot images for thinclient computers (based on Linux Debian/Ubuntu). Allows rDesktop connections (Terminal Server), FreeNX & X over SSH. In this document we will first see how to connect to the same Ubuntu where we will generate the images and in which we will have installed applications; later we will customize a client to use RDP,
The thin client's (from Pentium II with 64Mb RAM) they will be able to boot from PXE, floppy disk (with Etherboot or gPXE), CD, USB or installed locally. Allows the use of removable devices from the thinclient (Data/Audio CD-ROM, USB flash drive – even NTFS -, CD-USB, Firewire…); Volume control by the user, Multiple parameters can be configured for each session. Other alternatives are: LTSP, PXES, Thinstation and K12LTSP. We could use LDAP authentication in Ubuntu itself to authenticate against an Active Directory for example or install the Citrix client for the deployment of applications.
Its official website: HTTP://www.tcosproject.org
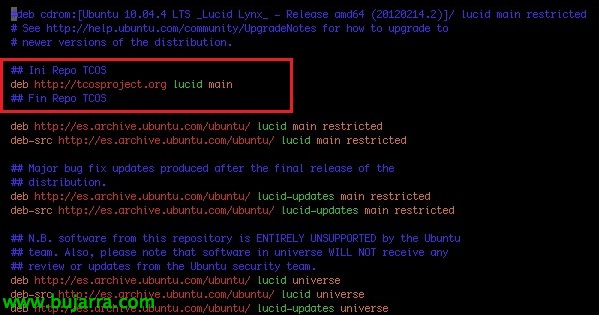
We'll start with an Ubuntu Desktop 10.04.4 Newly installed x64,

We must have in '/etc/apt/sources.list’ The entry 'deb http://tcosproject.org lucid main', We will make an 'apt-get update’ after,

We will first install the 'tcos-keyring' package’ to install the GPG key from the TCOS package, later we will install TCOS,
'apt-get install tcos-keyring’
'apt-get install tcos’

We will upgrade GDM with 'apt-get upgrade’

And we will be able to run 'tcos-cofigurator’ to configure the TCOS server. This command would be optional if we do not want to use local services to connect or have a DHCP server on it. Well, in this document we will perform as we have said, Two possibilities, the first image we will create will use the services of this host and then we will use only a Microsoft environment. In this case, we configure a DHCP range for the computers and the hostname prefix they will use.

On the “Remote Users”, How users will connect to this host, we will create the ones we need in addition to assigning a prefix to the username & the groups to which they will belong (Default fuse).

In “Ticket Manager” We will enable the remote connection by dialing “Enable Remote Entry”, We will indicate if we want autologin and save, we will have to restart the computer to activate it (or restart GDM/KDM),

And in “Boot Images”, we'll run TcosConfig to finally create the boot images. If we only want to create the images and not use a TCOS server to serve as a DHCP/remote connection host, we would run from the shell: 'tcosconfig'.

We will select the image architecture that we will generate, it will depend on the equipment that uses it, “Yes” to generate them from 32bit and “No” for x64.

We will select the distribution we are going to use (Debian or Ubuntu), in this case it will be Ubuntu, in addition to its distribution (Hardy, Intrepid, Jaunty, Kamic, Lucid), We will use the last, a Lucid, We select the architecture, The kernel version, The main download server & the safety, the TCOS repository and whether we want to use the experimental version; Click on “Build chroot”.

…

Once it is finished, click on “Build TCOS”

The TCOS config wizard will load to make changes to the configuration, “Go ahead”,

We will select the TCOS configuration template, We have:
– base.conf will not use any templates.
– tcos.conf.low will disable the USB, sound, tcosmonitor and IDE or SATA devices
– tcos.conf.all will have most of the features enabled.
– tcos.conf.light will disable the USB, sound, and IDE or SATA devices, tcosmonitor will be enabled.
– tcos.conf.nfs forces NFS boot and will disable USB, sound, tcosmonitor and IDE or SATA devices.

We'll set up Xorg's Options, DRI at Xorg, Sound Options, Remote Access Support and Wireless Network Configuration,

In more advanced settings, we will configure the Usernames and passwords (authentication), Debug Settings, Configuring Daemons and Services & the Start Menu and splash,

We'll configure the Kernel Options, Some Tricks for Thin Clients and Other Configurations,

We will select the boot method, which may be: Etherboot floppy disk, PXE Boot, CDROM Boot and NFS Boot (memory <38).

And we press “Begin” to generate the image,

… Wait a few seconds…

And that's it!

We already have the image generated, Click on “Finish and save”,

And we will be able to boot our light computers over the network and they will boot directly to this TCOS server,

Running 'tcosmonitor’ We will get a management panel, where we will be able to perform a series of tasks in remote teams.
– Actions for the terminal/equipment: Reboot, Extinguish, Restart X with the new settings, Disconnect customer, DPMS Turn Off Monitor, DPMS Turn On Monitor, Lock screen, Unlock Screen, Clear terminal information & Update terminal information.
– User actions: Connect the remote display (VNC), Demo Mode (From this team), Block the Internet, Unblock the Internet, Show applications run by this client, Run Application on User Screen & Send a text message to the user.
– Sound, Video and Files: Send audio conference (From this team), Send files, Audio/Video Broadcast, Screenshot.

We must disable Multicast DNS to have a shorter timeout during login at '/etc/nsswitch.conf’ substituting 'hosts: files mdns4_minimal [NOTFOUND=return] DNS mdns4’ by 'hosts: DNS files’

We can create customizations by editing '/etc/dnsmasq.conf’ to assign a static IP address to computers based on their MAC address,

With 'tcospersonalize –host=DIRECCIÓN_IP’ We will customize the configuration per host. We will have several tabs, “Graphical settings”,

If we put in Boot Line 'startx=W rdesktop=DIRECCIÓN_IP’ this computer will connect to a Terminal Services or Remote Desktop server (RDP),
If we want to customize the DHCP server configuration, We will edit ‘ /etc/dhcp3/dhcpd.conf', or we can mount the DHCP server on a Windows computer, in addition to moving the TFTPd service, as long as we copy the content of '/var/lib/tcos/tftp'.
Complete AKI Guide,