Installing an Openfiler-based storage server or file server – Appliance NAS/SAN

In this document we will review the operation of a file server called Openfiler, we can install it directly on a server or run it on a VMware virtual machine and run it with VM ESX/VM Workstation/VM Player or VM Server. The first thing to do is to access their website www.openfiler.org and download the version that interests us the most.
If we download the appliance version, it will already be installed and we will not have to do anything, Ideally, it should be downloaded and installed on a server.
Installing Openfiler – HERE,
Configuring Openfiler – HERE
Configuring the iSCSI initiator/initializer on the host side – HERE
More Openfiler Possibilities – HERE

We put the CD on the server, we started this one from the CD, in the boot menu simply to install it press ENTER. If we want to see what hardware is compatible or other options, We have everything available on your website.

As a typical Linux installation we can check if we have the CD right to avoid possible problems during the installation, whatever,

GOOD, Here we start with its installation, Pressed “Next” To get started with the installation wizard,

We select our language for the keyboard, “Spanish” & “Next”,

We select how we want the discs to be partitioned, We can perform automatic partitioning, depending on our albums, this is already different in each case, In mine, I'll perform automatic partitioning. “Next”,

As always, it tells us that it will delete the contents of the partitions, we confirm it if we are sure and “Yes”,

In my case, It looks like I only have one disc, later I will put more to create the storage systems, Well, we formatted that drive & “Next”,

Let's see how it would look, We can customize it, But it's more than enough, “Next”,
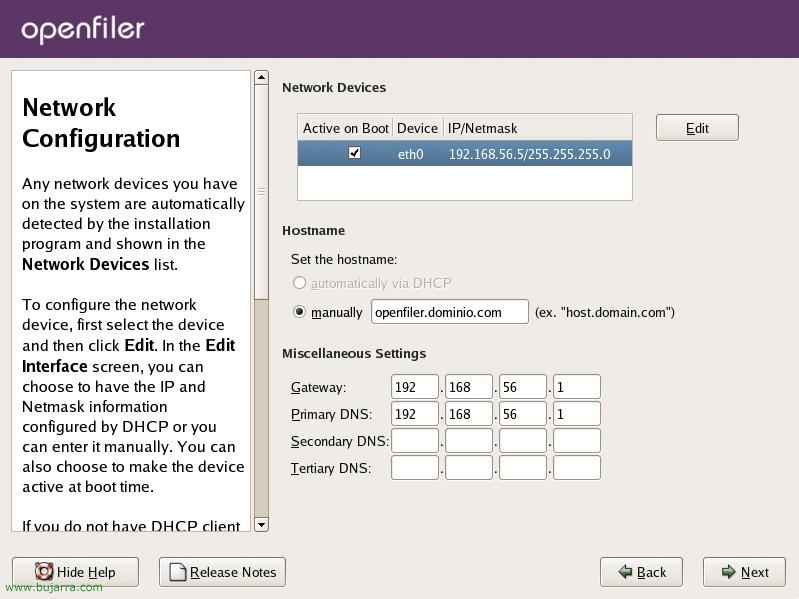
Here we will configure the Openfiler network, We activate the interfaces that interest us, we set your IP address, The Netmask, We will specify the name we want this host to have, the gateway and DNS servers, “Next”,

Select the time zone location, “Next”,

We indicate the password for the root user, “Next”,

And if we press “Next” Openfiler installation will begin,

… We wait for a while while while the system is installed…

Once installed, Pressed “Reboot” to restart, we can now take out the installation CD,

This is what we will see when our appliance has already rebooted, it will tell us the URL to manage it, since in principle from the console we will not be able to do it if we do not enable it.

So we open a browser and go to the address it tells us: https://direccion_openfiler:446, We will get a security alert with the certificate, Continue, “Yes”,

The first time we enter we have to accept the license terms, The contract, Click on “I do read, and hereby accept, the license terms.” and we scroll down.

To log in, The user we must enter is 'OpenFiler’ with password, Click on “Login”,

The first thing is to know what we want our appliance for, in my case, We'll use it for shared storage (logically), but using it with iSCSI, I've added two disks to the appliance and on them I'll do a mirrored RAID1 for that storage. If we are going to “Volumes > Physical Storage Mgmt.” We will look at the physical discs. And if we click on “View” We will see the details of each album.

The first thing we will do is partition each disk to include it if we are interested in it as a member of a RAID, So we create a partition of the type we are interested in (Primary), In the partition type, if we are interested in a fault tolerance system, we will select “RAID array member”, Select the beginning and end and click on “Create”,

We see that we already have the first partition, Now we have to go for the other one or the other disks and partition them in the same way as this one.

When we have all the disks partitioned we can create a RAID, To do this, we are going to “Volumes” > “Software RAID Mgmt.”, click on create a new RAID, and select the type we are interested in, We have different types of RAIDs, (If you need to know which one suits you best, Read HERE), In my case I select “RAID-1 (mirrored)”, and select both discs that I want to be members of this mirror. If we want, we have the possibility to mark one of them as Spare, which means that if a member breaks down, this one that is spare or reserve would start to work, It's not my case since I don't have a third album, but it would be ideal. To create the RAID we click on “Add array”,

We see the RAID with its details, So far so good, but to work with this RAID, we need to create a volume of data that points to this RAID.

So for this, We're going to “Volumes” > “Volume Group Mgmt.”. Here we will create this volume group, by selecting our RAID, We indicate a name and click on “Add volume group”.

Ok,

Once the volume group has been created, we only need to create the volume in it and indicate what type it will be to be used as a file system, To do this, we are going to “Volume” > “Create New Volume”, We give it a name, as if it were the one of the partition, A description, the size we are interested in and the file system we want to use, in my case it will be an iSCSI since I will connect later from the servers and I will have it as if it were a local disk drive, Click on “Create” to create it.

Once created, we will always see the space that is being used, what we have left free and we can modify the RAID, the volumes or whatever interests us.

In “General” > “Local Networks” We have to create the networks that we want to access our appliance, it can be a specific host, or several, or a subnet, and even deny access to a host, In my case I will access my network range, Click on “Update” to record it.

Ok, there he is.

Now we need to enable the appliance to be used as an iSCSI device, for this we have to enable the iSCSI target, all this from “Services” > “Enable/Disable”. From here we will also enable the services that may interest us such as FTP to access the disks through this protocol or other access systems depending on the file system of the disks.

Ok,

Now if we go into the volume that we created earlier, we can configure a password for access from the host iSCSI, since “Volumes” > “List of Existing Volumes”, by clicking on “Edit” About our volume.

We can choose the passwords for the user who will access this volume and from which hosts, we enter a username and password and give access to the IP range we have generated before or to the IP of the host. “Update”,
Configuring the iSCSI initiator/initializer on the host side,
To configure the host that will use the iSCSI disks we will use the Microsoft connector software, We can download it from www.microsoft.com. If you need to know how to install the Microsoft iSCSI Software Initiator, Press HERE.

Once installed, We open it from “Panel de Control” > “iSCSI Initiator”. On the “General” on the “Secret” is where we will indicate the password that we have specified earlier in the iSCSI target.

We need to add the iSCSI device (The openfiler), to do this in the “Discovery” Select “Target Portals” > “Add” and we put the IP address of the openfiler next to the iSCSI port which by default is the 3260. “OK”,

We will check that it is already coming out in “Targets”, But we have to authenticate ourselves in it, for this, Click on “Log On…”,

We mark the first check so that every time we reboot the host connects to the iSCSI “Automatically restore this connection when the system boots” and click on “Advanced…”

We fill in all the data, what is the IP with which the Openfiler will be accessed, what is the IP of the Openfiler, We enable authentication with “CHAP logon information” and enter the username that we generated earlier from the properties of the iSCSI volume. We accept everything.

If we go to the “Team management” > “Disk Management” We will get the wizard to initialize and convert disks, Click on “Following”,

Select the disk we want to initialize, Ours, “Following”,

Select if we want to make the volume dynamic, I'm not interested, “Following”,

“End”,

We already see as if it were a new disk on the server itself, Now it's normal, Create a partition so you can use it. Right-click on the disk and “New partition…”

“Following”,

Select the partition type, “Following”,

The volume we want to assign to it, “Following”,

The letter that we want to assign or mount in a directory, “Following”

And the final file system, next to the label, “Following”,

“End” to create such a partition,

And here we will already have our shared storage in RAID1 with fault tolerance.
From here we will see some additional configurations that we can make to the Openfiler.

On the screen “Accounts” > “Authentication” we can configure the authentication of the appliance to use an Active Directory – GIVES, these configurations will be made by configuring the LDAP protocol, Enabling the “Use LDAP”. By filling in the following fields:
“Server”: “servidor_dc.dominio.com”
“Base DN”: “dc=domain,dc=com”
“Root bind DN”: cn=cuenta_del_administrador,ou=Users,dc=domain,dc=com” or “cn=cuenta_del_administrador,CN=Users,dc=domain,dc=com” (OU will depend on Organizational Unit or CN for Common Name).
“Root bind password”: CONTRASEÑA_ADMINISTRADOR

On the “Status” > “System Information” we have, as its name suggests, a summary of the general health of our Openfiler appliance.

On the “Status” > “iSCSI” we have the hosts that connect to our target iSCSI.

In “General” > “HA Cluster Resources” we could create a high availability system with another Openfiler, ideal if we have a lot of load and want the optimal for our systems.

In “General” > “Clock” is where we will set the time, synchronization to some NTP time server (How to set one up – HERE), the time zone…

If we have any UPS (Uninterruptible Power Supply) or UPS (Uninterruptible Power Supplies) We could set it from here to schedule a clean shutdown.

Since “General” > “Shutdown” it is from where we can turn off or restart the device, and even programming it.

Ideally, when we have our Openfiler well configured, we make a backup of the configuration, To do this, we will do it from “General” > “Backup/Restore”, or if we want to restore an already saved configuration.
www.bujarra.com – Héctor Herrero – Nh*****@*****ra.com – v 1.0