

Migrating the Citrix UPM profile to FSLogix

If you are still one of those who are still working with Citrix UPM mobile profiles (User Profile Management) and you want to try the wonder of FSLogix, But of course, you have users with a UPM profile and you want to migrate that to FSLogix so you don't start from scratch, This is your post!
So what I said, if you want to see what FSLogix is all about, we already wrote a document where we explained how it works, In this post we will only look at how to migrate data from an existing UPM profile to FSLogix VHD or VHDX containers.
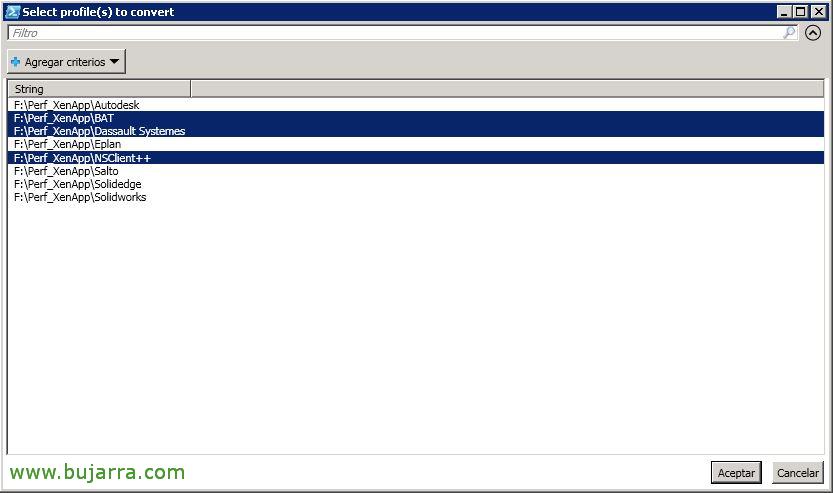
We'll use David Ott's wonderful script, what it will do is convert the profiles it finds in 'F:\Perf_XenApp’ and will leave them in FSLogix format in 'F:\Perf_FSLogix’ (obviously in the script modify with your correct paths, as well as modify the maximum size of the virtual disk that you will create, I have it in 10GB with dynamic growth). When you run the script, it will detect the profiles it has discovered, and select the ones we want to migrate. We will be able to try one, and after validating it, go in groups, or all at once like the brave. The good thing is that the original profile is not touched, This is, you will always have a turn back in case the user's new VHD or VHDX gives you problems.
Here is the script we are using: Migra_Perfiles_UPM_a_FSLogix.ps1
<#
Written by David Ott This script will convert Citrix UPM profiles to FSLogix .vhd profiles (you should be able to edit it to do vhdx as well)
Pay attention to all of the commented areas.  It uses diskpart to create/mount/dismount the .vhd file, and robocopy to copy the UPM profile to the .vhd.
Once executed (assuming you have edited $newprofilepath and $oldprofiles to match your environment) it will give you a list of profiles to convert.  You can then select which profile(s) you wish to convert to FSLogix profiles.
You could also edit this script to use hyperv commands to create/mount/dismount the vhd/vhdx files instead of diskpart if you have the hyperv module installed.
Before using in production test!!
#>
# fslogix profile path $newprofilepath = "F:\Perf_FSLogix" ##### FSLogix Root Profile Path
<#
upm profile path - our production UPM root folders are username.domain, and the actual Windows 7 profile lives under v2x64UPM_Profile:
\\servershare%USERNAME%.%USERDOMAIN%!CTX_PROFILEVER!!CTX_OSBITNESS!
this would have to be edited based on environment - the main thing is to have it have the full path to all of the actual UPM_Profile directories #>
$oldprofiles = gci F:\Perf_XenApp | select -Expand fullname | sort | out-gridview -OutputMode Multiple -title "Select profile(s) to convert"| %{
Join-Path $_ "UPM_Profile"
}

# | ?{$_.name -like "*.$env:userdomain"}

# foreach old profile foreach ($old in $oldprofiles) {
<#
Since I know that the folder has the username in it i get that and save it to the sam variable, and use that to get the user's sid then save that to $sid.
You will most likely have to edit the $sam line to pull the username out of the old profile path.  Play with the string and split-path until you nail down just the username.  For instance let's say your current profile path is \serverprofileshareusernamev2x64UPM_Profile  you could do something like this $sam = (($old -split "profileshare")[1] -split "v2x64")[0] -Replace "\\",""
That splits the string at profileshare, and selects the 2nd part (0 would be the first) which is usernamev2x64UPM_Profile it then splits that again using v2x64 and selects the first part (remember 0 is the first) which is username Finally it replaces the "\" characters (you need to match \\ as \ is a special character the first slash just says to use it as a string) with nothing... leaving you with the username.
#>
$sam = (($old -split "Perf_XenApp")[1] -split "UPM_Profile")[0] -Replace "\\",""
$sid = (New-Object System.Security.Principal.NTAccount($sam)).translate([System.Security.Principal.SecurityIdentifier]).Value
<#
A .reg file located in %localappdata%FSLogix - last thing the script does is create the .reg file for the profilelist key #>
$regtext = "Windows Registry Editor Version 5.00

[HKEY_LOCAL_MACHINESOFTWAREMicrosoftWindows NTCurrentVersionProfileList$sid]
`"ProfileImagePath`"=`"C:\\Users\$sam`"
`"FSL_OriginalProfileImagePath`"=`"C:\\Users\$sam`"
`"Flags`"=dword:00000000
`"State`"=dword:00000000
`"ProfileLoadTimeLow`"=dword:00000000
`"ProfileLoadTimeHigh`"=dword:00000000
`"RefCount`"=dword:00000000
`"RunLogonScriptSync`"=dword:00000000
"
<# set the nfolder path to \newprofilepathusername_sid - this is not default If you are going with the default then replace then reverse the $sam/$sid variables as below $nfolder = join-path $newprofilepath ($sid+"_"+$sam)
#>
$nfolder = join-path $newprofilepath ($sid+"_"+$sam) ##### See note above
# if $nfolder doesn't exist - create it if (!(test-path $nfolder)) {New-Item -Path $nfolder -ItemType directory | Out-Null}
& icacls $nfolder /setowner "$env:userdomain$sam" /T /C
& icacls $nfolder /grant $env:userdomain$sam`:`(OI`)`(CI`)F /T
# sets vhd to \nfolderpathprofile_username.vhd $vhd = Join-Path $nfolder ("Profile_"+$sam+".vhd")
# diskpart commands $script1 = "create vdisk file=`"$vhd`" maximum 10240 type=expandable"
$script2 = "sel vdisk file=`"$vhd`"`r`nattach vdisk"
$script3 = "sel vdisk file=`"$vhd`"`r`ncreate part prim`r`nselect part 1`r`nformat fs=ntfs quick"
$script4 = "sel vdisk file=`"$vhd`"`r`nsel part 1`r`nassign letter=T"
$script5 = "sel vdisk file`"$vhd`"`r`ndetach vdisk"
$script6 = "sel vdisk file=`"$vhd`"`r`nattach vdisk readonly`"`r`ncompact vdisk"
<#
if the vhd doesn't exist create, attach, wait 5 seconds (windows has to catch up), create/format the partition,
assigns letter T (change this as needed), and sets the disk label to Profile-username #>
if (!(test-path $vhd)) {
$script1 | diskpart $script2 | diskpart Start-Sleep -s 5
$script3 | diskpart $script4 | diskpart
& label T: Profile-$sam New-Item -Path T:\Profile -ItemType directory | Out-Null
# set permissions on the profile start-process icacls "T:\Profile /setowner SYSTEM"
Start-Process icacls -ArgumentList "T:\Profile /reset /T"
Start-Process icacls -ArgumentList "T:\Profile /inheritance:d"
$cmd1 = "T:\Profile /grant $env:userdomain$sam`:`(OI`)`(CI`)F"
Start-Process icacls -ArgumentList "T:\Profile /grant SYSTEM`:`(OI`)`(CI`)F"
Start-Process icacls -ArgumentList "T:\Profile /grant Administrators`:`(OI`)`(CI`)F"
Start-Process icacls -ArgumentList $cmd1
} else {
# if the vhd does exist then attach, wait 5 seconds, assign letter T $script2 | diskpart Start-Sleep -s 5
$script4 | diskpart
}

# copies in the UPM profile to the Profile directory on the vhd /E /Purge - this is so it will update with the latest info
"Copying $old to $vhd"
& robocopy $old T:\Profile /E /Purge /r:0 | Out-Null

# cambiar nombre perfil UPM ya migrado #Rename-Item -Path F:\Perf_XenApp$sam -NewName "Cambio.$sam" -Force

# Mover perfil UPM ya migrado Move-Item F:\Perf_XenApp$sam F:\Perf_XenApp_Cambiado_UPM_Profile$sam  -Force

# creates the %localappdata%FSLogix path if it doesnt exist if (!(Test-Path "T:\ProfileAppDataLocalFSLogix")) {
New-Item -Path "T:\ProfileAppDataLocalFSLogix" -ItemType directory | Out-Null
}
# creates the profiledata.reg file if it doesn't exist if (!(Test-Path "T:\ProfileAppDataLocalFSLogixProfileData.reg")) {$regtext | Out-File "T:\ProfileAppDataLocalFSLogixProfileData.reg" -Encoding ascii}
$Script5 | diskpart
}
I hope it will be useful to you in case you ever need it, thank the author of the script for his work. If we look closely, it will use each user's name to get the SID to name the container directory correctly, will own the container user with full permissions, will create the VHD with the indicated size, He assembles it, partitions it into NTFS, Temporarily as a unit T:, and copy all the contents of the UPM profile to this VHD.
Thank you all for your reading times & Share on social media.


