
Raspberry Pi – Introduction

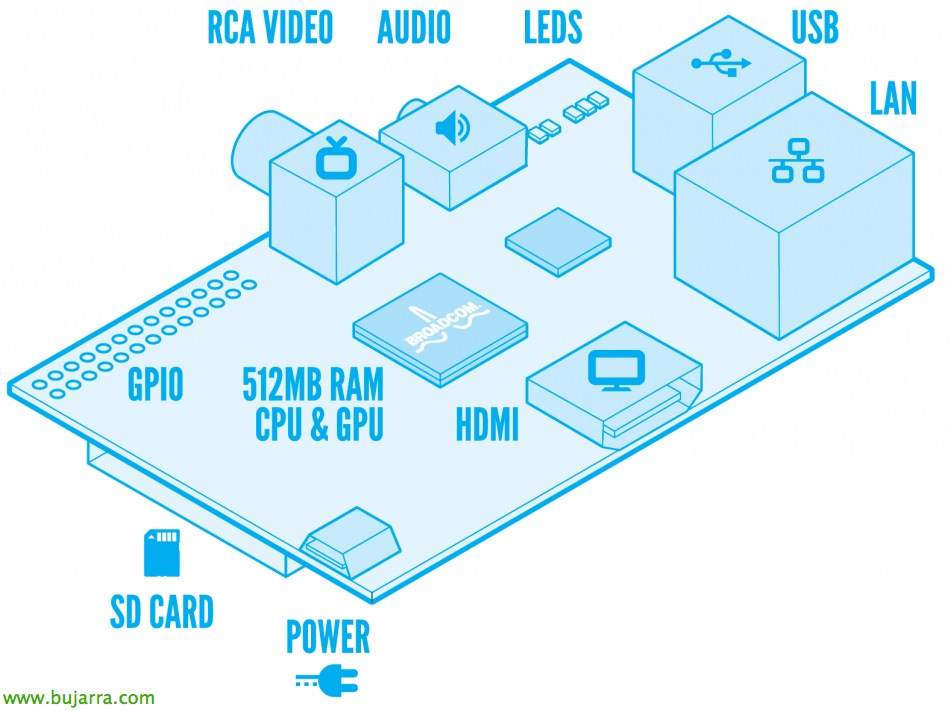
These days that we are testing different ThinClients a Raspberry Pi has passed through my hands, that is not a ThinClient, but obviously it can be used as it, I wanted to write this article to bring this device closer to all those who do not know it or have been lucky enough to be able to try it. The PRi (Model B) It's a small computer (700Mhz ARM CPU and 512Mb RAM) with 2 USB outputs, 1 RJ45, 1 HDMI, 1 RCA, GPIO connector, Space for 1 SD CARD and that we will feed with a MicroUSB at 5V. We can get a Raspberry Pi for about 30€. ¿Cheap? No! The following!

Having defined very briefly what a Rpi, we will only have to think about what we need it for, since its small size (of a packet of tobacco), their scarce food and their potential, it will allow us to free our minds and think of different uses. As a ThinClient Team (and launch Citrix XenApp applications, desktops with VMware View/XenDesktop, RDP…), Multimedia equipment, Video surveillance equipment, Mobile Equipment (with a battery of 10.000 mAh we will have an autonomy of approximately 12h. Or put a USB nano Wifi on it for connectivity…), Home automation… The foundation that created it, aims to bring all children and schools closer to the possibility of having a computer. One of the projects that are attracting the most attention is the possibility of translating simultaneously (with subtitles on glasses) the conversation between two people from different countries, Better to see it than to explain it: http://www.raspberrypi.org/archives/1689.
Well, the first step will be to download the OS. that we want in our RPi, For this we will have the official images website: http://www.raspberrypi.org/downloads. We may use official images or images customized by users in the community, in this first example we will download a Raspbian "wheezy", which is an optimized distro based on Debian.
To put the image on the SD card, we will do it with the utility Win32DiskImager on Windows or on Linux or Mac using:
– Insert the SD Card into our PC's and see with 'mount’ what is the SD card
– Disassemble the SD card with: Diskutil Umount /Dev/Disk2S1
– Upload the image to the SD Card: sudo dd if=2012-10-28-wheezy-raspbian.img of=/dev/disk2s1 bs=1
– Expel it with: diskutil eject /dev/disk2s1
We will insert it into our Raspberry and turn it on, it will ask us some basic parameters such as if we want to start X automatically, Change the password of the 'PI' user, extend partition to entire SD, language, Time ranges, if we want SSHd enabled by default…
Once started, it will be advisable to update it with: 'apt-get update’ & 'apt-get upgrade'.
If we want to practice before we have a Raspberry Pi or then dump it into a custom disk image, We can use the emulator QEMU (o Q on Mac OS).
For advanced configuration of the RPi, We can edit '/boot/config.txt’ with the parameters that interest us from http://elinux.org/RPi_config.txt.

Modifying the Startup Logo,
If we want to customize the quick start of our RPi in a corporate way with the logo of our organization, we can install the viewer with 'apt-get install fbi', We'll leave the image at '/etc/splash.png’ and we'll create the script '/etc/init.d/asplashscreen’ with:
[SourceCode]——————————————–[/SourceCode]
[SourceCode]#! /bin/sh
### BEGIN INIT INFO
# Provides: asplashscreen
# Required-Start:
# Required-Stop:
# Should-Start:
# Default-Start: S
# Default-Stop:
# Short-Description: Show custom splashscreen
# Description: Show custom splashscreen
### END INIT INFO
do_start () {
/usr/bin/fbi -T 1 -noverbose -a /etc/splash.png
exit 0
}
case &Quot;$1&Quot; in
Start|&Quot;&Quot;)
do_start
;;
Restart|Reload|force-reload)
ECHO &Quot;Error: argument '$1’ not supported&Quot; ≫&2
exit 3
;;
stop)
# No-op
;;
status)
exit 0
;;
*)
ECHO &Quot;Usage: asplashscreen [Start|stop]&Quot; ≫&2
exit 3
;;
Esac
:
——————————————–[/SourceCode]
We'll make it executable with 'chmod a+x /etc/init.d/asplashscreen’ and indicate that it is a daemon that automatically starts 'insserv /etc/init.d/asplashscreen'. We restart and check it! By the way, the RPi does not come with a case by default, so if we look well, We can purchase them directly with a corporate box with the logo printed on it. A product to connect to any network and serve our users, Securely accessing your organization!
As a video viewer or multimedia equipment,
About Wheezy Distribution, we can directly use the Omxplayer video viewer by running: 'omxplayer -r -o hmdi PATH_FICHERO’ to open a video and take it out through the HDMI.
If we want to double-click on a video and have it play automatically, It will be enough to create the file '/usr/share/applications/omxplayer.desktop’ with the content:
[SourceCode]——————————————–
[Desktop Entry]
Type=Application
Name=OMXPlayer
Categories=AudioVideo;Player;
Exec=lxterminal –command &Quot;Omxplayer -or HDMI %f&Quot;
Terminal=false
Icon=/usr/share/icons/nuoveXT2/96×96/categories/applications-multimedia.png
——————————————–[/SourceCode]
If we only want it as a multimedia team, the ideal will be to put a distribution fully prepared with XBMC such as XBian or RaspBMC, to name two of the best. The test that verified that the Raspberry Pi is fully valid for this, was to perfectly reproduce a movie with Matroska 1080p format!!!
Setting up a VNC server,
In case someone needs remote access (Not with shadow blade) it will be enough to install TightVNC with 'apt-get install tightvncserver'. We configure the service by indicating the password for access with: 'vncserver'. We create a session with: 'vncserver :1 -Geometry 1280×800 -depth 24'.
If we want TightVNC to boot at startup with the Raspberry Pi, We add at the end of the whole (But before the exit!) in '/etc/rc.local':
su -c “vncserver :1 -Geometry 1280×800 -depth 24” pi
Using a microphone,
Once one is connected (or that of a WebCam), We will load the module with: 'Modprobe snd_bcm2835’
And we can make the recordings with:
– To WAV: 'arecord -D plughw:1,0 test.wav’ (stops later with CTR+C)
– to MP3: We will pre-install LAME ('apt-get install lame') and run after: 'Arecord -f cd -t raw | lick -x -r – out.mp3’
To play the audio: 'Aplay test.wav’
To play with the microphone and give it more/less audio we will use: 'alsamixer’ and then record the changes with: 'Alsactl Store'.
To stream (or take out the audio) from the Raspberry Pi to another computer remotely, We will do it with: 'arecord -D plughw:1,0 -F dat | sh -C USUARIO@EQUIPO_REMOTO play -f give’
Webcam Use,
For me one of the things to which I am going to give more use, from putting a motion detector on the door of the house and sending me an email with the detected images, or when recording the routes with my car for all the reasons we can think of…
First things, a simple application to take photos in X seconds (-l), We install it with 'apt-get install fswebcam'. Command:
'FSwebcam-R 640×480 -S 15 –Flip h –jpeg 95 –Shadow –title “Tundra IT” –Subtitle “Blog bujarra.com” –info “Monitor: Active @ 1 Fpm” –Save home.jpg -Q -L 60'.
To record a video directly with: 'ffmpeg -f video4linux2 -r 25 -640×480 -i /dev/video0 /tmp/video.avi’
Use of 'motion', this tool will allow us to use our RPi as a video surveillance system, from recording video or images, to be able to connect to a URL and be able to visualize what is happening… The first thing will be to install it with 'apt-get install motion'. We'll edit '/etc/motion/motion.conf’ all the parameters we need, for me the ones that have fit me the most:
– Enable Remote Connection: 'webcam_localhost off’
– Change the destination of images with: 'target_dir /home/pi/Desktop/motion’
– Change the port to which we will connect from the browser: 'webcam_port 8081’
– Assign a user to authenticate on the web: 'control_authentication user:contraseña’
– Setting Image Quality: 'quality 60’
– Set the correct capture size of our images with: 'width’ & 'height’
– To choose the codec with which you will compress the video: 'ffmpeg_video_codec mpeg4’
– Up 1500 to what fits us so that it detects more asked for them moved with: 'threshold 4000’
– %f will be the name of the file (With his path), in case we want to use it as a variable.
– With 'locate on’ It will draw us a rectangle of the object that detected the movement.
– With 'text_right’ or 'text_left’ We will put the texts that interest us in each frame.
– 'output_normal off’ For when a movement is detected that does not save the jpg image.
– 'ffmpeg_cap_new off’ so that it does not save videos with the movements. O 'on’ to use the ffmpeg library, A video format will need to be set.
In addition, we can install sendEmail to send emails by command line: 'apt-get install sendemail'.
Command to send mail with the image attached: 'sendemail -f PERSONA_ORIGEN@DOMINIO_ORIGEN -t PERSONA_DESTINO@DOMINIO_DESTINO -s SERVIDOR_SMTP -m TEXTO_CUERPO -u TEXTO_ASUNTO -xu USUARIO_AUTENTICACION_SMTP -xp CONTRASEÑA_AUTENTICACION_SMTP -o tls=auto -a %f
Or just upload it to an FTP with: 'wput ftp://USER:PASSWORD*@*****IO.COM %f’
We can configure, for example, in the following events to enter these commands to automate these alerts:
on_event_start
on_picture_save
We'll set it as a daemon with the parameter 'daemon on', If we want to run it later without forcing the demon mode we will execute it as 'motion -n'. And in '/etc/default/motion’ We can indicate that Motion automatically starts with the system by editing: 'start_motion_daemon=yes'. The first time we must create the directory '/var/run/motion’ so that you don't make mistakes when starting the demon.
The latter has been giving me problems and my camera was blocking after a few frames taken, So without any more sense I have had to create a process that starts it without depending on what Motion allows us. This would be my '/etc/init.d/hhh-motion’
[SourceCode]——————————————–
#!/bin/bash
### BEGIN INIT INFO
# Provides: blah
# Required-Start: $syslog
# Required-Stop: $syslog
# Default-Start: 2 3 4 5
# Default-Stop: 0 1 6
# Short-Description: blah
# Description:
#
### END INIT INFO
#! /bin/sh
# /etc/init.d/hhh-motion
#
# Some things that run always
# touch /var/lock/blah
# Carry out specific functions when asked to by the system
case &Quot;$1&Quot; in
Start)
ECHO &Quot;Starting script hhh-motion&Quot;
mkdir /var/run/motion
motion
;;
stop)
ECHO &Quot;Stopping script hhh-motion&Quot;
ECHO &Quot;start_motion_daemon=no&Quot; ≫ /etc/default/motion
/etc/init.d/motion stop
;;
*)
ECHO &Quot;Usage: /etc/init.d/hhh-motion {Start|stop}&Quot;
exit 1
;;
Esac
exit 0
——————————————–[/SourceCode]
We create it as a service with 'update-rc.d hhh-motion defaults’ and we restart to test!
Using Citrix,
If we are using the Debian Wheezy base image (on model B) we will not be able to install the Citrix client, as Citrix generates clients for linux x86, x64 and ARM (the ARM is not good for us since it is based on ARMEL and not on ARMHF, which is the architecture of the base image that brings). So without digging further and waiting for a next document I send you by using an image called: ‘RPiTC – Raspberry Pi Thin Client Project‘ which is a Thin Client-based distribution with the following utilities:
– VMWare View Client 1.6.0
– Citrix Receiver for Linux 12.2.3
– Quest vWorkspaces 7.0b.
– RDesktop 1.7.1.
– SPICE Client (virt-viewer 0.5.3).
– IceWeasel 10.x with Citrix Extension.
– …
Where we can easily customize the opening of any of them with the parameters we need!! Well, With this we end this document, where we can appreciate many features and we can give free rein to our imagination with our beloved RPi!


