Distributed File System – DFS + Replication – DFS-R

One of the new features brought by Microsoft Windows 2003 RC2 is the new console for configuring DFS and configuring replicas that now work perfectly. The most important thing is that you have to have the RC2 version on the servers that are going to have the DFS root. To upgrade to the RC2, just install the CD2 of the distribution, install the new components. And if you want to update the domain to the version 2003 RC2, you have to execute the ADPREP that also comes in CD2 (adprep /forestprep). This document explains the DFS for the Windows version 2000 or 2003 – HERE.
GOOD, What is DFS: Let's say a company that has a file server, and all users access their data, If this file server goes down, users would not be able to work, Typically, users don't rely on a physical server, if not a route, A path, this is the DFS. It's a virtual path that typically points to the domain name: domaindfs domain and directories are created for it as if they were shortcuts to the data. If, for example, we have the SRVDATOS file server and the ACCOUNTING and FINANCE folders hang from it: SRVDATAACCOUNTING and SRVDATAFINANCE; and users access them that way it would be misconfigured, the logical thing to do is to set up a DFS, that users point to DFSledger domain or DFSfining domain. And this DFS root should be replicated to the domain controllers in case a domain controller goes down, the root is lifted from another domain controller. And the important thing is that the data is replicated on two file servers, one as the main and the other as secondary in case our SRVDATOS falls to work against SRVDATOS2. With DFS, all of this is set up, The roots and the replicas.
Well, Once the server and active directory have been upgraded to this version of 2003 with RC2 , The following steps must be followed:
Install DFS,

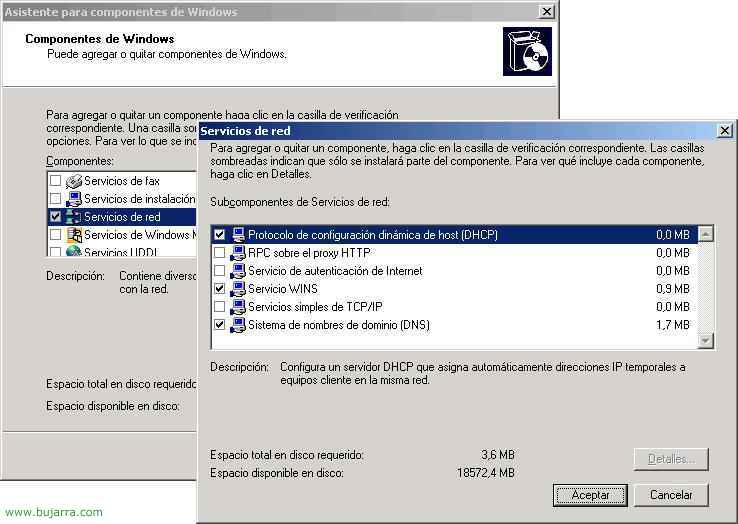
Vale, Well, then, the first thing is to install the DFS plugin, to do this from a domain controller: “Beginning” > “Configuration” > “Control Panel” > “Add or remove programs” > “Add or remove Windows components” and select “Distributed file system (DFS)”, We mark the whole component, to install what is the DFS service, The Management Console and Replication Service. Click on “Following” and we install it.
Create a DFS root,

Once installed, creates a console called “DFS Administration” in the “Administrative tools”

First of all, create a new namespace, What is the root, To this end, on “Namespaces” Right Button > “New namespace…”

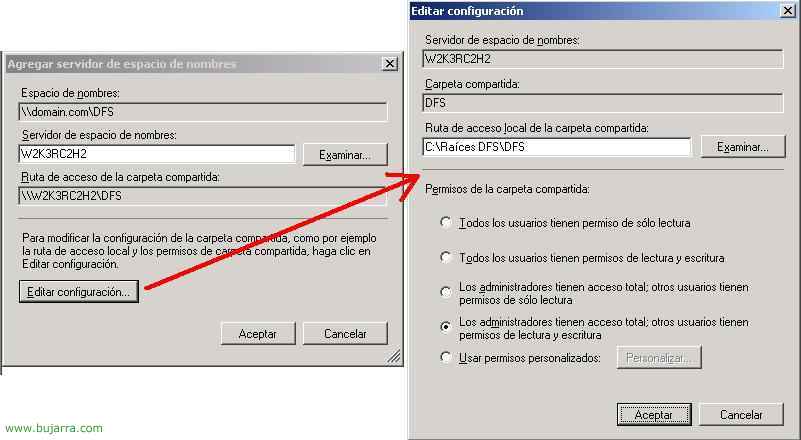
We must tell you which server will store this information, simply the structure of this root, We indicate the name of the domain controller from which we are installing it, “Following”,
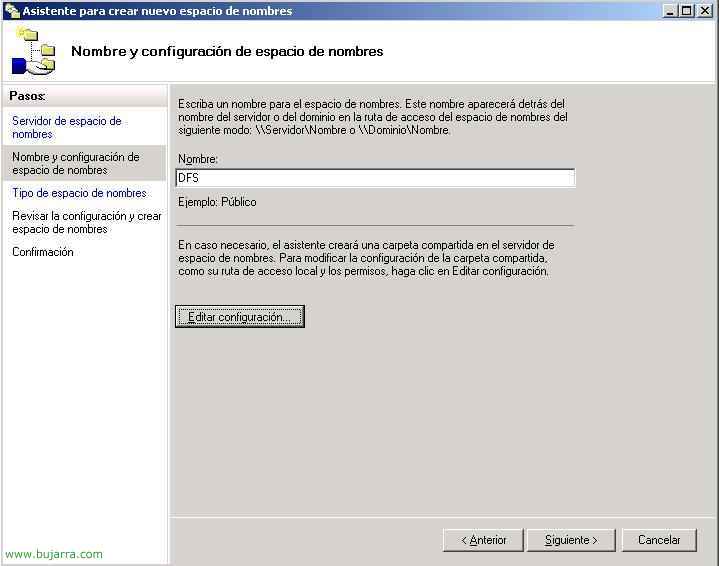
We give it a name, then it will be seen behind the domain name, in my case it will be domainDFS, and before continuing, Let's edit the settings to see more details,

It tells us where the root will create us, since “Examine” Select the path that seems most correct to us, This will not take up space on the server, It's just for setup. And we give you the permissions that interest us, the normal thing is not to restrict it from here, but then by NTFS permissions. We accept and continue,
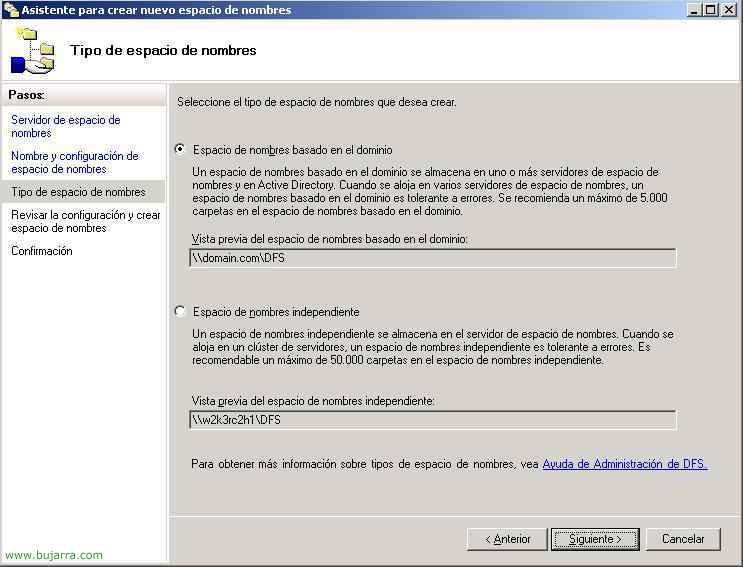
GOOD, now we need to select the type of DFS we are going to create, whether domain or independent, The normal thing is domain since it is tolerant to errors and if a server that has the root goes down, nothing happens since the user does not realize, “Following”,
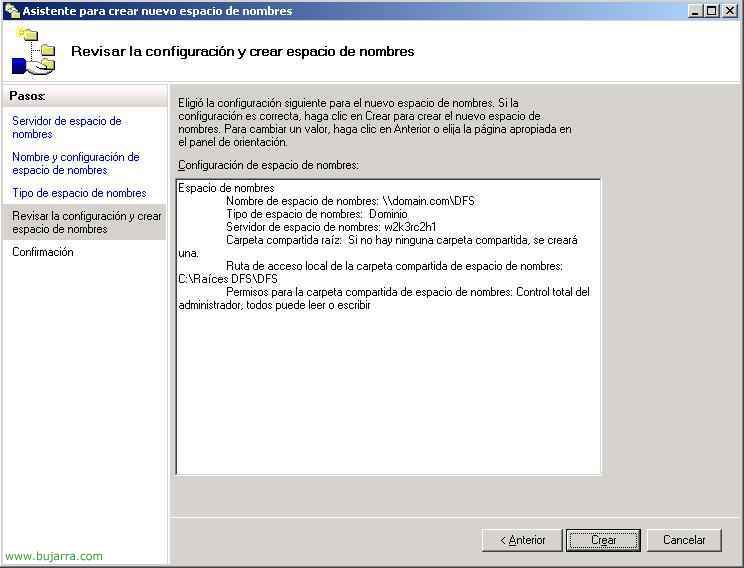
Check that everything is okay and press “Close” Why did I create it.

We check that everything is fine, She has created the root for us and for this she has shared a folder named after her, In my match, DFS, Click on “Close”,
Create a folder in the DFS,
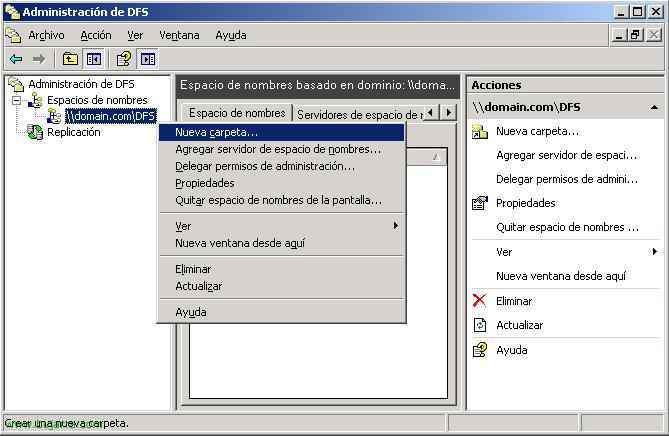
Now that we have the roots, We need to put in the folders that we want users to access, for this, About the root, Right Button > “New folder…”

Please give this folder a name, I usually call it the same as the actual folder that contains the data, in this example, I create the one called Finance, we see that in order to access it, users should type: domain.comdfsfinance (if they don't use scripts). On the “Add…” we put what will be the folder to which it will redirect, that is, the folder with the data, In my case W2K3RC2H1finance$ (normally, Shared folders on servers are hidden with a $ so that users cannot directly access them. We accept both windows,
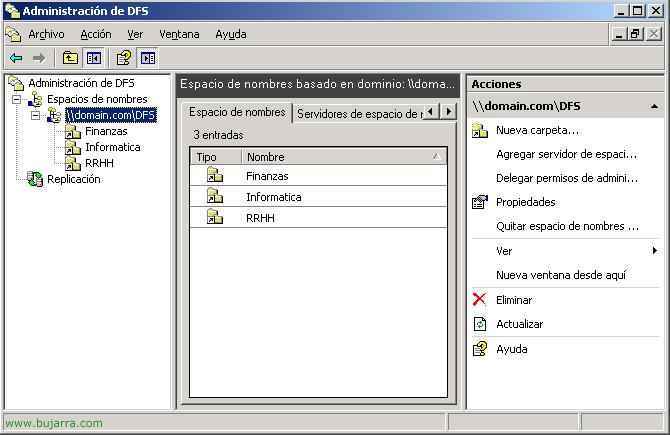
And so we will have the folders we want in the DFS, Now all that remains is for users to access them from domain.comdfsfinanzas, domain.comdfsinformática, domains.comdfs
RH… or we map them to you with scripts…

This would be an example. They are routes “Virtual” Accessing physical data.
Configuring fault tolerance in DFS,
The most important thing about DFS starts here, When we set everything up twice, Two roots, two destinations for each folder and we set up data replicas… We continue with the same configuration as above, I have two servers: “W2K3RC2H1” and “W2K3RC2H2”, the first of these is domain controller, and both are file servers, the data is saved in the first and will be replicated with the DFS to the second. The root will also be in both (is the structure of the DFS). And so if either of the two servers goes down, nothing will happen, If the first server goes down, the root will also be held by the other server and of course with the replicated data.
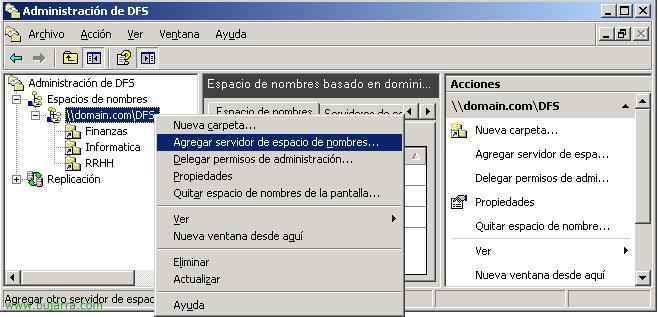
Well, Well, the first thing, We create a place to locate the root, It will be the second server I have, At the root, Right-click > “Add Namespace Server…”
In “Namespace Server” we put the name of the other server that we want to have the root. EYE! very important, on this new server you will have to install the DFS plugin from “Add or remove Windows programs” > “Add or remove Windows components”, Why else, Yes, the root will work, but if what we want is for it to replicate the files, then it is necessary and we also put the console to also administer the DFS from it in case the first server ever goes down and if we want to modify whatever it is. So before continuing, you have to install it as it was installed in the first one (explained in the first image). Well, once you have chosen the server that will save the root, We choose from “Edit Settings…” the permissions we want to put on it, The normal thing is to leave it the same as we put the root in the first server. We accept everything.
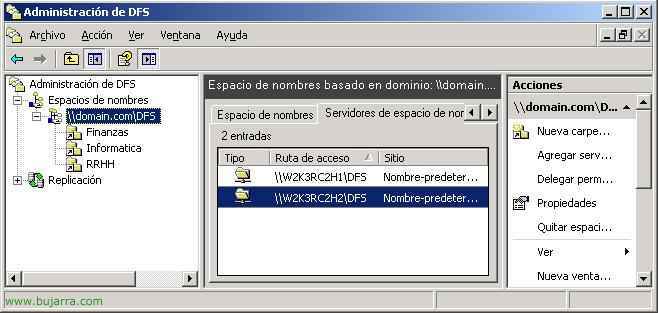
We already see that we have the DFS root on both servers, perfect.
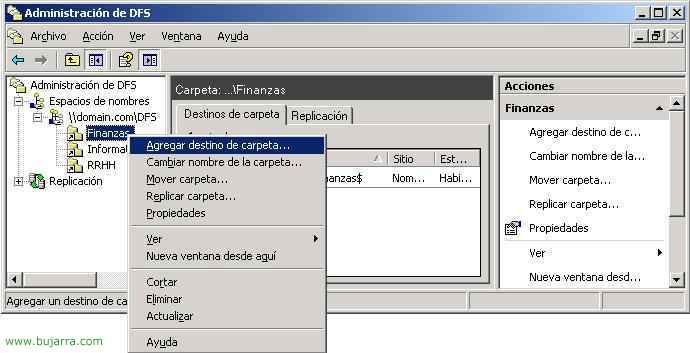
Now each folder would have to have another destination, in case the first server is not available, pull from the other (and then, so that both folders, logically, have the same content, We'll set up data replicas). So to put another destination to these folders, about each of them, Right Button > “Add Folder Destination…”

In “Folder Destination Path” we put the path where we want the link of this DFS folder to work if the other link goes down, the normal thing is to have it the same as in the other, We create the empty folder (Finances in my case) and share it in the same way as it is on the first server and with the same permissions, then we will replicate its content. Accept.

We can create replication now, But we'll explain it now, Further down in case we already have folders and want to know how to replicate, So now I tell you that “No”.

As we can see, we already have the Financials folder located on two servers, first they will all go to W2K3RC2H1Finance$ and if this fails they will be forwarded to W2K3RC2H2Finance$ automatically.
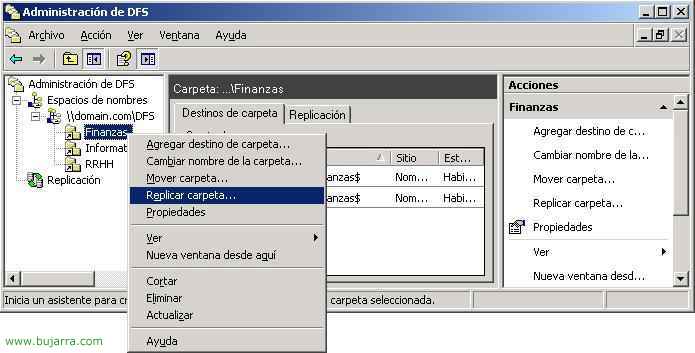
Now what we're going to do is replicate the contents of this folder that we just told you has two locations, so that always in the event that the server goes down 1, everything works perfectly in the 2. About the folder we are interested in (normally all, one by one), Right Button > “Replicate folder…”

We enter a name and check that the folder is the one we want to replicate, We give “Following”,
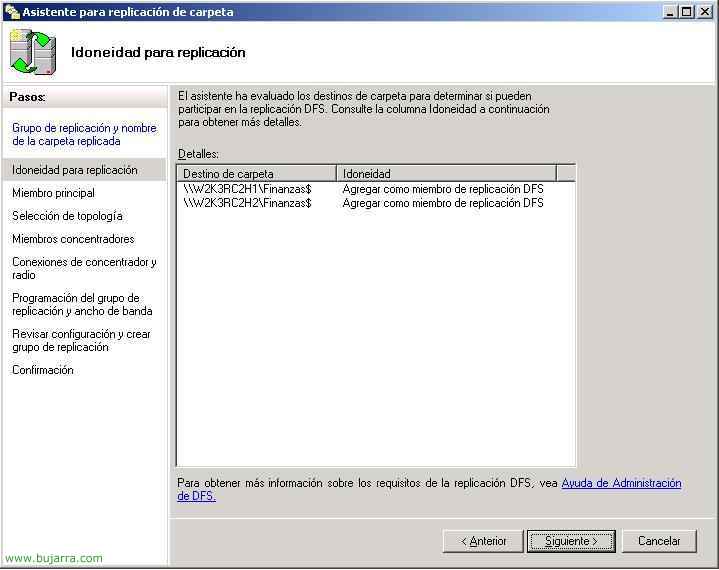
We check that they are the two folders, ORIGIN and DESTINATION…

Vale, Accept, tells us that in some of the two (Maybe in both) DFS Replication service is not started, will start it for us.

GOOD, As is normal, asks us what the ORIGIN server is, The main, from which the data is to be replicated, we indicate the one who has the data and “Following”,

We indicate the topology that interests us, it is usually a “Full mesh”, “Following”,

This part is interesting, If we don't want it to be continuously replicating we can set a few times, a schedule for copying the data, or if we want we can cap the bandwidth, Don't saturate him, if we use a VPN… but you can't do both at the same time, We choose what suits us best, If it's like in my case, a LAN, Constant replication and full bandwidth, since it's a LAN, “Following”,

We check that everything is fine, and we give “Create”,

We wait for the process to be finalized… “Close”,
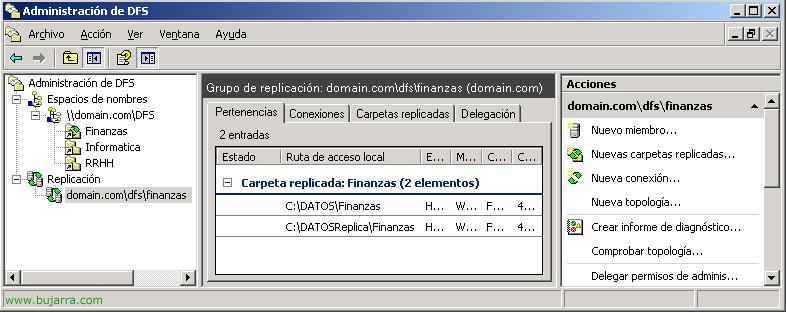
And there in the part of “Replication” is where we will see the replicas we have, if they are being replicated and all the options that interest us,

Now all that's left is for users to work, For our part, it remains to prove that this replica works well, We can create files or modify them on the first server and check that these changes are sent to the second server at the moment.