Configuring Access Gateway in NetScaler

Well, once we have basically configured our NetScaler, we are going to implement the Access Gateway feature that will give us secure access to our Citrix XenApp applications or XenDesktop desktop from the outside to our users through any device. In this document we will see how to publish a Web Interface of our internal network through the NetScaler CAG and we will access it via the web and via Citrix Receiver!
In the Previous document we already saw how to basically configure our NetScaler, Continuing on the same steps…

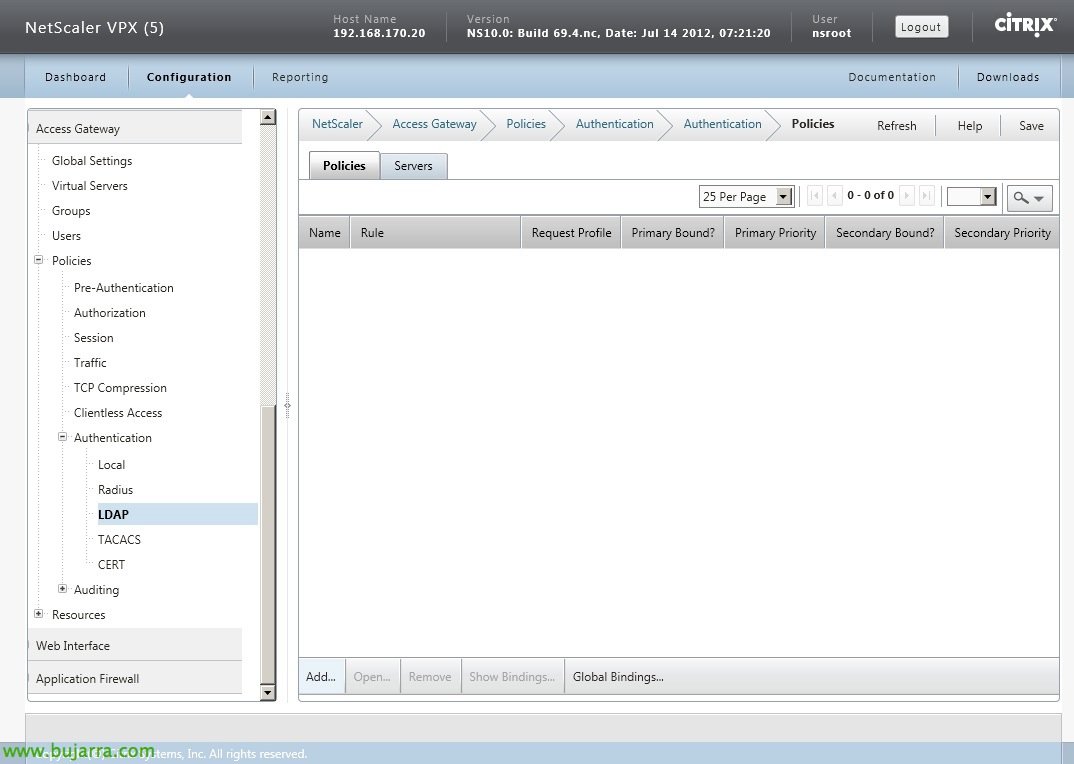
First we will have to register an LDAP server that will be validated by the CAG against which the users of our Active Directory will validate the CAG, for this: “Access Gateway” > “Policies” > Authentication” > “LDAP” > Eyelash “Servers” > “Add…”

We add the server name, we provide your IP address, guy “AD”, in “Base DN (location of users)” we will put the DN route of where we have our users, will be the base of our users, In my case I put the whole tree of the domain ('dc=domain, dc=that') And I'll filter later. In “Administrator Bind DN” We indicate the path of our user with which we will validate the accounts, in my case it will be: 'cn=LDAP User, cn=Users, dc=domain, dc=that') in addition to your password at “Administrator Password” and we confirm it. In “Server Logon Name Attribute”: 'samAccountName'. In “Search filter” We will be able to filter and validate only the members of a group, if they do not belong to it, we will not validate them, in my case: 'memberOf=cn=Portal Users, ou=Groups, ou=Tundra IT, dc=domain, dc=that'. In “Group Attribute” Indicate: 'memberOf'. In “Sub Attribute Name”: 'CN'. If we want users to be able to change their passwords, instead of LDAP we will use LDAPS by changing port '389’ by '636', and in 'Security Type’ instead of 'PLAINTEXT’ Go 'SSL’ and check 'Allow user change password'. List! “Create”!

GOOD, Now we'll create an authentication policy for this server: “Access Gateway” > “Policies” > Authentication” > “LDAP” > Eyelash “Policies” > “Add…”. We give it a name, we select the server we have just defined and assign it a 'True value' expression. “Create” and that's it!

The next step will be to set up a session profile from “Access Gateway” > “Policies” > “Session” > Eyelash “Profiles” > “Add...”

We give it a name, on the “Security” We confirm that “Default Authoritation Action” is in 'ALLOW',

On the “Published Applications” We enable “ICA Proxy” so that he behaves like a CSG, we indicate the URL of the “Web Interface Address” which in this case I have in a virtual machine on the network (in future documents we will see how it is very easy to deploy a WI in NetScaler itself). We further indicate that “Web Interface Portal Mode” in 'NORMAL’ and in “Single Sign-on Domain” We will indicate the domain of our network to prevent users from having to enter it.

Last, on the “Client Experience” We will confirm that “Clientless Access” is in 'ALLOW'’ to avoid the need to use the Access Gateway client or plugin, and that's it! “Create”.

GOOD, Now we set up a session profile from “Access Gateway” > “Policies” > “Session’ > 'Policies' tab’ & 'Add...’

We give a name to politics, we associate the profile we have just created with it and add an expression 'True value'’ & “Create”.

GOOD, now let's create our Access Gateway server, since “Access Gateway” > “Virtual Servers” > “Add…”

We give you a name, We set you an IP address, we must add the certificate that we want it to present, We will have installed it previously, So “Add >”.

On the “Authentication” We'll add the policy we created earlier as the primary authentication.

On the “Published Applications”, we will need to add the STAs of our network, in 'Secure Ticket Authority'’ Pressed “Add…”

And we introduce the STAs, which in my case being an XA environment will be the servers themselves, if we have XD it will be the controllers themselves, we enter them in the format: 'http://DIRECCIÓN_IP:PUERTO_XML/scripts/ctxsta.dll’ & “Create”.

We must confirm that they come out with a 'UP' status. If we don't get there, it would be necessary to confirm that we are able to reach the XenApp IPs with the PIN/MIP of the NetScaler through PING + XML. Apart from NS 1494tcp or 2598tcp to XAs themselves, if we have ICA or HDX in normal mode or if we will have enabled session reliability. “OK”.

We will be able to assign the session policy that we have previously created to the CAG Virtual Server (from your tab “Policies” > “Session”) or create a group (since “Access Groups” > “Groups” > “Add…”) and assign this session policy to it, This will be ideal if we want to apply profiles to different types of users, depending on which groups they belong to.

Then we confirm that we have the Access Gateway virtual server lifted,

And we save the settings!

We will need a Web Interface installed, where we will create a website, we will indicate that the authentication is performed “On Access Gateway”,

The URL of the authentication service will be the public access URL of our customers: 'https://FQDN_PUBLICO/CitrixAuthService/AuthService.asmx’ (we will modify the host to attack the CAG, Well, that's how I usually do it).

In addition, Once the site is created, We'll set up the “Secure Access”,

Indicating 'Direct with Gateway'’ either for all networks or excluding the LAN IP range,

And finally we will indicate the name of external connection, We will enable session reliability if needed.
Enabling iPad-like mobile device connections, iPhone…

We will have to create a session profile identical to how we did with the web part, But now we'll change the “Web Interface Address” to the XML file path of our service site: “HTTP://DIRECCIÓN_IP_WI/Citrix/PNAgent/config.xml”

We will also create the policy and associate its profile, We will add the following expression: 'REQ. HTTP. HEADER User-Agent CONTAINS CitrixReceiver’ to read the connection header, and if you come from a Citrix Receiver we will send you to that site!

And we finally add this policy on the CAG virtual server, on the “Policies” > “Session”, We add it with less priority than normal access to the web portal.