Configuring Terminal Server Gateway on Windows 2008

Terminal Services on Windows 2008 bring a new feature called “TS Gateway” that we use to connect from outside the organization to computers that use Terminal Server in the local area network. To be able to use this feature, we have to install it on a server on the network, we don't care if you have Terminal Server services installed or not. In the router/firewall we will redirect port 443tcp to this server and this in turn will redirect us to the Terminal Servers securely through 3389tcp, we can also apply certain directives to secure the connection a little more.

This would be a schematic of a network of Terminal Servers, so that they can be connected from the outside (Internet) to Terminal Services servers, we must install TS Gateway or Gateway in one of them, and redirect HTTPS traffic to it, and it will take us to the server we have requested when connecting, since the Gateway server uses RDP over HTTPS. For this document, the gateway server will be w2k803 and the Terminal Services server will be w2k802.

To add this feature, We need to go to the server management console and add the following function: “TS Gateway”,

By checking this component, the requirements you have will be installed, Of course they have to be installed, Click on “Add required features”,

We can install a certificate now so that the RDP connection is encrypted with the SSL layer and is more secure, If we already have a certificate we can take advantage and install it now, otherwise, after, Checking the third option. “Following”, The installation of a certificate will be mandatory at a later date.

We can now create authorization policies for the connection using TS Gateway/TS Gateway, but we will do it later from the console. “Following”,
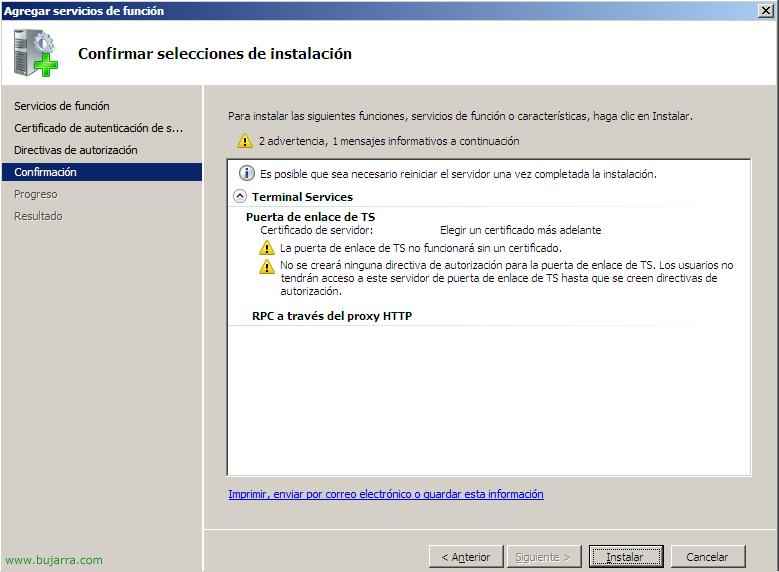
We confirm what we are going to install and click on “Install”,

… We wait while it is installed…

OK, Installation completed successfully, Click on “Close”,

To open the Admin console, We're going to “Beginning” > “Programmes” > “Administrative tools” > “Terminal Services” > “TS Gateway Manager”.

If it is the first time we open it we will see that it is totally unconfigured, it will show us different alerts. Now let's go about configuring the gateway server properties, To do this on the right-click server we are going to “Properties”. And we go over the tabs to configure it as we are interested.

On the “General” We can enable a maximum number of simultaneous connections or directly disable connections through this server.

On the “SSL Certificate” is where we will install an SSL certificate, we can create one from here or if we install it from the Control Panel we could choose it here. In this case, we just have to create a certificate to secure the connection, To do this, click on “Create certificate…”,

Up, We must indicate the full name of this server, below where we will save a copy of the certificate that users will later install. “Accept”,

Vale, “Accept”,

Now we see that the screen has changed indicating that we have a certificate correctly installed, but this certificate being from an untrusted certificate authority (because we have generated it, not a certificate authority, a CA – Certificate Authority). Click on “Examine” to save a copy of the certificate in a directory where users can later install it.

Select the certificate and click on “View certificate…”,

On the “Details” Click on the Down button “Copy to file…”,

We will get the wizard for the export of certificates, Ok, We continue it, “Following”,

Mark “Do not export the private key” and “Following”,

“X.509 encoded binary DER (.CER) & “Following”,

Select the path where we will save it and the name. “Following”,

“End” to copy the certificate to this folder.

Vale, “Accept”, We will then follow this when we want to see how a user connects.

Tells us where to use Terminal Services connection authorization policies (The CAP_TS) if from an NPS server ( Network Policy Server) local or a central one that will be the server of these policies. NPS is the component that replaces Microsoft Windows IAS 2003. If we will only have one Terminal Services Gateway server, it will be normal to dial local, but a central one so as not to have to duplicate policies on both servers.

On the “Server Farm” we find the servers that will balance to allow access to the connections from the outside, here if we have more than one PE server is where we must add them so that the connections are balanced, Enter the name of the server and click on “Add”, Below you will see the list of the servers belonging to that farm and their status.

On the “Audit” We will be able to audit all events that interest us to check the security of our systems, from seeing who connects, Who is trying to connect, Authorization errors, Access to Resources…

On the “SSL Bridging Protocol” is to secure the connection if we have an ISA Server within the network or a device to establish a secure SSL connection between it and the Gateway server. We have more info for ISA HERE (at the end of the document).

Now what we need to do is create two directives, a first call CAP (Connection Authorization Policies), Allows you to specify groups of users and/or computers, who can access a TS server Gateway. To create such a policy in the “Gateway Administrator” envelope “Policies” con botón derecho en “Connection authorization policies” > “Create new policy” > “Custom”.

On the “General” We provide you with a policy name, for example, TS_CAP and we enable it.

On the “Requirements” it will be where let's say what authentication method will be used to connect, Yes with “Password” or “Smart card”. And then we have to select a group of users to indicate who has access to connect, I have a group in the Active Directory called “TS Users” where I put the users I want to connect, Here I add it to indicate this. In addition, if we want for greater security, we can create a group in the Active Directory and put computers in it to allow only these connections from certain computers.

And on the “Device redirection” we need which devices we want to be redirected by the RDP connection of Terminal, We can enable all devices, disable or customize them.

Now what we need to do is create another directive, this second one called RAP (Resource Authorization Policies), allows you to specify the internal network resources that remote users will be able to access through a TS Gateway server. When you create a RAP policy, additionally, computer groups can be created and associated with the RAP policy. Remote users will have access only if they meet at least one of the conditions specified in the TS CAP and one of the TS RAP. To create such a policy in the “Gateway Administrator” envelope “Policies” con botón derecho en “Resource authorization policies” > “Create new policy” > “Custom”.

On the “General” We provide you with a policy name, for example, TS_RAP and enable it.

The tab “User groups”, it is the same as in the CAP directive, here we indicate groups of users to allow them connectivity using the TS Gateway. Who has access to connect, I have a group in the Active Directory called “TS Users” where I put the users I want to connect.

On the “Equipment Group” we add if we are interested in any group in the Active Directory to give access to certain computers through TS Gateway.

And in the “Allowed Ports” we will see which port the Remote Desktop clients will connect to the Terminal servers, We can only allow connections to the 3389, to any port or customize it.
The configuration of a Terminal Services Gateway server would be completed here, now what we are going to see is how a user who is on the Internet should connect to a Terminal Server that is within the network through the PE server.

First of all, how on the Gateway server we have generated an invalid certificate, not with a valid Certificate Authority such as: VeriSign, RapidSSL,CAcert, Comfortable, Thawte… Well, on the client PC you have to install the certificate above to indicate that you trust the Issuing Entity of this certificate. To do this,, before we have saved the certificate in a directory called SHARED on the Gateway server, assuming it's shared and users can access it, About the previously generated certificate, right-click on the certificate “Install certificate”,

We will get a certificate import wizard “Following”,

We must check the “Place all certificates in the following store” and on the “Examine” Select “Trusted Root Issuers”, “Following”,

“End” To import the certificate correctly,

Confirm, “Yes”,

Accept,

Again, on the client PC with the certificate already installed, We open the client of “Remote Desktop Connection” (“Beginning” > “Execute” > MSTsc). Of course it has to be the version 6 of the customer, otherwise, we have to download it from the Microsoft website (http://support.microsoft.com/default.aspx/kb/925876). We go to the “Advanced options” and click on the “Configuration”. In the new window that opens we have to check “Use this TS Gateway server configuration” and in “Server Name” we indicate which is the Gateway server of the organization”.
We accept the configurations and indicate which server we are going to connect to, it will ask us for authentication before reaching the Terminal Services window for security, since I have NLA enabled (Network Level Authentication), A new type of authentication, that authenticates the user, to the client computer and the server's credentials to each other. This means that authentication is now performed before the Terminal Services session is lifted and the user is presented with the login screen. With previous Remote Desktop Connection clients 6.0, TS sessions were initiated as soon as the user clicked on “Connect”, and this creates a window of opportunity for malicious users to perform Denial of Services attacks (Two) and steal credentials via a man-in-the-middle attack (MITM).

Well, we see that it would already be connected to Terminal Services, now to check if I'm doing it through the Gateway we go to the console.

We open the “TS Gateway Manager” and in “Supervision” We'll see who's connected and see that they're connected to the server named w2k802.bujarra.com through the gateway server called w2k803.bujarra.com. From here we can also log out the user “Break this connection” or disconnect it “Disconnect this user”.
www.bujarra.com – Héctor Herrero – Nh*****@*****ra.com – v 1.0