Configuring Terminal Services – Terminal Services Administrator – Remote Desktops – TS Session Agent – Properties of RDP

In this document, we will explain several topics of Terminal Services configurations on Windows 2008 that have not been dealt with in previous documents such as:
Terminal Services Administrator – HERE
Remote Desktops- HERE
Configuring Terminal Services- HERE
In addition, at the end of the document, various configuration options that the RDP protocol brings are also detailed 6.0 Microsoft's.
Terminal Services Administrator,

To start this console we open from the “Administrative Tools” > “Terminal Services” > “Terminal Services Administrator”.

From this console we can do several basic things, the first of all the ideal is to create a group of Terminal Servers where we will put all the TS servers to manage them together if we are interested, for this, on the right-hand panel in “Actions” Click on “New Group…”

We give you a generic name, for example, the name of the organization, “Accept”,

And what we'll do now is we'll go server to server by adding them to that group from the right-hand pane of “Actions” > “Add to Group”,

It will show us the available groups, we select it and “Accept”,

By right-clicking on the group we can disconnect the session of all users if we are interested in it at any given time…

Or if, for example,, if we place ourselves above the group, We will see all the users connected regardless of which server, By selecting a user we have the following possibilities, how “Disconnect” from the session to the users, “Send message”, to carry out a “Remote control” to troubleshoot issues, “Reestablish” The Session, View the “State”, or directly “Log Out”.
Terminal Services also comes with a fairly basic console to have organized the different desktops of the different Terminal Servers that we have, call “Remote Desktops”,

To open the Said Console, We're going until “Administrative Tools” > “Terminal Services” > “Remote Desktops”

And about “Remote Desktops” with right click we can add connections with “Add New Connection…”

Select the name of a server you want to connect to and give it a name, We can mark that it saves the credentials by checking the last check. “Accept”,

We indicate the username with which we will connect to said server with the format of DOMAINuser and a password. “Accept”,

And here we already see the desktop of a server, Now the ideal is to add all the desktops of all the servers we have on the network, From this console we will have all of them centralized.
Terminal Services Configuration,
This is the main console for configuring Terminal Services, where we will be able to modify all the configuration parameters that a Terminal Services server has.

To open the Said Console, We're going until “Administrative Tools” > “Terminal Services” > “Terminal Services Configuration”

This would be the central console for all the configurations that we can make at the Terminal Services level, From here we see the protocol used by the services, what Microsoft RDP would be 6.0 TCP. On this screen, In the central part is where we will see the configurations of this server, if we double-click on any of them, we will access the “Properties”.

On the properties, on the “General” We have different possibilities, from force deleting temporary directories on exit, or use temporary directories per session (this will create a directory with the user's session ID in %Temp%) or restrict each user to use only one session (Why if they log in, do it only once and there will be no more sessions than necessary, per user).
In addition, If we are going to perform some kind of maintenance on this server and we need to disable logins on it, We will do it from here, We can ban new logins, allow or deny them until the server restarts.

On the “Licensing” is where we can configure all the parameters related to the Terminal Services licensing issue, we will indicate what type of licenses we have acquired, whether user or device, and we will also be able to indicate which is our TS license server, that automatically discovers you on the network or by indicating the specific name.

On the “TS Session Agent” is where we can join farms/communities of Terminal Services servers, by checking the first check we will join this Terminal Server in that farm, indicating the server that has the services of “TS Session Agent”, The interesting thing is to carry out load balancing with the users, and we will configure a weight on the farm for each server, If we want them all to be the same, we will put the same value on all of them.

On the main screen of “Terminal Services Configuration” We have the protocol that is used for the connection between the client and the servers, RDP (Remote Desktop Protocol), If we enter its properties we will find the following screens. In the first tab “General” We can configure the security level at the protocol level, We have the following possibilities in “Security Level”:
– “Remote Desktop Protocol Security Layer (RDP)”: Uses native Remote Desktop Protocol encryption to secure communications between client and server).
– “Negotiate”: Use TLS 1.0 To authenticate the server, if TLS is supported. If TLS is not supported, The server will not be authenticated.
– “SSL (TLS 1.0)”: Requires the use of TLS 1.0 To authenticate the server. If TLS is not supported, connection will fail. This method is only available if a valid certificate is selected on the back.
We also have the possibility of establishing the “Encryption level” to encrypt data traveling between the Terminal Server and the client PC:
– “Low”: Encrypts data sent from the client to the server using encryption of 56 Bit.
– “Supported Client” :Encrypts data sent between the client and server with the most secure key type that the client supports.
– “High”: Encrypts data sent from the client to the server and vice versa using secure encryption of 128 Bit.
– “FIPS compliant”: Encrypts and decrypts data sent from the client to the server and vice versa with the Federal Information Processing Standard encryption algorithms (FIPS) 140-1, using Microsoft cryptographic modules. For more info – HERE.

On the “Login settings” is where we will be able to configure which user they are going to log in to this server, We can make each user indicate their username (“Use customer-provided login information”), or that it is always the same indicating it from here (“Always use the following login information”) or by checking the “Always ask for password” end users will not be able to save the password to connect to this server in their RDP client.
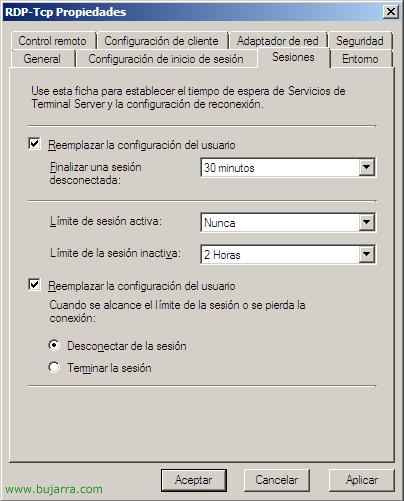
On the “Sessions” We can configure the following parameters and can reposition the user's configuration:
– End a disconnected session: A disconnected session is when the TS client window is closed without having clicked to log off, is the time you wait until the session is finished.
– Active session limit: The maximum time a user can be logged in without logging out.
– Inactive session limit: The maximum time that a disconnected session on the TS server can be closed.
– When a session limit is reached or connection is lost: What the server does when a user disconnects the session or when they have no connection to the server. If you leave it unplugged or end it.
– Allow reconnection: When a session is disconnected and the user has to reconnect, from where you are allowed to reconnect, whether only from your workstation or from any other PC.
Please note that if the session is terminated, there may be data loss

On the “Environment” it is where we can configure if we are interested in running an application when they connect via RDP, we can disable them to run when connected by Terminal Services and we can disable them to run when they are connected locally by dialing: “Not allowing the start of an initial program; Always show desktop”. Or Run the one that is configured in the “Environment” in the user's properties in AD. Or directly “Start the next program when the user logs on” by Terminal Server.
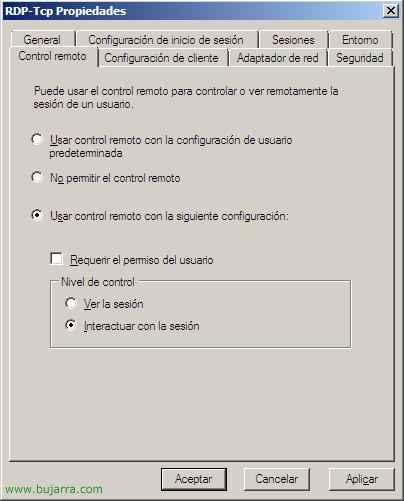
On the “Remote control” we can configure the possibilities on this server so that administrators can make remote controls over the sessions of users who are connected to Terminal Services, we can use the settings according to the user's properties in the DA (“Use remote control with default user settings”) or disable it, Marking “Do not allow remote control” on any user on this server. Or “Use remote control with the following settings” and play with the possibilities of “Require user permission” to connect to your session, whether to ask or not; And when we connect what will we do if only “Watch the session” or “Interact with the session”.

On the “Client Settings” we can configure the image quality (“Color Depth” > “Limit Maximum Color Depth” and indicate the bits per pixel that we are interested in, 16 colors, 256 colors, 16Bit, 24Bit…) and we can disable the redirection of different hardware to the server (Disk drives, Printers, LPT ports, COM ports, clipboard, audio, Plug and Play Compatible, and be able to set the client's primary printer as the default).

On the “Network adapter” is where we can indicate if the server has more than one network card from which it will accept RDP connections, in addition to configuring the limit of sessions that this server will accept, being able to establish a maximum number of connections.

And on the “Safety” It is where we can set the level of permissions 'abruptly', since from here we are interested, We can disable the login of certain users by putting them on the list and being able to deny access.
www.bujarra.com – Héctor Herrero – Nh*****@*****ra.com – v 1.0