Creating an iSCSI Target on Windows Unified Data Storage Server

In this document, we'll see how we can create an iSCSI Target with our Windows operating system, No third-party apps, we can create or assign virtual disks to the iSCSI Target to later use them in shared storage, To set up a cluster… What we will need is a compatible Operating System, or a Windows Unified Data Storage Server, It's an OS. OEM, This is, that are already pre-installed with the equipment when we purchase it from our manufacturer. If we have a Windows Server 2003 o Windows Server 2008, we should update it to these editions, I will comment on this in another document, to be able to have OEM operating systems on virtual machines (For example).

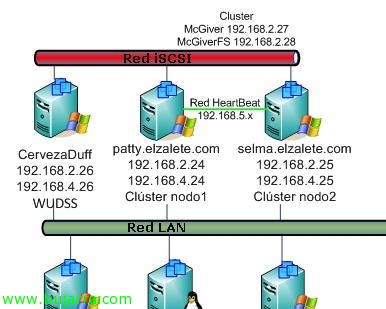
Simply inform what my network scheme is. I have a WUDSS server (Windows Unified Data Storage Server 2003), with two network cards, one for the LAN (192.168.2.0/24) and the other for the iSCSI network (192.168.4.0/24) and separate traffic, since LAN traffic should not collapse with the data traveling between the computers that connect to the iSCSI Target. The iSCSI Target computer is called CervezaDuff and an iSCSI initiator will be Patty or Selma. The document is separated into two parts, one will be the configuration by the iSCSI storage server (Configuring the Target iSCSI) and the other the configuration that we will make on the servers that will be connected to said storage (Configuring the iSCSI Initiator):
Configuring the Target iSCSI,

We open the WUDSS administration console (Windows Unified Data Storage Server 2003), We're going to “Microsoft iSCSI Software Target” > “iSCSI Targets” and right-click create a new one “Create iSCSI Target”

A short setup wizard will come out, “Next”,

We indicate the name of the iSCSI Target and a description, “Next”,

Now we need to indicate the iSCSI initiators, This is, The computers that will access this computer to use their shared storage, Click on “Browse…”,

And we select our iSCSI initiators from our iSCSI network, If we don't have them, it may be because we have not configured the iSCSI initiator of the nodes, So this step doesn't need to be set up immediately, but we must indicate who are the ones who are going to connect, We could mark ourselves’ indicating the local IQN, “OK”,

“Next”,

And “Finish” to create the iSCSI target, later we will continue with part of its configuration.

The first thing that comes to mind is to create or present a disk to this iSCSI Target, this uses VHD format virtual disks (Virtual Hard Disk), So if we don't have any, We created it, envelope “Devices” > Right Button > “Create Virtual Disk”,

We run the wizard to create a virtual disk “Next”,

We select the location for our HD and continue,

We must establish the space we want to give to the virtual hard drive, in this example case I will give you 200Mb, we will take into account that the space we indicate will be reserved immediately and this will be the disk that we will present to the iSCSI Target for the initiators to connect to it.

We indicate a description that will help us to know the content it will have, “Next”,

We can skip this step now if we haven't generated the iSCSI Target, In our case how we have it, We added it, “Add…”

All Target iSCSI will be released, We select the one we want to present the album to & “OK”,

“Next”,

and “Finish”, so we will have created the iSCSI Target and presented a disk.

One thing I recommend doing, is to assemble the virtual disk and give it the format that interests us, so that it appears immediately in the iSCSI initiator. To do this,, About the Virtual Disk, Right-click > “Disk Access” > “Mount ReadWrite”,

It gives us a message indicating that the virtual disk has been mounted on the computer, “OK”,

So let's go to our iSCSI server, We start it and partition it, About Right-Click Equipment > “Manage”,

We're going to “Storage” > “Disk Management” and the wizard will automatically appear to initialize the disks or convert them into dynamic ones, “Next”,

Select the disk to initialize & “Next”,

We don't mark the disc, since we don't have the need to make it dynamic & “Next”,

“Finish”,

And once we have it, we must create a partition in it, it will be an MBR partition and not GPT as I think I remember for clusters they are not supported… So right-click on the disc & “New Partition…”

We would follow the partitioning wizard until it is complete… we will format the partition as NTFS (Not required, but recommended),

Vale, ready, There we have our virtual disk ready.

Now we dismantle it, So just like before, over the virtual disk from the WUDSS console > “Microsoft iSCSI Software Target” > “iSCSI Targets” > “Devices” > right click on the vHD > “Disk Access” > “Dismount”.

It will ask us if we are sure to disassemble it, We indicate that “Yes”, We will take into account that all the files on the disk are closed, for a clean closure.

“OK”,

Now on the properties of the Target iSCSI we will be able to see some properties that we did not see during the creation wizard,

We will have several tabs, in principle they are the ones that have come up during the wizard when creating it, in addition to being able to configure an authentication on our iSCSI Target if we were interested, depends on our network, whether we want to configure it or not, would be in “Authentication”, in this case I must add everyone I want to connect to my iSCSI Target, so in “iSCSI Initiators” I add (As I said, If they do not appear on this list, it's because we haven't set up the launcher on each of them, This is seen below), Click on “Add…”,

IQN identifier type and click on “Browse…” to add all of our iSCSI initiators,

We select as many as we have & “OK”,

“OK”,

GOOD, in principle those computers will be able to connect to my iSCSI Target. “OK”,
Configuring the iSCSI Initiator,
We will do it on Windows Server 2008, that already have the launcher installed by default, if we have Windows Server 2003, we should download the iSCSI initiator from the Microsoft download website (HTTP://www.microsoft.com/downloads).

This process must be carried out as many times as we want to be connected to the storage, In my case I will have to do it twice, now about 'Patty’ and then on 'Selma'. Let's go to the “Control Panel” > “iSCSI Initiator”. By the way, if we have Windows Firewall enabled, We will have to allow passage through port 3260TCP.

About the tab “Detection” Click on “Add Portal…” to add to the Target iSCSI.

Enter the IP address of the iSCSI Target, and it will be the IP address of the private network that these computers have with each other, the iSCSI network that must go to 1Gb to be supported, the port we leave by default the one that is 3260 and click on “Advanced options…”,

In “Local adapter” Mark “Microsoft iSCSI Initiator”, and in source IP the IP that our team has, which must be of the same network range as the iSCSI network, In principle how I didn't set up authentication, We leave it as it is and click on “Accept”,

Accept,

And now, Let's go to the tab “Destinations” and if everything is correct, you should check that there is already a connection to the Target iSCSI, we must connect to it from “Sign in…”,

We mark the check of “Restore this connection automatically when your computer starts” and click on “Advanced options…”

Same as before, in “Local adapter” Mark “Microsoft iSCSI Initiator”, and in source IP the IP that our team has, which must be of the same network range as the iSCSI network, In principle how I didn't set up authentication, We leave it as it is; in “Destination Portal” we select our iSCSI Target, Click on “Accept”,

Accept,

And we will be able to check that the status already says 'Connected', it means that everything has gone OK, we accept and check if this is the case.

If we go on Equipment and right-click “Administer”,

Envelope “Storage” > “Disk Management” and refresh the screen or examine the discs again, we'll see that we have a new HD, we just put it online and you'd be ready to work on it.

List!