Installing and Configuring Citrix Provisioning Services 5.6

With Citrix Provisioning Services we can distribute servers or desktops over the network, called on-demand equipment provisioning. This provisioning will allow us to dynamically and accelerate the generation of new virtual desktops or servers at the desired time. Together with XenDesktop we will be able to manage virtual desktops as in VMware View with VMware Composer, distribute disk images that are obtained from a master virtual desktop with the Provisioning Services Agent to our users.
In this video We check how we can get hold of 150 New equipment on the fly, We will distribute them over the network and we will be able to start light equipment, thinclients, fat clients or directly integrate it with XenDesktop and provide machines immediately. These computers don't have to have a hard drive, a CD drive... simply have a network card and boot with PXE from the BIOS.
First of all, we will install a Provisioning Services server to later generate a series of virtual desktops, but first we will install the Provisioning Services agent on a master computer from which we will obtain the image of its disk (Dynamic) with the operating system and applications installed & Configured. Once we have this disk, we will distribute it through PXE over the network and the computers we want will boot that image (ideal for XenDesktop integrations).

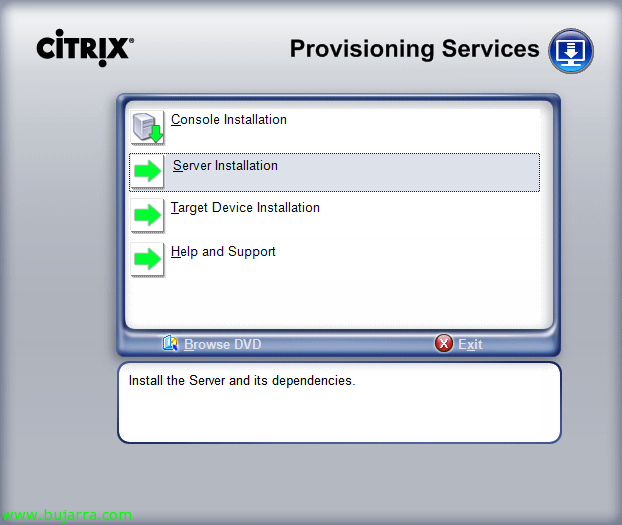
What I said, first we install the Provisioning server from the DVD that we will have downloaded from MyCitrix, en el autorun seleccionamos “Server Installation”.

We install the Native SQL client, “Yes”,

In my scenario I will not install SQL Express on the server itself since I have a database server that we will later use for the database, we start the installation, “Next”,

We accept the agreement,

We indicate our name and organization, “Next”,

Provisioning Services Default Path: %ProgramFiles%CitrixProvisioning Services, “Next”,

We select custom installation, “Next”,

We select at least the base service “Streaming Service”, the network boot service “Network Boot Services” and the management console “Provisioning Services Console”,

“Install” to finally start the server installation.

…

OK, Completed installation, Click on “Finish” to start the configuration,

Deberemos tener un servidor DHCP en la red para desplegar la imagen de los discos dinamicos durante el arranque de red de los puestos remotos, lo normal es que tengamos uno ya en la red e indicamos “The service that runs on another computer”. Si no lo tenemos nos lo podremos instalar en este equipo & marcar la primera opción,

Well, before continuing with the setup wizard, we will have to configure our DHCP server with the following information, we will configure the option 66 “Nombre de host de serv. de inicio” con la dirección IP del servidor Provisioning Server y la opción 67 “Nombre de archivo de inicio” con el valor ARDBP32. BIN.

Indicaremos donde se ejecutará el servicio PXE si en local o en otra máquina,

Si es el primer servidor de Provisioning Services en nuestra red deberemos crear una granja de servidores para la gestión de los discos dinamimos (imágenes o vDisk)… en el caso que querramos tener un balanceo de carga o alta disponibilidad podremos posteriormente agregar otro Provisioning Server a la comunidad. In this case “Create farm…”,

Indicaremos el servidor de BD donde almacenaremos la base de datos,

Indicamos la BD de Provisioning Services, el nombre de la comunidad Provisioning, el Sitio para este servidor y ya un nombre de colección para los discos que hemos publicado y las máquinas asignadas, así como el grupo de administradores de PVS,

We create a new store and name it that will be where we store our vDisk's with the complete information of the virtual desktop disk of the templates, “Next”,

We indicate who our Citrix license server is and validate it, “Next”,

We indicate the service accounts for the Stream and Soap services, Default “Network service account” & Mark “Configure the database for the account”, “Next”,

Indicamos los puertos que utilizará PVS para mantener las comunicaciones con los escritorios virtuales y el puerto para la consola, “Next”,

If we have a TFTP server on the network we can use it with the ARDBP32 image. BIN, otherwise, we install the TFTP server that comes with Provisioning Server by checking the box for “Use the Provisioning Services TFTP service”, with which we will publish the image ARDBP32. BIN and we will deploy the disks to the machines, “Following”,

We leave the IP address of our Streaming server, If we have more servers we will put them here, en las opciones avanzadas si marcamos ‘Verbose mode’ podremos obtener ayuda en el caso de tener problemas a la hora del despliegue. "Next",

We check that everything is correct & “Finish”,

…

List, we already have the server installed and very basically configured. Ahora instalaremos el Target Device en un equipo que ya tengamos preparado para desplegar por red. En este caso dispongo ya de un Windows XP con las aplicaciones que quiero que mis usuarios puedan ejecutar por lo que generaremos un vDisk de este equipo para ser utilizado posteriormente.

Once we have Provisioning Server configured, before configuring anything, lo que nos interesa es crear una imagen de un sistema operativo para poderlo distribuirlo por la red. Así que pensamos qué es lo que queremos distribuir, en mi caso distribuiré un Windows XP y el cliente ICA para que mis usuarios puedan trabajar con un equipo ya listo con un S.O. y usen las aplicaciones vía Citrix Presentation Server, aunque podría dejarle las aplicaciones instaladas, un Office o las que usen. Así que tengo por ahí un PC con un Windows XP limpio y las aplicaciones que nos interese, para poder hacer una imagen de este equipo, primero tenemos que instalarle el “Target Device”, later we will create an image of this XP. In this example, we see that I will distribute an XP., a desktop OS., but it can also be equally logical to distribute server OS., with the services already configured… then we will be able to make this hard drive we are creating 'Private' or 'Standard', This is, The first is a virtual hard disk that we will assign to only one remote machine and it CANNOT be shared., All changes made will be saved.; And the second can be used to distribute the same image of a virtual HD to different machines at the same time., And thus send an XP with its applications across the entire network., For example..
From the Provisioning Services DVD > “Target Device Installation”,

“Target Device Installation”,

We start the Citrix Provisioning Services Target Device wizard, “Next”,

“I accept the terms in the license agreement” & “Next”,

We indicate name & organization & “Next”,

Default Path: %ProgramFiles%CitrixProvisioning Services, “Next”,

“Install” to begin installation,

…

“Finish”

We launch the wizard to generate the image “Imaging Wizard”,

With this wizard we will create an image of this machine's disks, “Next”,

We must specify a Provisioning Services server to connect to and credentials with permission, “Next”,

We will create a vDisk for the first time and we will be able to use this wizard to update previously generated vDisks, “Next”,

We choose a disk name and a Store where to store it. In the vDisk type we will indicate Fixed for a fixed disk size or Dynamic so that the disk uses only what is in use and grows according to needs until it reaches its quota. “Next”,

We define the volumes and their target disk sizes, “Next”,

It will automatically create this machine as a target, We indicate a name and a target collection, “Next”,

We check that everything is correct and that it will be fully optimized by enabling all the options “Optimize for Provisioning Services”. (Esto lo podremos utilizar para optimizar equipos para otros entornos/sistemas). “Finish” para que nos comience a generar el vDisk!

…

Reiniciamos y arrancamos la próxima vez por red mediante PXE, “Yes”,

…nos convierte y sube el disco al Store…

“FInish”. Con esto ya hemos finalizado y tenemos ya un vDisk generado.
Ahora en este ejemplo que haremos quiero generar 3 equipos a partir de este vDisk del XP para 3 equipos cualquiera de la red que arranquen con PXE, además las cuentas de los equipos se darán de alta en el Directorio Activo, for this, primero necesitamos seleccionar una plantilla dentro de nuestra colección,

Desde el device que hemos generado le marcamos como plantilla “Set Device as Template”,

Confirm, “Yes”,

To generate a series of machines we will use the “Auto-Add Wizard”,

“Next”,

“Next”,

We select the site where to create them, “Next”,

We select the collection,

We specify the template from which the machines will start, “Next”,

We specify the machine name prefix, numbering and a suffix, “Next”,

We check that everything is correct & “Finish”,

We go to the vDisk properties

And on the “Mode” We must indicate that the access mode is a standard image to be used by multiple devices, we will also configure the cache.

And we check that if we start any machine over the network via PXE, a desktop based on the template image will already be deployed.

Comprobando que cualquier equipo ya arranca por red (podemos habilitar el modo verbose en las opciones de Bootstrap de cada servidor PVS para ver más detalle y comprobar que no hay errores, o si necesitamos depurarlos).