Installing and configuring Magic Mirror on Raspberry Pi

In this document we will see the installation of Magic Mirror on a Raspberry Pi, Not bad, For what? Ideal for having a small information panel that you can fully customize, Designed for any environment, whether it is your home or your company. The normal thing then will be to do some DIY, We will put a mirror on the monitor and as it is a black panel with white text or images it is very futuristic!
What I said, By following the steps in this document you will be able to have your own magic mirror that while you look at yourself that you are guap@, You have more information about everything that happens around you! And in the office he would look very geeky too, with monitoring data… We will get a panel with all the information we want to see differently 🙂
Official Site: https://magicmirror.builders/
On GitHub: https://github.com/MichMich/MagicMirror
Installing Magic Mirror
The requirements to get started are very simple, we will need to have Raspbian Stretch installed and configured with an IP address.

If you have any Raspberry Pi model 2 o Raspberry Pi 3 it will be enough to run the following script to install all the dependencies and Magic Mirror itself:
[SourceCode]Bash -C “$(curl -sL https://raw.githubusercontent.com/MichMich/MagicMirror/master/installers/raspberry.sh)”[/SourceCode]
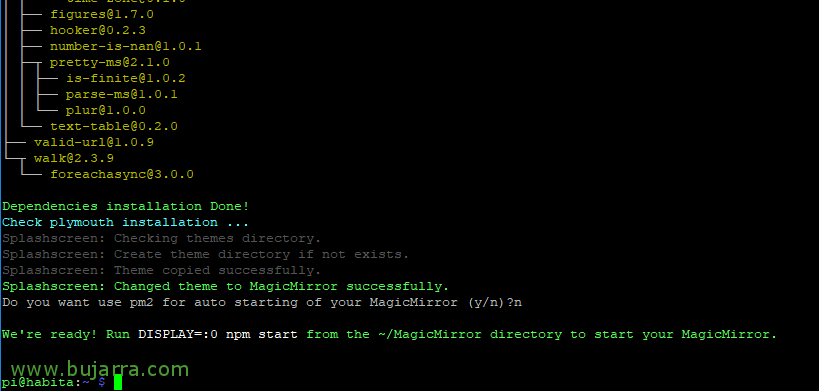
At the end of the installation it will ask us if we want it to start by default when starting the Raspberry or not, here what each one wants. In my case, I prefer to start it later for different reasons, for this I have added a script in '~/.config/lxsession/LXDE-pi/autostart’ call for example '@/home/pi/magic_mirror_arranca.sh’ which has the following content:
[SourceCode]cd /home/pi/MagicMirror/
Not the worst start # Pi2 and Pi3
Node serveronly # Pi1 and Zero[/SourceCode]

Once we start it automatically or manually we will see that Magic Mirror is loaded on the screen with the default settings. In case you're interested, if we want to start Magic Mirror from an ssh session:
[SourceCode]DISPLAY=:0 Not the worst start[/SourceCode]
If we want to install it manually or the previous script fails (for older Raspberry Pi models, 1 and Zero), We can do it as follows:
[SourceCode]sudo apt-get install npm git -y
git clone https://github.com/MichMich/MagicMirror
cd ~/MagicMirror
npm install[/SourceCode]
Note that the Magic Mirror configuration file will be '/home/pi/MagicMirror/config/config.js’ and in it we will have to add any configuration or module. We start easy, we allow them to connect from any computer on the network to the Magic Mirror and we will indicate the default language that is Spanish:
[SourceCode]
address: “”,
…
ipWhitelist: [],
…
Language: “is”,
…
[/SourceCode]
We save the file and try to start Magic Mirror again, or via an HTTP browser://raspberry_pi:8080
By the way, If anyone is interested in modifying font sizes, I would achieve this by modifying the CSS: '~/MagicMirror/css/custom.css'.
With this we have already seen how to install, Launch and set up very basically Magic Mirror, we will continue afterwards with the Modules that have interested me the most and how to install them. Since the interesting thing here is everyone who puts on the modules they want and where they want, For more info on the list of officers: https://github.com/MichMich/MagicMirror/wiki/3rd-Party-Modules
And if you want to know the areas of the screen where the modules can be placed, annotate: top_bar, top_left, top_center, top_right, upper_third, middle_center, lower_third, bottom_left, bottom_center, bottom_right, bottom_bar, fullscreen_above and fullscreen_below.
But before, I leave you with a series of additional options that can be done from now on, it is the typical thing we do in a Raspberry Pi that is a Kiosk, so that the screensaver does not get on, or the low energy beam, removing the cursor to prevent the Wi-Fi module from being put into energy saving…
Remove Power Saver on Wifi Dongle
We will achieve this if in the file '/etc/network/interfaces’ We add the following line at the end:
[SourceCode]wireless-power off[/SourceCode]
Remove the mouse cursor
We can hide the mouse cursor by installing Unclutter:
[SourceCode]sudo apt-get install unclutter[/SourceCode]
Remove the screensaver
To prevent the black screen or any other screensaver from getting, we must first install:
[SourceCode]sudo apt-get install x11-xserver-utils[/SourceCode]
And then modify the file '~/.config/lxsession/LXDE-pi/autostart’ adding to the end of the file:
[SourceCode]@xset s noblank
@xset s off
@xset -dpms[/SourceCode]
And finally we add in the file /etc/lightdm/lightdm.conf and below [Seat:*] The following:
[SourceCode]xserver-command=X -s 0 -Damn it[/SourceCode]
Remove voltage alert
To remove the little ray that yellow or go, The warning of little txitxa, add in '/boot/config.txt’ in the end:
[SourceCode]avoid_warnings=1[/SourceCode]
Monitoring Module with Nagios or Centreon

We are going to add a very interesting module to Magic Mirror, one that goes a lot with the style of the blog, I could while washing my face see how my business or my smart home is doing? Well, yes, by following these steps you will install the necessary module in Magic Mirror to be able to know what is happening, as it will connect to your Nagios or your Centreon and show it to you.
[SourceCode]cd ~/MagicMirror/modules
git clone https://github.com/qistoph/MMM-nagios.git nagios
Cooldown Nagios
npm install[/SourceCode]
And if we add the following code to the Magic Mirror configuration file, We can achieve it!
[SourceCode]{
module: “Nagios”,
Position: “top_left”,
header: “Smart Home Status”,
config: {
statusUrl: “HTTP://DIRECCION_IP_CENTREON_O_NAGIOS/statusJson.php”,
user: “Admin”,
password: “xxxx”,
reloadInterval: 60000
}
},[/SourceCode]
If you want more info about this Plugin: https://github.com/qistoph/MMM-nagios
On the Centreon side we must export the file '/var/log/centreon-engine/status.dat’ to JSON format, very simple as follows:
[SourceCode]git clone https://github.com/lizell/php-nagios-json.git
cp php-nagios-json/php-nagios-json/statusJson.php /var/www/html/[/SourceCode]
And we edit the file '/var/www/html/statusJson.php', we will have to make some modifications to make it work 🙂 for you First of all, put the variable '$statusFile’ with the path of the file .dat correctly and if we use Centreon it may not detect a version, so if we comment we will surely:
[SourceCode]// if ($nag_version == 4) {
$data = getData4($statusFile);
// } else if ($nag_version == 3) {
// $data = getData3($statusFile);
// } else {
// $data = getData2($statusFile);
// }[/SourceCode]
Forecast time 1 week

This module comes installed by default, to enable it, simply add the following code in the Magic Mirror configuration file:
[SourceCode]{
module: “weatherforecast”,
Position: “top_left”,
config: {
Location: “Bilbao”,
locationID: “6362436”,
Appid: “82537b248dxxxxxxxxxxxxxxxxxxxxxx”,
showRainAmount: True
}
},[/SourceCode]
Setup is simple, locationID and appid we will get it in http://www.openweathermap.org and HTTP://www.openweathermap.org/help/city_list.txt.
For more info: https://github.com/MichMich/MagicMirror/tree/master/modules/default/weatherforecast.
Current Weather
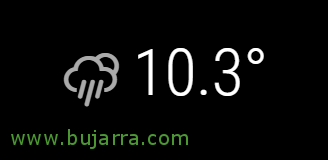
Another widely used and simple module, just enter the following code in the Magic Mirror configuration file:
[SourceCode]{
module: 'Currentweather',
Position: 'top_right',
config: {
Location: 'Bilbao',
locationID: ‘6362436’, //ID from bulk.openweather.org/sample/
Appid: '82537b248d2xxxxxxxxxxxxxxxxxx',
updateInterval: ‘3600000’,
onlyTemp: True
}
},[/SourceCode]
For more info: https://github.com/MichMich/MagicMirror/tree/master/modules/default/currentweather
On-screen emails

If you want to read the emails you have new and want to see them in your magic mirror, in my case I connect through IMAP, Even though it can be connected against everything, even Office 365, These would be the steps to install the module:
[SourceCode]cd ~/MagicMirror/modules
git clone https://github.com/ronny3050/email-mirror.git
CD Email
npm install[/SourceCode]
And we add the following code to the MagicMirror configuration file
[SourceCode]{
module: 'email',
Position: 'top_left',
config: {
user: “my*****@*****io.com“,
password: “xxxxx”,
host: “mail.dominio.com”,
port: 143,
TLS: False,
authTimeout: 10000,
numberOfEmails: 5,
Fade: False
}
},[/SourceCode]
For more info about the module: https://github.com/ronny3050/email-mirror
RSS News

If you want to stay up to date while looking in the mirror and want to read the headlines or news that interest you, all you have to do is enable a Magic Mirror module and enter all the RSS addresses you want to follow! Adding this configuration in the Magic Mirror configuration file will achieve this:
[SourceCode]{
module: “newsfeed”,
Position: “bottom_bar”,
config: {
Feeds: [
{
title: “Deia”,
URL: “HTTP://www.deia.com/rss/general.xml”
},
{
title: “The Mail”,
URL: “HTTP://www.elcorreo.com/bizkaia/rss/atom/portada”,
Encoding: “ISO-8859-1”
},
],
showSourceTitle: False,
showPublishDate: False
}
},[/SourceCode]
For more info about this module: https://github.com/MichMich/MagicMirror/tree/master/modules/default/newsfeed
Agenda
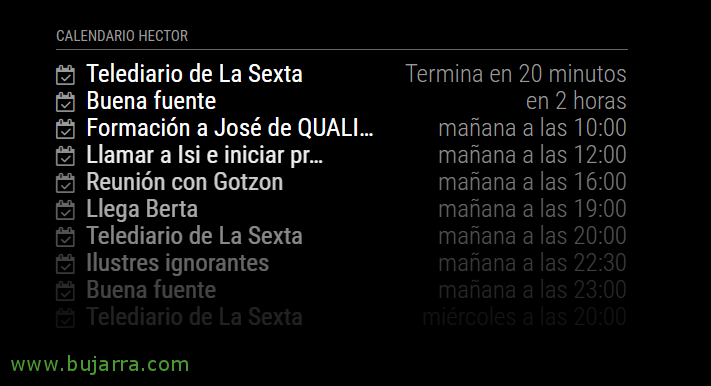
If you feel like putting your calendar in, in my case I use Google Calendar, But wow, that with any ics file you can assemble it!
[SourceCode]{
module: “Calendar”,
header: “Hector Calendar”,
Position: “top_left”,
config: {
Calendars: [
{
symbol: “calendar-check-o “,
URL: “https://calendar.google.com/calendar/ical/lfmkxxxxxxxxxxxxxxxxxjk@group.calendar.google.com/private-fbdba546xxxxxxxxxxx827/basic.ics”
}
]
}
},[/SourceCode]
For more info: https://github.com/MichMich/MagicMirror/tree/master/modules/default/calendar
Highway traffic status
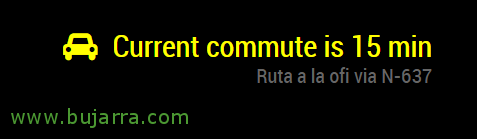
If we want to know how long it will take us to get somewhere, for example to work, We can always know in real time how long it will take us to get there, Can you imagine putting on lipstick while you see that you're going to be late? Crazy! 😛
[SourceCode]cd ~/MagicMirror/modules
git clone https://github.com/SamLewis0602/MMM-Traffic.git
cd MMM-Traffic
npm install[/SourceCode]
Add the following code to the configuration file:
[SourceCode]{
module: 'MMM-Traffic',
Position: 'bottom_right',
Classes: 'Dimmed Medium', //optional, default is 'bright medium', only applies to commute info not route_name
config: {
api_key: 'AIzaSyDr1y9oxxxxxxxxxxxxxxxxxuvA',
mode: 'driving',
origin: 'Federico Moyúa Plaza, 3, 48009 Bilbo, Bizkaia',
Destination: 'Zamudio Technology Park, 48170, Vizcaya',
route_name: 'Route to the office',
changeColor: True,
showGreen: False,
limitYellow: 5, //Greater than 5% of journey time due to traffic
limitRed: 20, //Greater than 20% of journey time due to traffic
traffic_model: 'pessimistic',
interval: 120000 //2 minutes
}
},[/SourceCode]
We'll obviously change the start/end path and enter our Google API key.
For more info on this module: https://github.com/SamLewis0602/MMM-Traffic
List of pending issues (Wunderlist)

Another quite interesting module can be the typical reminder list, in my case I'm a Wunderlist lover, So I indicate the necessary steps to get it up and running:
[SourceCode]cd ~/MagicMirror/modules
git clone https://github.com/qistoph/MMM-nagios.git nagios
Cooldown Nagios
npm install[/SourceCode]
After installation, we proceed to add the following code to the Magic Mirror configuration file:
[SourceCode]{
module: 'MMM-Wunderlist',
Position: 'top_right',
header: 'Shopping list',
config: {
accessToken: '9f3de965af18647aexxxxxxxxxxxxxxx960',
clientID: '9052dxxxxxxxxxxxxx3',
Lists: [“Shopping”]
}
},[/SourceCode]
The accessToken and clientID will sound like you need to request it on the: https://developer.wunderlist.com.
Well, and what was said on this website https://github.com/MichMich/MagicMirror/wiki/3rd-Party-Modules or on the internet you can search for multiple modules or make your own. And that, After configuration, that, DIY, make a wooden frame and put the monitors we need inside, We'll place the mirror that really isn't a mirror, if not it is an acrylic mirror sheet of 2 Faces. If you go to any serious glassware store explaining yourself, they will know what crystal you want, It's not very expensive, and I remember that the glazier left me different pieces to do several tests. If someone is lost I pass the phone of the glassware =)
Then everyone can complete the project as they want, so that you don't always have the monitor on, A motion sensor can be put on and a relay can turn it on when there is movement, And of course, All this until you can imagine, you can put a video camera on the Raspberry and with OpenCV it recognizes your face and shows other types of information on the screen, or a child some cartoons waving… as well as voice recognition to show you any other type of information, etc…
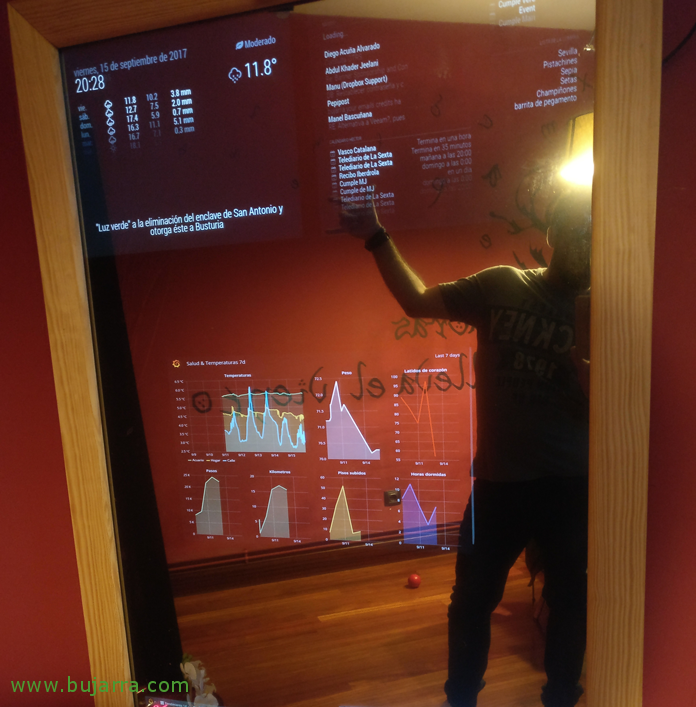
And more or less like this it would look, And yes, That's me, with a few more drawings of Grafana, etc… This picture is quite old, One day I put cool panels to give you more ideas!